DiMAGE Z3 Camera Firmware Ver.1.03e Contents of update Target ...
DiMAGE Z3 Camera Firmware Ver.1.03e Contents of update Target ...
DiMAGE Z3 Camera Firmware Ver.1.03e Contents of update Target ...

You also want an ePaper? Increase the reach of your titles
YUMPU automatically turns print PDFs into web optimized ePapers that Google loves.
KONICA MINOLTA SOFTWARE INSTALL GUIDE<br />
www.konicaminolta.com<br />
www.konicaminoltasupport.com<br />
<strong>DiMAGE</strong> <strong>Z3</strong> <strong>Camera</strong> <strong>Firmware</strong> <strong>Ver.1.03e</strong><br />
This section explains how to install <strong>DiMAGE</strong> <strong>Z3</strong> firmware version 1.03e. (<strong>Firmware</strong> is s<strong>of</strong>tware used<br />
internally to control the camera.) Be sure to read through the following explanation before you<br />
install the s<strong>of</strong>tware. Do not turn the camera OFF during installation; doing so could damage the<br />
CPU inside the camera.<br />
<strong>Contents</strong> <strong>of</strong> <strong>update</strong><br />
To support 2GB SD memory card.<br />
<strong>Target</strong> products<br />
This firmware is for use only with the <strong>DiMAGE</strong> <strong>Z3</strong> and cannot be used with other products.<br />
If the firmware version is already <strong>Ver.1.03e</strong>, it is not necessary to <strong>update</strong> the firmware. (Check the<br />
firmware version as shown below.)<br />
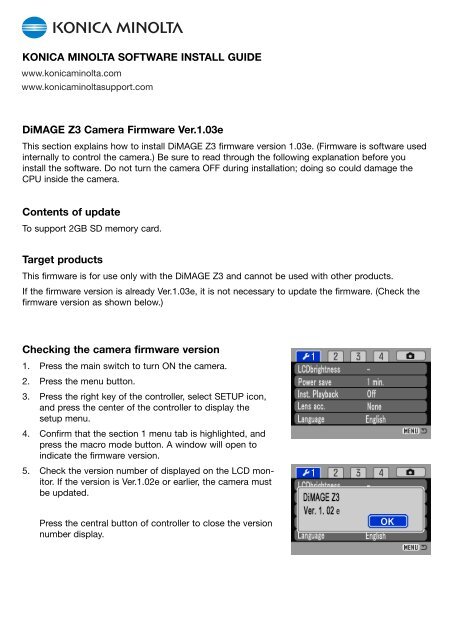
Checking the camera firmware version<br />
1. Press the main switch to turn ON the camera.<br />
2. Press the menu button.<br />
3. Press the right key <strong>of</strong> the controller, select SETUP icon,<br />
and press the center <strong>of</strong> the controller to display the<br />
setup menu.<br />
4. Confirm that the section 1 menu tab is highlighted, and<br />
press the macro mode button. A window will open to<br />
indicate the firmware version.<br />
5. Check the version number <strong>of</strong> displayed on the LCD monitor.<br />
If the version is Ver.1.02e or earlier, the camera must<br />
be <strong>update</strong>d.<br />
Press the central button <strong>of</strong> controller to close the version<br />
number display.
Preparing the SD memory card for updating<br />
A downloaded file must be copied to a SD memory card in the camera. Before updating the camera,<br />
read the data-transfer section <strong>of</strong> the <strong>DiMAGE</strong> <strong>Z3</strong> instruction manual to connect the camera to<br />
a computer.<br />
• Prepare a 8MB or larger SD memory card and insert it in the camera.<br />
• Make sure that the SD memory card has been formatted by the camera.<br />
• Using the USB cable, connect the camera to a computer. If the camera is not compatible<br />
with the computer system, a SD memory card reader can be used instead.<br />
• Confirm the option “Transfer mode” in section 1 <strong>of</strong> the setup menu is set to “Data storage”,<br />
the default setting.<br />
When copying via CompactFlash card reader When copying via <strong>DiMAGE</strong> <strong>Z3</strong> connected to<br />
PC using USB-cable USB-2<br />
1. Two respective download files have been prepared for Windows & Macintosh. Please use the<br />
suitable one for your PC. Please read the end-user license agreement in advance <strong>of</strong> saving the<br />
file on your PC.<br />
The downloaded file is compressed.<br />
-Windows- z3v103e.exe--808KB<br />
Double-click the downloaded file.<br />
The file is a self-extracting archive, and decompresses automatically.<br />
-Macintosh- z3v103e.sea.hqx--1.1MB<br />
Use Stuffit Expander or another such s<strong>of</strong>tware utility to extract the downloaded file.<br />
*After creating a folder in your PC and extracting the contents <strong>of</strong> the archive, the following folder is<br />
created.<br />
"z3v103" folder "z3v103" folder includes bellow files.<br />
"dsc.app" file (Windows 2.07MB / Macintosh 2.1MB)<br />
"ram.bin" file (Windows 92.9KB / Macintosh 96KB)<br />
* Copy the "dsc.app" file and "ram.bin"<br />
file onto the SD memory card.<br />
For Windows<br />
For Macintosh
2.Confirm that the file has been copied to the card using the computer.<br />
3.Disconnect the camera from the computer or remove the SD memory card from the<br />
card reader.<br />
If you are using Windows Me, 2000 or XP, click the unplug-or-eject-hardware icon<br />
in the lower right-hand corner <strong>of</strong> the screen, wait until the safe-to remove-hardware<br />
window appears, then remove the SD memory card the card reader, or disconnect<br />
the USB cable from the camera.<br />
How to <strong>update</strong> firmware<br />
NOTE:<br />
When performing the s<strong>of</strong>tware <strong>update</strong>, use new Alkaline batteries, fully recharged Ni-MH batteries<br />
or the AC adapter AC-1L or AC-11 (sold separately).<br />
When using the AC adapter, be sure not to inadvertently disconnect the camera during the s<strong>of</strong>tware<br />
updating procedure, otherwise the camera may be permanently damaged.<br />
* After updating the firmware, it is necessary to operate the reset default function, and camera<br />
settings will be reset to the default settings.<br />
1. With the camera <strong>of</strong>f, insert the prepared SD Memory<br />
card.<br />
2. Press and hold the shutter-release button all the way<br />
down without turning on the camera.<br />
3. Without lifting the your finger from the shutter-release<br />
button, press the main switch to turn on the camera.<br />
4. The access lamp will be lit. Please wait until the lamp<br />
turn <strong>of</strong>f. (It takes 1 or 2 minutes. You can release your<br />
fingers from the shutter-release button and the main<br />
switch.)<br />
5. When the access lamp turns <strong>of</strong>f, updating is completed.<br />
Remove the batteries and then insert them again.<br />
(When using AC adapter, disconnect the AC adapter<br />
and then connect it again.)<br />
6. Check that the camera firmware version number has<br />
changed to "<strong>Ver.1.03e</strong>". (See the "Checking the camera<br />
s<strong>of</strong>tware version")<br />
* If the updating failed or an error occurred during the<br />
procedure, turn the camera <strong>of</strong>f, and repeat the procedure<br />
from step 1.<br />
After checking the version number, press the center<br />
button <strong>of</strong> controller. Setup menu will be displayed.<br />
* After updating the camera, delete both "dsc.app" and "ram.bin" files from the SD memory card.<br />
* Windows and Windows Me, 2000 and XP are registered trademarks <strong>of</strong> Micros<strong>of</strong>t Corporation in the U.S.A and other countries.<br />
* Macintosh is a registered trademark <strong>of</strong> Apple Computer Inc. in the U.S.A. and other countries.<br />
For questions or comments about this matter, contact your nearest Konicaminolta service facility.<br />
07.2005/12984