Repairing Sony Cyber-shot DSC-W5 Battery Terminal - iFixit
Repairing Sony Cyber-shot DSC-W5 Battery Terminal - iFixit
Repairing Sony Cyber-shot DSC-W5 Battery Terminal - iFixit

You also want an ePaper? Increase the reach of your titles
YUMPU automatically turns print PDFs into web optimized ePapers that Google loves.
<strong>Repairing</strong> <strong>Sony</strong> <strong>Cyber</strong>-<strong>shot</strong> <strong>DSC</strong>-<strong>W5</strong> <strong>Battery</strong> <strong>Terminal</strong><br />
<strong>Repairing</strong> <strong>Sony</strong> <strong>Cyber</strong>-<strong>shot</strong> <strong>DSC</strong>-<br />
SUMMARY<br />
<strong>W5</strong> <strong>Battery</strong> <strong>Terminal</strong><br />
Written By: Thomas<br />
Disassembling <strong>Sony</strong> <strong>Cyber</strong><strong>shot</strong> <strong>DSC</strong>-<strong>W5</strong> in order to get to the battery terminal so that it can<br />
be replaced.<br />
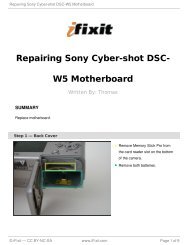
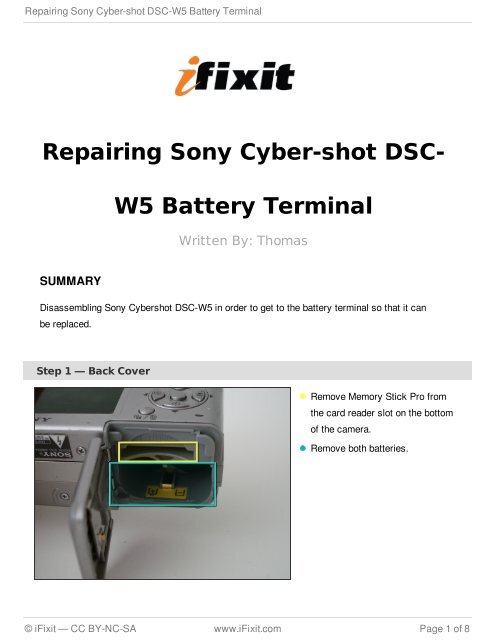
Step 1 — Back Cover<br />
Remove Memory Stick Pro from<br />
the card reader slot on the bottom<br />
of the camera.<br />
Remove both batteries.<br />
© <strong>iFixit</strong> — CC BY-NC-SA www.<strong>iFixit</strong>.com Page 1 of 8
<strong>Repairing</strong> <strong>Sony</strong> <strong>Cyber</strong>-<strong>shot</strong> <strong>DSC</strong>-<strong>W5</strong> <strong>Battery</strong> <strong>Terminal</strong><br />
Step 2<br />
Remove the single visible screw from both sides of the camera.<br />
Remove the two screws that are adjacent to the warning label, which is on the underside of<br />
the camera.<br />
Do NOT remove all four screws from the bottom.<br />
Step 3<br />
Gently remove the back cover from the camera.<br />
The first time the case is removed, it will be stiff. Be patient and gently rock the<br />
cover back and forth until it slides free.<br />
© <strong>iFixit</strong> — CC BY-NC-SA www.<strong>iFixit</strong>.com Page 2 of 8
<strong>Repairing</strong> <strong>Sony</strong> <strong>Cyber</strong>-<strong>shot</strong> <strong>DSC</strong>-<strong>W5</strong> <strong>Battery</strong> <strong>Terminal</strong><br />
Step 4 — LCD Screen<br />
Remove the two screws holding the circuit board down.<br />
Step 5<br />
Detach the orange cable from the<br />
board.<br />
Use a thin object,like a<br />
paperclip, to gently pry the<br />
cable off the connector.<br />
© <strong>iFixit</strong> — CC BY-NC-SA www.<strong>iFixit</strong>.com Page 3 of 8
<strong>Repairing</strong> <strong>Sony</strong> <strong>Cyber</strong>-<strong>shot</strong> <strong>DSC</strong>-<strong>W5</strong> <strong>Battery</strong> <strong>Terminal</strong><br />
Step 6<br />
The LCD screen sits in two slots; one on the bottom, and one on the left edge.<br />
Slide LCD screen from the two slots.<br />
Do not attempt to completely remove the screen, as it is still attached to the<br />
camera.<br />
Step 7<br />
To remove the LCD screen, detach the orange cable from the board.<br />
If needed, replace the LCD screen.<br />
© <strong>iFixit</strong> — CC BY-NC-SA www.<strong>iFixit</strong>.com Page 4 of 8
<strong>Repairing</strong> <strong>Sony</strong> <strong>Cyber</strong>-<strong>shot</strong> <strong>DSC</strong>-<strong>W5</strong> <strong>Battery</strong> <strong>Terminal</strong><br />
Step 8 — Speaker<br />
Remove the two screws holding down the steel back plate.<br />
Remove steel back plate.<br />
Step 9<br />
Now remove the plastic plate that covers the motherboard.<br />
© <strong>iFixit</strong> — CC BY-NC-SA www.<strong>iFixit</strong>.com Page 5 of 8
<strong>Repairing</strong> <strong>Sony</strong> <strong>Cyber</strong>-<strong>shot</strong> <strong>DSC</strong>-<strong>W5</strong> <strong>Battery</strong> <strong>Terminal</strong><br />
Step 10<br />
Warning: Electric Shock From this point on, hold the camera by the chrome edges<br />
ONLY. Capacitors store electric charge even if the batteries are removed.<br />
Remove the blue cable.<br />
Step 11<br />
Disconnect the flash cable (black and white wires) before completely removing the front<br />
case.<br />
Gently start to remove the case.<br />
Once the cable is free, set aside the front case.<br />
© <strong>iFixit</strong> — CC BY-NC-SA www.<strong>iFixit</strong>.com Page 6 of 8
<strong>Repairing</strong> <strong>Sony</strong> <strong>Cyber</strong>-<strong>shot</strong> <strong>DSC</strong>-<strong>W5</strong> <strong>Battery</strong> <strong>Terminal</strong><br />
Step 12<br />
The speaker should now be clearly seen on the underside of the camera.<br />
Gently unplug the speaker from the motherboard.<br />
Replace the speaker.<br />
Step 13 — <strong>Battery</strong> <strong>Terminal</strong><br />
Remove the orange cable connecting the battery terminal to the motherboard.<br />
© <strong>iFixit</strong> — CC BY-NC-SA www.<strong>iFixit</strong>.com Page 7 of 8
<strong>Repairing</strong> <strong>Sony</strong> <strong>Cyber</strong>-<strong>shot</strong> <strong>DSC</strong>-<strong>W5</strong> <strong>Battery</strong> <strong>Terminal</strong><br />
Step 14<br />
To reassemble your device, follow these instructions in reverse order.<br />
This document was last generated on 2012-11-01 06:32:30 PM.<br />
The battery terminal is now free<br />
from the board and can be slid out.<br />
© <strong>iFixit</strong> — CC BY-NC-SA www.<strong>iFixit</strong>.com Page 8 of 8