C-5060 Wide Zoom - Olympus America
C-5060 Wide Zoom - Olympus America
C-5060 Wide Zoom - Olympus America

Create successful ePaper yourself
Turn your PDF publications into a flip-book with our unique Google optimized e-Paper software.
x191_qsge_quick_6.fm Page 1 Tuesday, August 26, 2003 10:55 AM<br />
1AG6P1P1756-- VT620901<br />
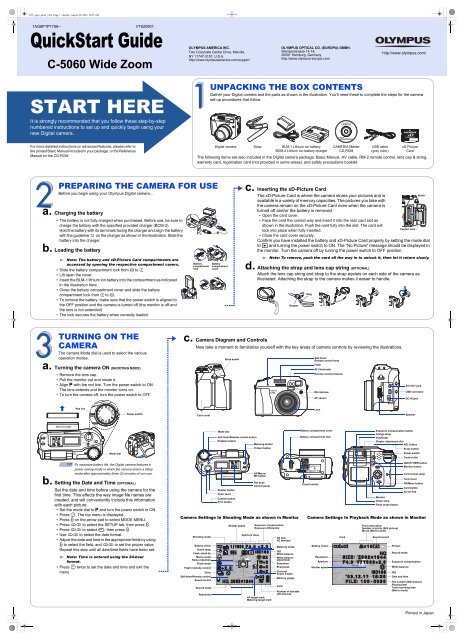
QuickStart Guide<br />
C-<strong>5060</strong> <strong>Wide</strong> <strong>Zoom</strong><br />
START HERE<br />
It is strongly recommended that you follow these step-by-step<br />
numbered instructions to set up and quickly begin using your<br />
new Digital camera.<br />
For more detailed instructions on advanced features, please refer to<br />
the printed Basic Manual included in your package, or the Reference<br />
Manual on the CD-ROM.<br />
PREPARING THE CAMERA FOR USE<br />
Before you begin using your <strong>Olympus</strong> Digital camera…<br />
a. Charging the battery<br />
• The battery is not fully charged when purchased. Before use, be sure to<br />
charge the battery with the specified provided charger (BCM-2).<br />
Hold the battery with its terminals facing the charger and align the battery<br />
with the guideline on the charger as shown in the illustration. Slide the<br />
battery into the charger.<br />
b. Loading the battery<br />
Note: The battery and xD-Picture Card compartments are<br />
accessed by opening the respective compartment covers.<br />
• Slide the battery compartment lock from = to ).<br />
• Lift open the cover.<br />
• Insert the BLM-1 lithium ion battery into the compartment as indicated<br />
in the illustration here.<br />
• Close the battery compartment cover and slide the battery<br />
compartment lock from ) to =.<br />
• To remove the battery, make sure that the power switch is aligned to<br />
the OFF position and the camera is turned off (the monitor is off and<br />
the lens is not extended).<br />
• The lock secures the battery when correctly loaded.<br />
TURNING ON THE<br />
CAMERA<br />
The camera Mode dial is used to select the various<br />
operation modes.<br />
a. Turning the camera ON (SHOOTING MODE)<br />
• Remove the lens cap.<br />
• Pull the monitor out and rotate it.<br />
• Align P with the red line. Turn the power switch to ON.<br />
The lens extends and the monitor turns on.<br />
• To turn the camera off, turn the power switch to OFF.<br />
Red line<br />
Mode dial<br />
Power switch<br />
TIP :To maximize battery life, the Digital camera features a<br />
power saving mode in which the camera enters a sleep<br />
mode after approximately three (3) minutes of non-use.<br />
b. Setting the Date and Time (OPTIONAL)<br />
Set the date and time before using the camera for the<br />
first time. This affects the way image file names are<br />
created, and will conveniently include this information<br />
with each picture.<br />
• Set the mode dial to P and turn the power switch to ON.<br />
•Press e. The top menu is displayed.<br />
•Press d on the arrow pad to select MODE MENU.<br />
•Press ac to select the SETUP tab, then press d.<br />
•Press ac to select X, then press d.<br />
•Use ac to select the date format.<br />
• Adjust the date and time in the appropriate fields by using<br />
d to select the field, and ac to set the proper value.<br />
Repeat this step until all date/time fields have been set.<br />
Note: Time is entered using the 24-hour<br />
format.<br />
•Press e twice to set the date and time and exit the<br />
menu.<br />
OLYMPUS AMERICA INC.<br />
Two Corporate Center Drive, Melville,<br />
NY 11747-3157, U.S.A.<br />
http://www.olympusamerica.com/support<br />
Battery<br />
compartment<br />
lock<br />
UNPACKING THE BOX CONTENTS<br />
Gather your Digital camera and the parts as shown in the illustration. You’ll need these to complete the steps for the camera<br />
set-up procedures that follow.<br />
Battery<br />
compartment<br />
cover<br />
c. Inserting the xD-Picture Card<br />
The xD-Picture Card is where the camera stores your pictures and is<br />
Notch<br />
available in a variety of memory capacities. The pictures you take with<br />
the camera remain on the xD-Picture Card even when the camera is<br />
turned off and/or the battery is removed.<br />
• Open the card cover.<br />
• Face the card the correct way and insert it into the rear card slot as<br />
shown in the illustration. Push the card fully into the slot. The card will<br />
Contact area<br />
lock into place when fully inserted.<br />
• Close the card cover securely.<br />
Confirm you have installed the battery and xD-Picture Card properly by setting the mode dial<br />
to q and turning the power switch to ON. The “No Picture” message should be displayed in<br />
the monitor. Turn the camera off by turning the power switch to OFF position.<br />
Note: To remove, push the card all the way in to unlock it, then let it return slowly.<br />
d. Attaching the strap and lens cap string (OPTIONAL)<br />
Attach the lens cap string and strap to the strap eyelets on each side of the camera as<br />
illustrated. Attaching the strap to the camera makes it easier to handle.<br />
Stopper<br />
c. Camera Diagram and Controls<br />
Now take a moment to familiarize yourself with the key areas of camera controls by reviewing the illustrations.<br />
Card cover<br />
Shooting mode<br />
Battery check<br />
Green lamp<br />
Flash stand-by<br />
Macro mode<br />
Noise reduction<br />
Flash mode<br />
Flash intensity control<br />
Drive<br />
Self-timer/Remote control<br />
Sound record<br />
Record mode<br />
Resolution<br />
Mode dial<br />
Strap eyelet<br />
Self-timer/Remote control button<br />
Rotation button<br />
Metering button<br />
Protect button<br />
Shutter button<br />
<strong>Zoom</strong> lever<br />
Custom button<br />
Print button<br />
Shutter speed<br />
Aperture value<br />
AF/Macro/<br />
MF button<br />
Hot shoe<br />
Control panel<br />
Exposure compensation<br />
Exposure differential<br />
AF target mark<br />
Metering target mark<br />
AE lock<br />
AE memory<br />
Metering mode<br />
ISO<br />
White balance<br />
White balance<br />
adjustment<br />
Saturation<br />
Sharpness<br />
Contrast<br />
Scene modes<br />
Memory gauge<br />
Card<br />
OLYMPUS OPTICAL CO. (EUROPA) GMBH.<br />
Wendenstrasse 14-18,<br />
20097 Hamburg, Germany<br />
http://www.olympus-europa.com<br />
Digital camera Strap BLM-1 Lithium ion battery<br />
BCM-2 Lithium ion battery charger<br />
Number of storable<br />
still pictures<br />
Ring<br />
Self-timer/<br />
Remote control lamp<br />
Flash<br />
AF illuminator<br />
Remote control receiver<br />
Microphone<br />
AF sensor<br />
Lens<br />
Battery compartment cover<br />
Battery compartment lock<br />
Tripod socket<br />
Battery check<br />
Resolution<br />
Aperture<br />
Shutter speed<br />
CAMEDIA Master<br />
CD-ROM<br />
Card<br />
USB cable<br />
(gray color)<br />
A/V OUT jack<br />
USB connector<br />
DC-IN jack<br />
Speaker<br />
Exposure compensation button<br />
Orange lamp<br />
Viewfinder<br />
Diopter adjustment dial<br />
AEL button<br />
Erase button<br />
Power switch<br />
Control dial<br />
Monitor<br />
Green lamp<br />
Flash mode button<br />
Print reservation<br />
Number of prints (Still picture)<br />
Movie (Movie mode)<br />
Sound record<br />
http://www.olympus.com/<br />
The following items are also included in the Digital camera package: Basic Manual, AV cable, RM-2 remote control, lens cap & string,<br />
warranty card, registration card (not provided in some areas), and safety precautions booklet.<br />
Protect<br />
Record mode<br />
QUICK VIEW button<br />
Monitor button<br />
Card access lamp<br />
Card cover<br />
OK/Menu button<br />
Card button<br />
Arrow Pad<br />
Camera Settings In Shooting Mode as shown in Monitor Camera Settings In Playback Mode as shown in Monitor<br />
Exposure compensation<br />
White balance<br />
ISO<br />
Date and time<br />
xD-Picture<br />
Card<br />
File number (Still picture)<br />
Playing time/<br />
Total recording time<br />
(Movie mode)<br />
Printed in Japan
x191_qsge_quick_6.fm Page 2 Tuesday, August 26, 2003 10:55 AM<br />
TAKING PICTURES<br />
There are two ways to compose your subject: using the<br />
monitor or with the viewfinder. Depending upon the shooting<br />
situation, there may be advantages to each method. Please<br />
refer to the printed Basic Manual for more information.<br />
a. Taking a Picture with the Monitor<br />
• Pull the monitor out and rotate it.<br />
• Set the mode dial to P and turn the power switch to ON.<br />
The monitor turns on.<br />
• Compose your subject on the monitor.<br />
VIEWING AND<br />
ERASING PICTURES<br />
With a Digital camera, you can easily view the photos you<br />
want—and delete the ones you don’t.<br />
a. Viewing Pictures<br />
There are two ways to access the Playback mode:<br />
• Set the mode dial to q and turn the power switch to ON.<br />
OR<br />
Green lamp<br />
# Flash stand-by<br />
Icons representing camera settings appear on the<br />
monitor, telling you important information such as the<br />
flash and record modes, battery check, and the number<br />
of storable still pictures.<br />
• Press the shutter button halfway.<br />
Shutter button<br />
The Digital camera confirms the focus and exposure are<br />
properly set when the green lamp lights steadily. The #<br />
indicator informs you that the flash is recommended and/<br />
or recharging (when blinking); or ready to fire (when<br />
steady).<br />
• If the camera is in the shooting mode with the lens barrel<br />
extended, press the QUICK VIEW button.<br />
The last picture taken appears in the monitor. Use<br />
bdac to scroll through all the images saved on your<br />
xD-Picture Card.<br />
CONNECTING THE CAMERA<br />
TO A COMPUTER<br />
TIP<br />
:<strong>Olympus</strong> recommends using the optional AC adapter to ensure a consistent<br />
power supply when downloading images.<br />
Make sure that the camera is turned off before connecting it to<br />
your computer.<br />
Windows 98 users must install the “USB Driver for Windows 98”<br />
software before connecting the Digital camera to the computer.<br />
Refer to the Software Installation Guide for complete information.<br />
<strong>Olympus</strong> makes it simple to connect the Digital camera to your computer.<br />
INSTALLING THE CAMERA<br />
SOFTWARE<br />
You’ve now mastered the basic functionality of your new <strong>Olympus</strong><br />
Digital Camera! You are now ready to begin exploring the possibilities<br />
that digital photography brings to your computer. Activities such as<br />
photo editing, printing, and much more are only steps away!<br />
About the <strong>Olympus</strong> CAMEDIA Master CD-ROM<br />
Your <strong>Olympus</strong> Digital Camera comes bundled with a suite of software and documentation.<br />
The CD includes:<br />
•CAMEDIA Master: To download pictures from the camera, view, organize, retouch and print<br />
your digital photos and movies.<br />
•USB Driver for Windows 98: This utility must be installed to allow the camera to communicate<br />
with your computer if it uses the Microsoft Windows 98 operating system.<br />
•<strong>Olympus</strong> Digital Camera Reference Manual: A complete reference guide in digital form,<br />
saved on the CD in PDF format.<br />
You are now ready to install the computer software.<br />
•Open the CAMEDIA Master CD-ROM package and locate the Software Installation Guide in<br />
the language you wish to use.<br />
•Continue to follow the step-by-step instructions for installing the software, and enjoy your new<br />
digital photo processing capabilities!<br />
• Press the shutter button completely to take the picture.<br />
A short beep confirms your picture has been taken.<br />
b. Taking a Picture with the Viewfinder<br />
• Set the mode dial to P and turn the power switch to ON.<br />
• Compose your subject on the Viewfinder.<br />
When you are finished reviewing your pictures:<br />
• Turn the power switch to OFF to turn the monitor off.<br />
OR<br />
TIP<br />
:When you take a picture with the viewfinder, press f to turn<br />
the monitor off.<br />
• Press the shutter button gently (halfway) to adjust the<br />
focus.<br />
• Press the shutter button completely to take the picture.<br />
A short beep confirms your picture has been taken.<br />
c. <strong>Zoom</strong>ing<br />
This Digital camera features a zoom lens, allowing you<br />
to get closer to the action, or for taking wide-angle shots<br />
that get everything into the picture.<br />
Push to <strong>Zoom</strong> out<br />
Pull to <strong>Zoom</strong> in<br />
• Push the zoom lever toward W to zoom out and get<br />
everything into the picture.<br />
• Pull the zoom lever toward T to choose telephoto shooting<br />
and get closer to the action.<br />
• To return to the shooting mode, press the QUICK VIEW<br />
button again.<br />
b. Erasing Pictures<br />
The beauty of digital photography is your ability to keep<br />
the photos you want, delete the rest, and reuse empty<br />
memory space to take new pictures. This Digital camera<br />
offers two ways to permanently erase unwanted digital<br />
photos:<br />
Single-Frame Erase: Deletes only the picture currently<br />
displayed in the monitor.<br />
Once erased, pictures cannot be restored.<br />
d. Flash Modes<br />
This Digital camera features multiple flash modes.<br />
Please note that not all flash modes are available<br />
depending on the shooting mode selected.<br />
Set the flash mode by turning the control dial while<br />
holding down #:<br />
Icon Flash Mode Description<br />
No<br />
indication<br />
Auto-flash The camera automatically decides if the flash is<br />
needed.<br />
! Red-eye<br />
Reduction Flash<br />
With the shutter button depressed halfway, the flash is<br />
ready to fire when the # in the monitor or the orange<br />
lamp next to the viewfinder lights steadily. When # or<br />
the orange lamp blinks, the flash is charging.<br />
e. Number of Storable Pictures<br />
Your digital camera can handle xD-Picture Card from<br />
16 MB to 512 MB. The number of storable pictures<br />
depends on the image quality selected.<br />
See the Reference Manual for complete descriptions of<br />
each recording mode and the storable frame capacity for<br />
the various resolution modes and xD-Picture Card<br />
capacities.<br />
• Set the mode dial to q and turn the power switch to ON.<br />
• Use the arrow pad to display the picture you want to erase.<br />
•Press S.<br />
•Press ac to select YES, then press e.<br />
TIP<br />
Reduces incidence of red-eye by emitting pre-flashes<br />
to shrink pupil size before firing the main flash. The<br />
strobe effect is normal operation for this mode.<br />
# Fill-in Flash The flash always fires with every picture.<br />
#SLOW1,<br />
#SLOW2,<br />
HSLOW<br />
• Make sure that “PC” is selected in the camera setting menus<br />
(factory default setting).<br />
• Turn the camera off.<br />
• Plug the supplied USB cable into the USB connector on your<br />
camera and computer as illustrated at right.<br />
• Set the mode dial to q and turn the power switch to ON. The<br />
camera starts communicating with the PC.<br />
Additional Camera Features<br />
Slow<br />
Synchronization<br />
TIP<br />
Adjusts the flash for special situations requiring slow<br />
shutter speeds.<br />
:To find out how many frames you have left, look for the number<br />
in the lower right corner. Remember, you can always delete<br />
unwanted pictures to make room for more. (See Step 5.)<br />
:Images can also be erased while in the “QUICK VIEW”<br />
mode described in step 5a. This makes it easy to quickly<br />
erase a picture that you just took.<br />
All-Frame Erase: Deletes all pictures on the xD-Picture<br />
Card in one operation, except for pictures you have<br />
protected.<br />
Once erased, pictures cannot be restored.<br />
• Set the mode dial to q and turn the power switch to ON.<br />
•Press e, then press d to select MODE MENU.<br />
•Use ac to select the CARD tab, then press d twice to<br />
access the CARD SETUP screen.<br />
• R ALL ERASE should be highlighted. Press e.<br />
• As a safeguard, the Digital camera will ask you to select<br />
YES or NO to confirm erasing, as this process permanently<br />
deletes all unprotected pictures. Select YES and press e.<br />
This Digital camera offers a host of advanced features to expand your creativity. Here’s just a small sampling.<br />
See the Basic Manual for details on these capabilities, and more!<br />
• Advanced photographic control: Aperture Priority, Shutter Priority, and full Manual modes are<br />
available to give you complete control of your photography.<br />
• 5 Scene Program Shooting Modes: This camera has 5 shooting modes to choose from depending on<br />
the shooting conditions and the effect you want to achieve.<br />
• Macro Mode and Super Macro Mode: For taking extremely tight close-up pictures.<br />
• Sequential Shooting: Take a rapid succession of still pictures.<br />
• Still Picture Editing: Edit still pictures and store them as new pictures.<br />
• Movie Recording: Yes, this Digital camera records movies with sound!<br />
• Two-in-one Pictures: Combine two separate images taken in succession and store them as a single picture.<br />
• Close-up Playback: Enlarge the pictures in the monitor to check details of the selected image.<br />
• Index Display: View several thumbnail pictures on the monitor at once.<br />
• Protecting Pictures: Prevents you from accidentally erasing photos.<br />
• Video Playback: View your pictures and movies on a television monitor.<br />
• Panorama Shooting: Connect overlapping images into a single picture using the panorama mode and<br />
<strong>Olympus</strong> CAMEDIA Master software.<br />
• Direct Printing: Connect directly to your PictBridge-compatible printer with the USB cable to print your<br />
favorite images easily.<br />
TIP<br />
:Remember to complete and return your Registration Card (not provided in some areas), and keep all camera<br />
documentation handy.<br />
Technical Support (USA)<br />
1-888-553-4448 (Toll-free)<br />
8:00 AM - 10:00 PM ET<br />
Monday - Friday<br />
European Technical Customer Support<br />
00800-67 10 83 00 (Toll-free)<br />
+49 180 5 - 67 10 83 or +49 40 - 237 73 899<br />
(Charged)<br />
9:00 AM - 6:00 PM MET<br />
Monday - Friday<br />
©2003 OLYMPUS CORPORATION