FujiFilm -- FinePix S602 ZOOM -- Service Manual
FujiFilm -- FinePix S602 ZOOM -- Service Manual
FujiFilm -- FinePix S602 ZOOM -- Service Manual

Create successful ePaper yourself
Turn your PDF publications into a flip-book with our unique Google optimized e-Paper software.
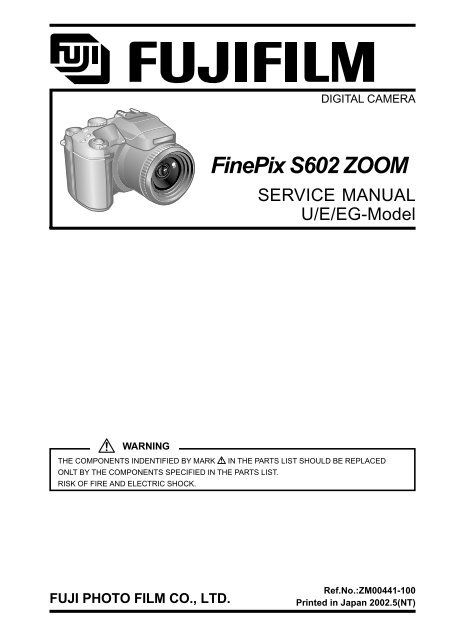
DIGITAL CAMERA<br />
<strong>FinePix</strong> <strong>S602</strong> <strong>ZOOM</strong><br />
SERVICE MANUAL<br />
U/E/EG-Model<br />
WARNING<br />
THE COMPONENTS INDENTIFIED BY MARK IN THE PARTS LIST SHOULD BE REPLACED<br />
ONLT BY THE COMPONENTS SPECIFIED IN THE PARTS LIST.<br />
RISK OF FIRE AND ELECTRIC SHOCK.<br />
FUJI PHOTO FILM CO., LTD.<br />
Ref.No.:ZM00441-100<br />
Printed in Japan 2002.5(NT)
<strong>FinePix</strong> <strong>S602</strong> <strong>ZOOM</strong> SERVICE MANUAL<br />
SAFETY CHECK-OUT<br />
After correcting the original problem, perform the following<br />
safety check before returning the product to the customer.<br />
1. Check the area of your repair for unsoldered or<br />
poorly soldered connections. Check the entire<br />
board surface for solder splasher and bridges.<br />
2. Check the interboard wiring to ensure that no<br />
wires are “pinched” or contact high-wattage<br />
resistors.<br />
3. Look for unauthorized replacement parts, particularly<br />
transistors, that were installed during a<br />
previous repair. Point them out to the customer<br />
and recommend their replacement.<br />
4. Look for parts which, though functioning, show<br />
obvious signs of deterioration. Point them out to<br />
the customer and recommend their replacement.<br />
5. Caution:<br />
For continued protection against<br />
2.5A 125/250V<br />
2.5A 125/250V<br />
RISK OF FIRE-<br />
REPLACE FUSE<br />
AS MARKED<br />
fire hazard, replace only with same<br />
type 2.5 amperes 125/250 volts<br />
fuse.<br />
Attention:<br />
Afin d’assurer une protection<br />
permanente contre les risques<br />
d’incendie, remplacer uniquement<br />
par un fusible de meme, type 2.5<br />
amperes, 125/250 volts.<br />
6. Warning:<br />
To reduce the electric shock, be<br />
WARNING! careful to touch the parts.<br />
HIGH VOLTAGE<br />
2
<strong>FinePix</strong> <strong>S602</strong> <strong>ZOOM</strong> SERVICE MANUAL<br />
TABLE OF CONTENTS<br />
TABLE OF CONTENTS<br />
1.Specifications<br />
1-1.Product Specifications ....................................................... 4<br />
1-2.Camera Features................................................................ 6<br />
1-3.Names of External Components ...................................... 7<br />
2.Disassembly<br />
2-1.Names of Internal Components ....................................... 9<br />
2-2.How to remove R CABI CONST .................................... 10<br />
2-3.Decomposition of R CABI CONST................................ 11<br />
2-4.How to remove LCD ASSY ............................................ 12<br />
2-5.How to remove TOP CABI CONST ............................... 13<br />
2-6.Decomposition of TOP CABI CONST .......................... 17<br />
2-7.How to remove LCD FRAME CONST ........................... 19<br />
2-8.Decomposition of LCD FRAME CONST ...................... 20<br />
2-9.Decomposition of MAIN PWB ASY............................... 20<br />
2-10.How to remove SHEET FRAME .................................. 21<br />
2-11.How to remove BATTERY LID .................................... 21<br />
2-12.How to remove BATTERY HOLDER UNIT ................ 22<br />
2-13.How to remove CAM PWB ASSY ............................... 22<br />
2-14.How to remove LENS FRAME ..................................... 23<br />
2-15.How to remove LENS CONST ..................................... 23<br />
2-16.How to remove LENS CABI ASSY ............................. 24<br />
2-17.How to remove SIDE MODULE UNIT ........................ 25<br />
2-18.How to remove AF SENSOR UNIT ............................. 26<br />
3.Schematic<br />
3-1.Cautions ............................................................................ 27<br />
3-2.Overview of Functions of Each Circuit ......................... 27<br />
3-3.Functions of Primary Blocks .......................................... 28<br />
3-3-1.Technical Outline ..................................................... 28<br />
3-3-2.CAM Board Block Functions .................................. 28<br />
3-3-3.MAIN Board Block Functions ................................. 28<br />
3-3-4.DCTS Board Block Functions ................................ 28<br />
3-4.Block Diagram ................................................................. 29<br />
3-5.Overall ............................................................................... 30<br />
3-6.Board mounting diagram ................................................ 31<br />
3-6-1.CAM PWB ASSY Component Location (A) .......... 31<br />
3-6-2.CAM PWB ASSY Component Location (B) .......... 32<br />
3-6-3.KEY PWB ASSY Component Location (A) .......... 33<br />
3-6-4.KEY PWB ASSY Component Location (B) .......... 34<br />
3-6-5.MAIN PWB ASSY Component Location (A) ........ 35<br />
3-6-6.MAIN PWB ASSY Component Location (B) ........ 36<br />
3-6-7.DCST PWB ASSY Component Location (A) ........ 37<br />
3-6-8.DCST PWB ASSY Component Location (B) ........ 38<br />
4.Adjustment<br />
4-1.Adjustments to Primary Components Following<br />
Replacement ................................................................... 39<br />
4-2.Preparation for adjustments .......................................... 40<br />
4-2-1.Measuring Equipments............................................ 40<br />
4-2-2.Jigs and Charts ........................................................ 40<br />
4-2-3.Connection ................................................................ 41<br />
4-2-4.Environmental Settings for Adjustment ................ 42<br />
4-2-5.Preparations for AF Sensor Adjustment ............... 42<br />
4-2-6.Environmental Settings for<br />
AF Sensor Adjustment ........................................... 42<br />
4-2-7.Environmental settings for AF adjustment ........... 43<br />
4-2-8.Environmental settings for Flash adjustment ...... 43<br />
4-3.About the Adjustment PC Soft ...................................... 44<br />
4-3-1.Attention at DSC jig driver ...................................... 44<br />
4-3-2.Attention at PC adjustment soft ............................. 45<br />
4-3-3.Attention at Firmware .............................................. 46<br />
4-3-4.Content of Adjustment Software ............................ 47<br />
4-3-5.Starting the Adjustment Software .......................... 47<br />
4-3-6.Customizing of Adjustment Software .................... 48<br />
4-3-7.Use of each command ............................................ 50<br />
4-4.Adjustment of Components (for PC adjustment) ........ 51<br />
4-4-1.Starting the Adjustment Software<br />
(cautions during use).............................................. 51<br />
4-4-2.Camera Jig Mode Procedure.................................. 51<br />
4-4-3.AF Sensor Adjustment ............................................ 52<br />
4-4-4.CCD Data Input ........................................................ 54<br />
4-4-5.Preparing the CCD Defect Data (FD) ................... 55<br />
4-4-6.CAM Adjustment ...................................................... 56<br />
4-4-7.Zoom/AF Adjustment ............................................... 57<br />
4-4-8.Flash Adjustment ..................................................... 58<br />
4-4-9.Battery Adjustment .................................................. 59<br />
4-4-10.Mode Dial Voltage Adjustment ............................ 60<br />
4-4-11.End Setting ............................................................. 61<br />
5.Inspection<br />
5-1.Preparation for inspection .............................................. 62<br />
5-1-1.Measuring Equipments............................................ 62<br />
5-1-2.Jigs and Charts ........................................................ 62<br />
5-1-3.Connection ................................................................ 63<br />
5-2.Inspection ......................................................................... 64<br />
5-2-1.External Inspection .................................................. 64<br />
5-2-2.Power Supply Switch Check................................... 64<br />
5-2-3.Checking Shock Noise in the Movie Mode ........... 64<br />
5-2-4.EVF Check ................................................................ 64<br />
5-2-5.Resolution Check ..................................................... 65<br />
5-2-6.Y Level Check .......................................................... 66<br />
5-2-7.Flash Photography Check ...................................... 67<br />
5-2-8.<strong>Manual</strong> Focus Check ............................................... 68<br />
5-2-9.Macro Operation Check .......................................... 68<br />
5-2-10.External Flash Operation Check.......................... 68<br />
5-2-11.Command Dial Check ........................................... 68<br />
5-2-12.Movie/Audio Check ................................................ 68<br />
5-2-13.Erase Mode Check ................................................ 68<br />
5-2-14.Low Battery Check................................................. 69<br />
5-2-15.Current Consumption Check ................................ 69<br />
5-2-16.LCD Display Image Check ................................... 69<br />
5-2-17.EVF Display Image Check.................................... 70<br />
5-2-18.Power OFF Operation Check ............................... 70<br />
5-2-19.Settings at Shipment ............................................. 71<br />
5-2-20.Clock Setup and Clear .......................................... 71<br />
6.Parts List<br />
6-1.U-Model ............................................................................ 72<br />
6-2.E-Model ............................................................................. 77<br />
6-3.EG-Model .......................................................................... 82<br />
6-4.Electrical Parts (U/E/EG-Model commonness) ........... 87<br />
7.Appendix<br />
7-1.List of Related Technical Updates Issued ................... 88<br />
3
1. Specifications<br />
<strong>FinePix</strong> <strong>S602</strong> <strong>ZOOM</strong> SERVICE MANUAL<br />
1. Specifications<br />
1-1. Product Specifications<br />
System<br />
Model<br />
Digital camera <strong>FinePix</strong> <strong>S602</strong> <strong>ZOOM</strong><br />
Number of effective pixels 3.1million pixels<br />
CCD sensor<br />
1/1.7 inch Super CCD in an interwoven pattern<br />
Number of total pixels 3.3 million pixels<br />
Number of recorded pixels 2832 x 2128 pixels (6.03 million pixels) /2048 x 1536 pixels/1280 x 960 pixels/640 x 480 pixels<br />
Storage media<br />
SmartMedia (3.3V), Microdrive<br />
File format Still image: TIFF-RGB, JPEG (Exif ver. 2.2)<br />
* Design rule for Camera File System compliant DPOF compatible<br />
Movie: AVI format, Motion JPEG<br />
Audio: WAV format<br />
Standard number of shots per Media<br />
Number of recorded<br />
2832x2128 2048x1536 1280x960 640x480 Movie (Video)<br />
Pixels<br />
Quality Mode HI FINE NORMAL BASIC FINE NORMAL FINE NORMAL NORMAL<br />
Approx. Approx. Approx. Approx. Approx. Approx. Approx. Approx. Approx.<br />
Image File Size _<br />
_<br />
18MB 2.4MB 1.2MB 460KB 1.3MB 590KB 620KB 320KB 130KB<br />
MG-4S (4MB) 0 1 3 8 2 6 6 12 30 Approx. 3 sec. Approx. 6 sec.<br />
MG-8S (8MB) 0 3 6 17 6 13 12 25 61 Approx. 6 sec. Approx. 13 sec.<br />
MG-16S (16MB) 0 6 13 33 12 26 25 49 122 Approx. 13 sec. Approx. 27 sec.<br />
MG-32S (32MB) 1 13 28 68 25 53 50 99 247 Approx. 27 sec. Approx. 55 sec.<br />
MG-64S (64MB) 3 26 56 137 50 107 101 198 497 Approx. 55 sec. Approx. 110 sec.<br />
MG-128S (128MB) 7 53 113 275 102 215 204 398 997 Approx. 112 sec. Approx. 222 sec.<br />
Microdrive (340MB) 19 147 311 765 279 589 566 1119 2729 Approx. 307 sec. Approx. 609 sec.<br />
Microdrive (1GB) 59 443 938 2190 842 1729 1642 3285 8213 Approx. 925 sec. Approx. 1833 sec.<br />
Sensitivity Equivalent to ISO 160/200/400/800/1600<br />
Lens<br />
Super EBC Fujinon 6x optical zoom lens<br />
Focus distance<br />
f = 7.8 mm-46.8 mm (Equivalent to 35 mm-210 mm on a 35 mm camera)<br />
Viewfinder<br />
0.44-inch 180,000 pixles electronic viewfinder<br />
Exposure control TTL 64-zones metering, Program AE ( , , , , ), Exposure compensation ( , , )<br />
available<br />
White balance , : Fully automatic<br />
, , : 8 positions selectable.<br />
Custom white balance selectable (2 positions)<br />
Focal range<br />
Normal (wide-angle): Approx. 50 cm (1.6 ft.) to infinity<br />
Normal (telephoto-angle): Approx. 90 (3.0 ft.) cm to infinity<br />
Macro: Approx. 10 cm (3.9 in.) to 80 cm (2.6 ft.)<br />
Super Macro: Approx. 1 cm (0.4 in.) to 20 cm (7.9 in.)<br />
Shutter<br />
: Variable-speed, 1/4 sec. to 1/2000 sec.<br />
: Variable-speed, 3 sec. (Night scenes only) to 1/2000 sec.<br />
, , : Variable-speed, 3 sec. to 1/1000 sec.<br />
: Variable-speed, 15 sec. to 1/10000 sec.<br />
Aperture<br />
F2.8-F11 13 levels in 1/3 EV steps<br />
Focus<br />
Passive-type external AF sensor + CCD-AF sensor<br />
Focus mode: AF, AREA AF, MF<br />
Self-Timer<br />
2 sec./10 sec. timer clock<br />
LCD monitor<br />
1.8 inches, low-temperature polysilicon TFT 110,000 pixels<br />
Flash<br />
Auto flash using flash control sensor<br />
Effective range: Wide-angle: Approx. 0.3 m-5.4 m (1.0 ft.-17.7 ft.)<br />
Telephoto-angle: Approx. 0.9 m-5.0 m (3.0 ft.-16.4 ft.)<br />
Flash modes: Auto, Red-Eye Reduction, Forced Flash, Slow Synchro, Red-Eye Reduction<br />
+ Slow Synchro<br />
4
<strong>FinePix</strong> <strong>S602</strong> <strong>ZOOM</strong> SERVICE MANUAL<br />
1. Specifications<br />
Input/Output Terminals<br />
DC Input<br />
To connect the AC power Adapter AC-5V/AC-5VH/AC-5VHS<br />
Accessory shoe<br />
Hot shoe<br />
A/V Output Stereo mini-jack (1)<br />
Power Supply and Others<br />
Power supply<br />
Use one of the following<br />
* 4 x AA-size alkaline batteries<br />
* 4 x AA-size Ni-MH (nickel-metal hydride) batteries (sold separately)<br />
* AC Power Adapter AC-5VH/AC-5VHS (sold separately)<br />
Available shots using batteries (When fully charged)<br />
Media type<br />
SmartMedia<br />
Battery type<br />
Alkaline batteries<br />
Ni-MH batteries<br />
HR-3UF 1700 mAh<br />
Using LCD monitor Approx. 200 frames Approx. 250 frames<br />
Using EVF Approx. 210 frames Approx. 280 frames<br />
Using LCD monitor Approx. 170 frames Approx. 230 frames<br />
Microdrive<br />
Using EVF Approx. 180 frames Approx. 240 frames<br />
The number of shots shown here is an approximate guide to the number of consecutive shots that can be<br />
taken based on 50% flash usage at normal temperatures. However, the actual number of available shots<br />
will vary depending on the ambient temperature when the camera is used and the amount of charge in the<br />
battery. The number of available shots will be lower in cold conditions.<br />
Conditions for use Temperature: 0 o C to +40 o C (+32 o F to +104 o F)<br />
80% humidity or less (no condensation)<br />
Camera dimensions 121.0 mm x 81.5 mm x 97.0 mm/4.8 in. x 3.2 in. x 3.8 in.<br />
(W/H/D)<br />
(not including accessories and attachments)<br />
Camera mass (weight) 500 g/17.6 oz. (not including accessories, batteries or media)<br />
Weight for photography Approx. 600 g/21.2 oz. (including batteries and SmartMedia)<br />
Accessories SmartMedia (16MB, 3.3V) (1) Supplied with: Anti-static case (1)<br />
Index label (1)<br />
AA-size alkaline batteries (4) Shaulder Strap (1)<br />
Protective cover (2) Metal strap clip (2)<br />
Clip attaching tool (1) Lens cap (1)<br />
Lens cap holder (1)<br />
A/V Cable (approx. 1.5 m (4.9 ft.), mini-plug (2.5 mm dia.) to pin-plug cable x 2) (1)<br />
USB Interface Set (1) * CD-ROM: Software for <strong>FinePix</strong> EX (1)<br />
* Special USB cable with Noise Suppression core (1)<br />
* Software Quick Start Guide (1)<br />
Owner's <strong>Manual</strong> (1)<br />
Optional Accessories SmartMedia<br />
MG-4S: 4MB, 3.3V MG-8S: 8MB, 3.3V MG-16S: 16MB, 3.3V<br />
MG-32S: 32MB, 3.3V MG-64S: 64MB, 3.3V<br />
MG-16SW: 16MB, 3.3V, ID<br />
MG-32SW: 32MB, 3.3V, ID<br />
MG-64SW: 64MB, 3.3V, ID MG-128SW : 128MB, 3.3V, ID<br />
AC-5VH/AC-5VHS AC Power Adapter<br />
Fujifilm Rechargeable Battery 2HR-3UF<br />
Fujifilm Battery Charger with Battery BK-NH (Not Available in U.S.A./Canada)<br />
FD-A2 Floppy Disk Adapter (FlashPath)<br />
Windows 95/98/98 SE/Me/NT 4.0, Mac OS 7.6.1 to 9.1<br />
SM-R2 Image Memory Card Reader<br />
Compatible with Windows 98/98 SE, Windows Me, Windows 2000 Professional or<br />
iMac or Power Macintosh and models that support USB as standard.<br />
DM-R1 Image Memory Card Reader<br />
Compatible with Windows 98 SE, Windows 2000 Professional (read-only), iMac DV<br />
and Power Macintosh PCs with FireWire as a standard feature. Mac OS 8.5.1 to 9.1<br />
PC-AD3 PC Card Adapter<br />
SC-FX602 Soft Case<br />
5
1. Specifications<br />
<strong>FinePix</strong> <strong>S602</strong> <strong>ZOOM</strong> SERVICE MANUAL<br />
1-2. Camera Features<br />
3.1 million effective pixels<br />
1/1.7-inch Super CCD provides high quality images with 2832 ×2128 (6.03 million) recorded pixels<br />
Powerful Super EBC Fujinon 6optical zoom lens (aspherical lens) for superb optical performances<br />
Maximum 4.4seamless digital zoom<br />
Wide range of light sensitivity settings from ISO 160, 200, 400 up to ultra-high settings with ISO 800* and 1600*<br />
* In 1280 ×960 pixels mode only<br />
“Motion Photo” VGA-sized movie with monaural sound (640 ×480 pixels at 30 frames/sec.)<br />
Dual media slots for SmartMedia and Microdrive<br />
Fast-acting dual-method focusing system that combines an external AF sensor (passive phase-difference AF sensor)<br />
and CCD-AF<br />
Quick, responsive operation with 3 second start-up and only 1 Second between shots<br />
Auto focus with macro function (manual focusing function also available)<br />
Super Macro function for close-up shots as near as 1cm (0.4 inch) to the subject<br />
Three type high-speed continuous shooting mode<br />
Top 5-frame continuous shooting (5 frames/sec.)<br />
Final 5-frame continuous shooting (5 frames/sec. within 5 seconds/25 shots)<br />
Long-period continuous shooting with 1280 ×960 pixels mode (1.8 frames/sec. up to 40 frames)<br />
AF AREA function lets you choose from 49 focusing points in the view finder image<br />
A wide range of exposure modes (including manual exposure) let you adjust your photography settings as you like<br />
A ultra-wide range of shutter speed from 1/10,000 sec to long exposures up to 15 sec in <strong>Manual</strong> mode<br />
0.44” 180,000-pixel electric viewfinder with diopter adjustment mechanism<br />
1.8” 110,000-pixel LCD monitor (low-temperature polysilicon TFT) with 100% coverage<br />
Support to external flash units<br />
Convenient preview function for checking your shots<br />
Immediate exposure checking after shooting using histogram indication function<br />
Playback zoom function (max. 18)<br />
Multiple exposure and monochrome photography function provides a wider range of photography options<br />
INFO button allows you to view your photography settings at a touch whenever the need arises<br />
Easy high-speed data transfer via the USB connection<br />
Conforms to “Design for Camera File system” standard and Exif ver 2.2 for digital cameras<br />
* “Design for Camera File system” standard and Exif format are formulated by the Japanese Electronic and Information<br />
Association (JEITA)<br />
Explanation of Terms<br />
AF/AE Lock:<br />
Auto Power Save Function:<br />
DPOF:<br />
EV:<br />
JPEG:<br />
Motion JPEG:<br />
PC Card:<br />
PC Card Standard:<br />
PCMCIA:<br />
VGA/QVGA:<br />
WAVE:<br />
White Balance:<br />
Smear:<br />
Exif Print:<br />
6<br />
On the <strong>FinePix</strong> <strong>S602</strong> <strong>ZOOM</strong>, pressing the shutter button down half way locks the focus and exposure settings<br />
(AF and AE lock). If you want to focus on a subject that is not centered in the frame or change the picture<br />
composition after the exposure is set, you can obtain good results by changing the composition after the AF<br />
and AE settings are locked.<br />
If the camera is not used in any way for 30 seconds, this function switches features such as the LCD monitor<br />
off (Sleep mode) to prevent battery depletion and the waste of power when the AC power adapter is<br />
connected. If the camera is then left unused for a further period, the Auto Power Save function switches the<br />
camera off. This period can be set to 2 minutes or 5 minutes on this camera. h The Auto Power Off function<br />
does not operate in PC mode, during automatic playback, or if it is disabled during setup.<br />
Digital Print Order Format DPOF is a format used for recording information on a storage media (image<br />
memory card, etc.) that allows you to specify which of the frames shot using a digital camera are printed and<br />
how many prints are made of each image.<br />
A number that denotes Exposure Value. The EV is determined by the brightness of the subject and sensitivity<br />
(speed) of the film or CCD. The number is larger for bright subjects and smaller for dark subjects. As the<br />
brightness of the subject changes, a digital camera maintains the amount of light hitting the CCD at a constant<br />
level by adjusting the aperture and shutter speed. When the amount of light striking the CCD doubles, the EV<br />
increases by 1. Likewise, when the light is halved, the EV decreases by 1.<br />
Joint Photographics Experts Group A file format used for compressing and saving color images. The<br />
compression ratio can be selected, but the higher the compression ratio, the poorer the quality of the<br />
expanded image.<br />
A type of AVI (Audio Video Interleave) file format that handles images and sound as a single file. Images in<br />
the file are recorded in JPEG format. Motion JPEG can be played back by QuickTime 3.0 or later.<br />
A generic term for cards that meet the PC Card Standard.<br />
A standard for PC cards determined by the PCMCIA.<br />
Personal Computer Memory Card International Association (US).<br />
Graphics standards for PCs. Images are displayed at 640 ×480 and 320 ×240 pixels respectively.<br />
A standard format used on Windows systems for saving audio data. WAVE files have the “.WAV” file<br />
extension and the data can be saved in either compressed or uncompressed format. This camera use PCM<br />
recording. WAVE files can be played back on a personal computer using the following software :<br />
Windows:MediaPlayer Macintosh:QuickTime Player QuickTime 3.0 or later<br />
Whatever the kind of the light, the human eye adapts to it so that a white object still looks white. On the other<br />
hand, devices such as digital cameras see a white subject as white by first adjusting the color balance to suit<br />
the color of the ambient light around the subject. This adjustment is called matching the white balance. A<br />
function that automatically matches the white balance is called an Automatic White Balance function.<br />
A phenomenon specific to CCDs whereby white streaks appear on the image when there is a very strong light<br />
source, such as the sun or reflected sunlight, in the photography screen.<br />
Exif Print Format is a newly revised digital camera file format that contains a variety of shooting information for<br />
optimal printing.
<strong>FinePix</strong> <strong>S602</strong> <strong>ZOOM</strong> SERVICE MANUAL<br />
1. Specifications<br />
1-3. Names of External Components<br />
Power switch<br />
Hot shoe<br />
Focusing ring<br />
Shutter button<br />
Exposure<br />
compensation<br />
button<br />
Flash button<br />
Continuous<br />
shooting button<br />
Mode dial<br />
Command dial<br />
Self-timer lamp<br />
EVF/LCD (viewfinder/<br />
monitor) button<br />
Viewfinder (EVF)<br />
Diopter adjustment dial<br />
(Focus Check) button<br />
Zoom button<br />
AE-L (AE lock) button<br />
Strap mount<br />
Indicator lamp<br />
BACK button<br />
Slot cover<br />
SmartMedia slot<br />
LCD monitor<br />
Tripod mount<br />
DISP button<br />
MENU/OK button<br />
4-direction (<br />
) button<br />
Battery cover<br />
Microdrive eject button<br />
Microdrive slot<br />
7
1. Specifications<br />
<strong>FinePix</strong> <strong>S602</strong> <strong>ZOOM</strong> SERVICE MANUAL<br />
Flash control sensor<br />
Flash<br />
AF sensor<br />
Flash pop-up button<br />
Microphone<br />
INFO (information check) button<br />
Strap mount<br />
(USB) socket<br />
Speaker<br />
A/V OUT (Audio/visual output)<br />
socket<br />
Terminal cover<br />
(One-touch AF) button<br />
DC IN 5V (power input) socket<br />
Lens<br />
Macro (close-up photography)<br />
button<br />
Terminal cover<br />
Focus mode selector switch<br />
SHIFT button<br />
8
<strong>FinePix</strong> <strong>S602</strong> <strong>ZOOM</strong> SERVICE MANUAL<br />
2. Disassembly<br />
2. Disassembly<br />
2-1. Names of Internal Components<br />
C DIAL UNIT<br />
KEY PWB ASSY<br />
R CABI ASSY<br />
ST ASSY CONST<br />
EVF CONST<br />
LCD ASSY<br />
SPEAKER ASSY<br />
TOP CABI ASSY<br />
MODE DIAL UNIT<br />
AF SENSOR UNIT<br />
LCD FRAME<br />
MAIN PWB ASSY<br />
DCST PWB ASSY<br />
CAM PWB ASSY<br />
MIC ASSY<br />
LENS CONST<br />
SIDE MODULE UNIT<br />
F CABI ASSY<br />
9
2. Disassembly<br />
<strong>FinePix</strong> <strong>S602</strong> <strong>ZOOM</strong> SERVICE MANUAL<br />
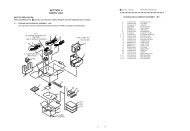
2-2. How to remove R CABI CONST<br />
[Procedure]<br />
1. Remove screw (M1.7x8.0).<br />
2. Remove screw (M1.7x5.5).<br />
3. Remove six screws (M1.7x5.0).<br />
4. Remove R CABI CONST in the direction of the arrow.<br />
5. Remove FFC(x2).<br />
(The undermentioned refer to how to remove the connector. )<br />
[Assembly procedure]<br />
Assemble it according to a reverse procedure.<br />
1<br />
3<br />
2 3<br />
3<br />
4<br />
10
<strong>FinePix</strong> <strong>S602</strong> <strong>ZOOM</strong> SERVICE MANUAL<br />
2. Disassembly<br />
2-3. Decomposition of R CABI CONST<br />
[Procedure]<br />
1. Remove FFC from KEY PWB ASSY.<br />
2. Remove screw (M1.7x4.0).<br />
3. Remove C DIAL UNIT in the direction of the arrow.<br />
4. Push STRAP L from the direction of the arrow and remove.<br />
5. Remove three screws (M1.7x4.0).<br />
6. Remove KEY PWB ASSY.<br />
7. Remove OK BUTTON, REAR BUTTON, <strong>ZOOM</strong> BUTTOM, and LED LENS.<br />
[Assembly procedure]<br />
Assemble it according to a reverse procedure.<br />
3<br />
1<br />
2<br />
4<br />
6<br />
5<br />
7 7<br />
7<br />
7<br />
11
2. Disassembly<br />
<strong>FinePix</strong> <strong>S602</strong> <strong>ZOOM</strong> SERVICE MANUAL<br />
2-4. How to remove LCD ASSY<br />
[Procedure]<br />
1. Detach the undermentioned parts.<br />
R CABI CONST<br />
2. Put tweezers etc. in the LCD FRAME hook on LCD right side and remove LCD ASSY from LCD FRAME.<br />
3. Remove the lock of the connector of MAIN PWB ASSY, and remove FFC from LCD ASSY.<br />
4. Remove Wire Harness connected with LCD ASSY.<br />
1<br />
2<br />
3<br />
[Assembly procedure]<br />
Assemble it according to a reverse procedure.<br />
[Notes of assembly]<br />
Process FFC/Wire Harness between LCD FRAME and MAIN PWB ASSY.<br />
12
<strong>FinePix</strong> <strong>S602</strong> <strong>ZOOM</strong> SERVICE MANUAL<br />
2. Disassembly<br />
2-5. How to remove TOP CABI CONST<br />
[Procedure]<br />
1. Detach the undermentioned parts.<br />
R CABI CONST, LCD ASSY<br />
2. Push ST BUTTON, and improve the flash in pop.<br />
3. Detach AF PLATE to the space between AF PLATE and F CABI CONST with a needle etc.<br />
Note that neither AF PLATE nor F CABI CONST are damaged.<br />
Do not stab the finger etc. enough when you use the needle.<br />
4. Remove the hook of ST BUTTON and remove ST BUTTON from the main body by using a minus driver.<br />
Do not lose because CSP(ST BUTTON) comes off together when ST BUTTON is detached.<br />
5. Remove two screws (M1.7x5.5).<br />
3<br />
4<br />
5<br />
13
2. Disassembly<br />
<strong>FinePix</strong> <strong>S602</strong> <strong>ZOOM</strong> SERVICE MANUAL<br />
6. Remove the speaker side of TOP CABI CONST in the direction of the arrow.<br />
7. Lift the SHUTTER BUTTON side of TOP CABI CONST in the direction of the arrow and remove.<br />
8. Remove from the main body while pulling TOP CABI CONST backward.<br />
7<br />
6<br />
8<br />
14
<strong>FinePix</strong> <strong>S602</strong> <strong>ZOOM</strong> SERVICE MANUAL<br />
2. Disassembly<br />
9. Remove Wire Harness (3) from TOP CABI CONST and FFC (1).<br />
10. Pull out SHEET FRAME from LCD FRAME.<br />
11. Remove Wire Harness (2).<br />
There is no dread of the electric shock and do not touch the terminal when you remove Wire Harness<br />
for the flash from the substrate.<br />
9<br />
9<br />
9<br />
10<br />
9<br />
11<br />
10<br />
11<br />
11<br />
15
2. Disassembly<br />
<strong>FinePix</strong> <strong>S602</strong> <strong>ZOOM</strong> SERVICE MANUAL<br />
[Assembly procedure]<br />
Assemble it according to a reverse procedure.<br />
1. Combine intuition on the tip of the AF sensor when you connect all Wire Harness with FFC.<br />
2. Combine the speaker side of TOP CABI CONST in intuition in the hook of F CABI CONST.<br />
3. Combine the grip part in intuition surely. At this time, confirm grip rubber is turned over and not transformed.<br />
4. Confirm TOP CABI CONST and confirm Wire Harness has been installed after it clings surely in SHEET FRAME.<br />
5. Note that it is at the top and bottom (The gate is the above) in ST BUTTON at assembly.<br />
2<br />
1<br />
3<br />
4<br />
Note the scissors crowding of Wire Harness.<br />
Gate<br />
5<br />
16
<strong>FinePix</strong> <strong>S602</strong> <strong>ZOOM</strong> SERVICE MANUAL<br />
2. Disassembly<br />
2-6. Decomposition of TOP CABI CONST<br />
[Procedure]<br />
1. Remove two screws (M1.7x4.0), and remove HOLDER EVF.<br />
2. Remove four screws (M1.7x4.0), and remove MODE DIAL UNIT.<br />
3. Remove EVF CONST.<br />
4. Remove SPEAKER ASSY.<br />
5. Remove two screws (M1.7x4.0), and remove ST TOP.<br />
1<br />
2<br />
4<br />
3<br />
5<br />
5<br />
17
2. Disassembly<br />
<strong>FinePix</strong> <strong>S602</strong> <strong>ZOOM</strong> SERVICE MANUAL<br />
6. Remove ST SHUFT(x2).<br />
7. Lift while pressing ST ASSY CONST against the SHUTTER BUTTON side and remove.<br />
6<br />
7<br />
7<br />
6<br />
[Assembly procedure]<br />
Assemble it according to a reverse procedure.<br />
[Notes of assembly]<br />
Note the taking turning of the flash hiss harness.<br />
Pass the flash hiss harness and the flash harness through the fingernail of HOLDER EVF.<br />
Do not float on the flash hiss harness and the flash harness.<br />
do not interfere in flash pop up detection SW.<br />
<br />
Flash pop up detection SW<br />
18
<strong>FinePix</strong> <strong>S602</strong> <strong>ZOOM</strong> SERVICE MANUAL<br />
2. Disassembly<br />
2-7. How to remove LCD FRAME CONST<br />
[Procedure]<br />
1. Detach the undermentioned parts.<br />
R CABI CONST, LCD ASSY, ST PLATE, ST BUTTON, TOP CABI CONST<br />
2. Remove FFC Wire Haness (4)(2).<br />
3. Remove main body A and part B, and remove LCD FRAME CONST.<br />
4. Discharge electricity from the main capacitor of DCST PWB ASSY.<br />
[Assembly procedure]<br />
Assemble it according to a reverse procedure.<br />
2<br />
2<br />
2<br />
B<br />
2<br />
2<br />
2<br />
3<br />
A<br />
19
2. Disassembly<br />
<strong>FinePix</strong> <strong>S602</strong> <strong>ZOOM</strong> SERVICE MANUAL<br />
2-8. Decomposition of LCD FRAME CONST<br />
[Procedure]<br />
Confirm the main capacitor of DCST PWB ASSY has been discharged without fail before work is started.<br />
1. Remove two screws (M1.7x3.0), and remove CONTACT PLT and DCST PWB ASSY.<br />
2. Remove two screws (M1.7x3.0), and remove MAIN PWB ASSY.<br />
[Assembly procedure]<br />
Assemble it according to a reverse procedure.<br />
1<br />
2<br />
2-9. Decomposition of MAIN PWB ASY<br />
[Procedure]<br />
1. Remove EJECTER in the direction of the arrow.<br />
2. Remove SHEET CF.<br />
[Assembly procedure]<br />
Assemble it according to a reverse procedure.<br />
1<br />
2<br />
20
<strong>FinePix</strong> <strong>S602</strong> <strong>ZOOM</strong> SERVICE MANUAL<br />
2. Disassembly<br />
2-10. How to remove SHEET FRAME<br />
[Procedure]<br />
1. Remove SHEET FRAME from LCD FRAME.<br />
[Assembly procedure]<br />
Assemble it according to a reverse procedure.<br />
[Notes of assembly]<br />
Note the damage of SHEET FRAME when you install SHEET FRAME in LCD FRAME.<br />
2-11. How to remove BATTERY LID<br />
[Procedure]<br />
1. Lift the hook of BATTERY LID, and remove BATTERY LID.<br />
[Assembly procedure]<br />
Assemble it according to a reverse procedure.<br />
2<br />
21
2. Disassembly<br />
<strong>FinePix</strong> <strong>S602</strong> <strong>ZOOM</strong> SERVICE MANUAL<br />
2-12. How to remove BATTERY HOLDER UNIT<br />
[Procedure]<br />
1. Detach the undermentioned parts.<br />
R CABI CONST, LCD ASSY, ST PLATE, ST BUTTON, TOP CABI CONST, LCD FRAME CONST<br />
BATTERY LID<br />
2. Remove screw (M1.7x5.0).<br />
3. Remove BATTERY HOLDER UNIT from the main body while opening the main body grip part.<br />
[Assembly procedure]<br />
Assemble it according to a reverse procedure.<br />
2<br />
2-13. How to remove CAM PWB ASSY<br />
[Procedure]<br />
1. Detach the undermentioned parts.<br />
R CABI CONST, LCD ASSY, ST PLATE, ST BUTTON, TOP CABI CONST, LCD FRAME CONST<br />
2. Open the hook of LENS FRAME, and remove CAM PWB ASSY in the direction of the arrow.<br />
3. Remove FPC from LENS CONST, and remove CAM PWB ASSY from the main body.<br />
[Assembly procedure]<br />
Assemble it according to a reverse procedure.<br />
3<br />
2<br />
22
<strong>FinePix</strong> <strong>S602</strong> <strong>ZOOM</strong> SERVICE MANUAL<br />
2. Disassembly<br />
2-14. How to remove LENS FRAME<br />
[Procedure]<br />
1. Detach the undermentioned parts.<br />
R CABI CONST, LCD ASSY, ST PLATE, ST BUTTON, TOP CABI CONST, LCD FRAME CONST<br />
BATTERY LID, BATTERY HOLDER UNIT, CAM PWB ASSY<br />
2. Remove FFC from LENS FRAME.<br />
3. Remove screw (M1.7x5.0), and remove LENS FRAME from the main body.<br />
[Assembly procedure]<br />
Assemble it according to a reverse procedure.<br />
[Notes of assembly]<br />
Do so as not to cut FFC adding impossible power when you build FFC into LENS FRAME noting it.<br />
2<br />
3<br />
2-15. How to remove LENS CONST<br />
[Procedure]<br />
1. Detach the undermentioned parts.<br />
R CABI CONST, LCD ASSY, ST PLATE, ST BUTTON, TOP CABI CONST, LCD FRAME CONST<br />
BATTERY LID, BATTERY HOLDER UNIT, CAM PWB ASSY, LENS FRAME<br />
2. Remove LENS CONST from F CABI UNIT.<br />
2<br />
23
2. Disassembly<br />
<strong>FinePix</strong> <strong>S602</strong> <strong>ZOOM</strong> SERVICE MANUAL<br />
[Assembly procedure]<br />
Assemble it according to a reverse procedure.<br />
[Notes of assembly]<br />
Make the cutting lack of the rib and LENS CONST of F CABI CONST combined in intuition,<br />
and build it in when you build in LENS CONST.<br />
2-16. How to remove LENS CABI ASSY<br />
[Procedure]<br />
1. Detach the undermentioned parts.<br />
R CABI CONST, LCD ASSY, ST PLATE, ST BUTTON, TOP CABI CONST, LCD FRAME CONST<br />
BATTERY LID, BATTERY HOLDER UNIT, CAM PWB ASSY, LENS FRAME, LENS CONST<br />
2. Remove three screws (M1.7X3.5), and remove LENS CABI ASSY.<br />
[Assembly procedure]<br />
Assemble it according to a reverse procedure.<br />
[Attention]<br />
Because the torque is managed as for FOCUS RING of LENS CABI ASSY, it is not possible to decompose.<br />
2<br />
24
<strong>FinePix</strong> <strong>S602</strong> <strong>ZOOM</strong> SERVICE MANUAL<br />
2. Disassembly<br />
2-17. How to remove SIDE MODULE UNIT<br />
[Procedure]<br />
1. Detach the undermentioned parts.<br />
R CABI CONST, LCD ASSY, ST PLATE, ST BUTTON, TOP CABI CONST, LCD FRAME CONST<br />
BATTERY LID, BATTERY HOLDER UNIT, CAM PWB ASSY, LENS FRAME, LENS CONST<br />
LENS CABI ASSY<br />
2. Remove screw (M1.7x5.0), and remove STRAP R.<br />
3. Remove SIDE MODILE UNIT from F CABI ASSY.<br />
2<br />
3<br />
[Assembly procedure]<br />
Assemble it according to a reverse procedure.<br />
[Notes of assembly]<br />
Match and build in the position of the FOCUS switch lever of FOCUS switch SW and F CABI ASSY<br />
of SIDE MODILE UNIT.<br />
25
2. Disassembly<br />
<strong>FinePix</strong> <strong>S602</strong> <strong>ZOOM</strong> SERVICE MANUAL<br />
2-18. How to remove AF SENSOR UNIT<br />
[Procedure]<br />
1. Detach the undermentioned parts.<br />
R CABI CONST, LCD ASSY, ST PLATE, ST BUTTON, TOP CABI CONST, LCD FRAME CONST<br />
BATTERY LID, BATTERY HOLDER UNIT, CAM PWB ASSY, LENS FRAME, LENS CONST<br />
LENS CABI ASSY<br />
2. Remove AF SENSOR UNIT in the direction of the arrow while pushing the front side part of AF SENSOR UNIT<br />
by the finger.<br />
[Assembly procedure]<br />
Assemble it according to a reverse procedure.<br />
[Attention]<br />
Replace F CABI ASSY when guide ditch part F CABI ASSY is damaged when AF SENSOR UNIT is detached.<br />
2<br />
AF SENSOR UNIT<br />
Guide ditch part<br />
26
<strong>FinePix</strong> <strong>S602</strong> <strong>ZOOM</strong> SERVICE MANUAL<br />
3. Schematic<br />
3. Schematic<br />
3-1.Cautions<br />
<br />
* Do not re-use the removed parts, but use new parts.<br />
Be careful that the negativ side of the tantalum capacitors are susceptible to heat.<br />
* Voltage indications are omitted for capacitors other than chemical and tantalum capacitors with a dielectric strength<br />
of 50 V or less.<br />
* Chip resistors without indication are 1/10 W.<br />
* k=1000 , M=1000 k<br />
* Variable resistors and semi-variable resistor are abbreviated the specification of B characteristic.<br />
3-2.Overview of Functions of Each Circuit<br />
Board Name Block name Function<br />
LENS CONST CCD BLOCK CCD output<br />
CAM PWB ASSY CAM BLOCK Analog to digital conversion of CCD output (IC102)<br />
CCD driver (IC100)<br />
MAIN PWB ASSY PROCESS BLOCK Video signal processing (IC210)<br />
USB communication (IC210)<br />
System control (IC210)<br />
MOTOR BLOCK<br />
Shutter/Iris/AF/Zoom driver (IC602)<br />
POWER ON BLOCK Power control (IC302)<br />
EVF BLOCK<br />
EVF control (IC405)<br />
LCD BLOCK<br />
LCD control (IC404)<br />
AUDIO BLOCK<br />
Audio signal processing (IC500)<br />
DCST PWB ASSY DC/DC BLOCK Each power supply generation (IC902)<br />
KEY PWB ASSY KEY BLOCK Operation SW(TELE/WIDE,EVF/LCD,MENU/OK,etc.)<br />
SIDE MODULE UNIT SIDE KEY BLOCK Operation SW(MACRO,CUSTOM,INFO,AF/MF,OPAF)<br />
MODE DIAL UNIT MODE BLOCK Operation SW(OFF/CAM/PB,S1/S2,MODE,ETC.)<br />
ST ASSY CONST STROBO BLOCK Flash luminescence<br />
27
3. Schematic<br />
<strong>FinePix</strong> <strong>S602</strong> <strong>ZOOM</strong> SERVICE MANUAL<br />
3-3.Functions of Primary Blocks<br />
3-3-1.Technical Outline<br />
Use of [the 3rd Generation Super CCD Honeycomb] has improved still photography performance. The 3,100,000<br />
effective pixels, and [the Honeycomb Signal Processing System], allows recording and reproduction of high-quality<br />
images of up to 2832 x 2128 (6,030,000) pixels. These features permit [Candle Shots] at ISO1600/800 in the 1Mega<br />
mode, a capability facilitated by the use of the unique honeycomb picture element which receives light over a wide<br />
area, technical developments in pixel summing signal processing*1, and noise reduction technology.<br />
Movie photography performance is improved. Horizontal/vertical pixel mixing*2 inside the CCD using a new data<br />
transfer system is the first to provide 30 frames per second in VGA format at greater than 3 megapixels.<br />
[High-speed Twin AF] uses both an external AF sensor (passive phase difference) and the CCD AF for higher-speed<br />
autofocus.<br />
The [Super Macro] feature allows photography of a subject at distances down to one centimeter.<br />
The [Double Slot] feature provides for both smart media and microdrives, allowing both recording of the large<br />
volumes of image data in the high image quality mode, and long movies.<br />
*1 : Image data obtained with honeycomb signal processing from twice the number of effective pixels. Shrinks four<br />
pixels into one. This processing increases the signal level (sensitivity) by a factor of four, and the S/N ratio (signal-tonoise<br />
ratio) by a factor of two, to permit photography at ISO1600.<br />
*2 : Mixes two pixels on the vertical axis, and two pixels on the horizontal axis, of the CCD.<br />
This processing increases the signal level by a factor of four, and the S/N ratio by a factor of two, to provide high<br />
sensitivity and high quality images, while at the same time allowing data to be read at high-speed (30 frames per<br />
second in VGA format).<br />
3-3-2.CAM Board Block Functions<br />
Photography Circuit Functions (CAM BLOCK)<br />
The analog video signal output from the newly developed CCD (1/1.7”, 3,100,000 effective pixels, square pixel<br />
honeycomb array, primary color CCD) is processed (pseudo-color compensation, adaptive interpolation, amplification,<br />
and signal mixing) in SCS3A_IC (IC102:CSP_IC), and subsequently converted to a 12-bit digital signal. The<br />
digital signal is then sent to the single chip image signal processing LSI : UCS1_IC (IC210 : CSP_IC*).<br />
* CSP_IC=Chip Size Packege IC<br />
3-3-3.MAIN Board Block Functions<br />
Image Signal Processing Functions (PROCESS BLOCK)<br />
Data input from CCD<br />
* The 12-bit digital image data (1H equivalent) output from the CAM BLOCK is sent to UCS1_IC, buffered in the IBUF,<br />
and converted to 32-bit (16-bit x 2) data. The 32-bit image data is then sent from the [I/O Buffer] in UCS1_IC and<br />
stored in the SDRAM_IC (IC211, IC218, IC219 : 40 Mbyte). A single frame (2832 pixels x 2128 lines) of image data is<br />
temporarily stored in the SDRAM_IC.<br />
* At the same time, AE multiplies the 12-bit image data input from the UCS1_IC in [AUTO], and sends the data required<br />
for AE/AWB/AF to the SDRAM_IC. To provide the appropriate data for AE/AWB/AF, this data is then sent from the<br />
SDRAM_IC in serial format to the SCS3A_IC via the UCS1_IC.<br />
Recording in the SSFDC<br />
The image data stored in the SDRAM_IC is converted from 32-bit to 12-bit data one line at a time in the [IBUF] in the<br />
UCS1_IC, and sent to [YC PRO]. The image data is then converted to 8-bit Y and C signals in [YC PRO], and then sent<br />
again to [IBUF]. The 8-bit Y and C signals are then converted to 8-bit Y, Y, Cb, and Cr signals and sent to the SDRAM_IC.<br />
The image data stored in the SDRAM_IC is compressed with [JPEG] in the UCS1_IC and again stored in the<br />
SDRAM_IC. The image data following compression is recorded sequentially in the SSFDC via [MEDIA] in the UCS1_IC.<br />
Image Replay from the SSFDC<br />
The compressed image data from the SSFDC is sent to UCS1_IC, and stored in the SDRAM_IC via [MEDIA]. The<br />
compressed image data stored in the SDRAM_IC is expanded with JPEG and stored again in the SDRAM_IC. The<br />
expanded image data is sent to [YC PRO] via [IBUF]. Gain control for the luminance and color difference signals, and<br />
aperture processing, are performed in [YC PRO] and the image data then sent again to the SDRAM_IC. The image<br />
data is then displayed via [ENCD] and [D/A].<br />
Movie Mode<br />
The 12 bit digital image data output from the (CAM BLOCK) is converted to 8-bit Y and C signals in the USC1_IC [YC<br />
PRO], and sent to the SDRAM_IC. The image data stored in the SDRAM_IC is compressed with [JPEG] in the<br />
UCS1_IC and again stored in the SDRAM_IC. The image data following compression is recorded sequentially in the<br />
SSFDC via [MEDIA] in the UCS1_IC.<br />
The photography adjustment data is stored in the FLASH_ROM (IC216). The FLASH_ROM also incorporates firmware.<br />
LCD Control Functions (LCD CONTROL BLOCK)<br />
The R, G, and B signals processed in the image signal processing UCS1_IC are output to the LCD panel via [LCD CONT].<br />
A low-temperature polysilicon TFT color LCD monitor (1.8, 110,000 pixels) is used.<br />
EVF Control Functions (EVF CONTROL BLOCK)<br />
The R, G, and B signals processed in the image signal processing UCS1_IC are output to the EVF panel via [EVF CONT].<br />
A high-temperature polysilicon TFT color monitor (0.44, 180,000 pixels) is used in the viewfinder.<br />
3-3-4.DCTS Board Block Functions<br />
Power Supply Functions<br />
The power supply circuit on the DCST board generates the -8V/16V (CCD), 1.5V (UCS1_IC), 3.3V<br />
(SCS3A_IC/UCS1_IC/SDRAM/SDRAM/ROM/LED/KEY), MOT_5.0V (lens/flash), D_5V (AUD01), LCD_13V (LCD/EVF<br />
backlight), D_3.3V (LCD circuit), and AD_3.3V (video circuit) voltages.<br />
28
<strong>FinePix</strong> <strong>S602</strong> <strong>ZOOM</strong> SERVICE MANUAL<br />
3. Schematic<br />
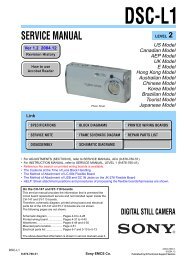
3-4. Block Diagram<br />
SHUTTER<br />
IRIS<br />
AF<br />
<strong>ZOOM</strong><br />
MOTOR DRV<br />
IC602<br />
V-DRV<br />
IC100<br />
CAM1 - 4<br />
SCS3A IC102 (CSP)<br />
VARIOUS<br />
PULSE<br />
ADCLK<br />
D+,D-,VBUS<br />
USB<br />
OUT<br />
AA LR6<br />
O.LPF<br />
HA-CCD<br />
1/1.7 inch<br />
3.3MEGA Pix<br />
OFD/RG<br />
BIAS<br />
IC800<br />
ANALOG<br />
BLOCK<br />
TG<br />
(PROGRAMABLE)<br />
IBUF<br />
CCD I/F<br />
AUTO<br />
TFDC<br />
BITMAP CG<br />
YC I/F<br />
YC PRO<br />
MADIA<br />
STROBO<br />
(POP UP)<br />
POP SW<br />
DETECTION<br />
BATT<br />
Back-up<br />
D/A (4ch)<br />
[MODE]<br />
OFF/CAM/PB<br />
S1/S2<br />
+/-<br />
STROBO<br />
CONTINUOUS<br />
MODE<br />
DIAL<br />
[KEY]<br />
DISP<br />
EVF/LCD<br />
P in P<br />
BACK<br />
MENU/OK<br />
L/R/U/D<br />
DR SW<br />
TELE/WIDE<br />
AE-L<br />
[SIDE KEY]<br />
MACRO<br />
CUSTOM<br />
INFO<br />
AF/MF<br />
OPAF<br />
RESET<br />
PWCTL<br />
PWR_ON IC IC302<br />
PWR CTL<br />
BLOCK<br />
PIO<br />
BLOCK<br />
LPF<br />
BATT<br />
Vol<br />
SP_AMP SPEAKER<br />
VDET<br />
VDET<br />
MIC_AMP<br />
DC IN FUSE<br />
SO1,SI1,SCL1<br />
DC Jack<br />
DCST PWB ASSY<br />
MIC<br />
AUDIO BLOCK IC500<br />
IMAGE BUS 32bit/75MHz<br />
JPEG<br />
CPU CORE<br />
USB<br />
SIO<br />
WDT<br />
MFT<br />
ICU<br />
ADC<br />
PORT<br />
CLKC<br />
ENCD<br />
CPU BUS 32bit/75MHz<br />
MICON I/O BUS 32bit/75MHz<br />
MICON CORE<br />
SDI<br />
I-cache 8KB<br />
SDRAM 32KB<br />
BUS CONTROL<br />
A/D<br />
I/O BUFFER<br />
IMAGE BUS I/F<br />
12<br />
UCS1 IC210 (CSP)<br />
AF<br />
SENSOR<br />
LPF<br />
75 ohm<br />
Drv.<br />
R/G/B<br />
VBS<br />
LED R LED G<br />
X'TAL<br />
24.5MHz<br />
X'TAL<br />
48MHz<br />
A/D<br />
(12bit)<br />
EVF-CONT<br />
IC405<br />
LCD-CONT<br />
IC404<br />
EVF_BL<br />
EVF<br />
Monitor<br />
LCD<br />
Monitor<br />
LED_BL<br />
SSFDC<br />
CF(MD)<br />
SOCKET<br />
STROBO BLOCK<br />
STROBO<br />
SENSOR<br />
STROBO IC<br />
STROBO-C<br />
DATA/TIME<br />
IC306<br />
AUDIO<br />
(SERIAL)<br />
AUDIO<br />
(A/D)<br />
DC/DC BLOCK<br />
CONTROL IC<br />
IC902<br />
EVR (4ch)<br />
EVR D/A<br />
8ch<br />
IC217<br />
EVR D/A<br />
8ch<br />
IC503<br />
SDRAM<br />
IC218,219<br />
(256Mb)<br />
(x32)<br />
AMP<br />
SDRAM<br />
IC211<br />
(64Mb)<br />
(x32)<br />
FLASH ROM<br />
IC216<br />
(16Mb)<br />
(EEPROM)<br />
AV_DET<br />
AUDIO<br />
VIDEO<br />
OUT<br />
BRIDGE BUS 32bit/75MHz<br />
LENS CONST CAM PWB ASSY MAIN PWB ASSY<br />
LENS<br />
x6 <strong>ZOOM</strong><br />
CCD_IN<br />
CCD CLK<br />
24.5MHz<br />
AVD,AHD,<br />
ADCK,FI<br />
29
3. Schematic<br />
<strong>FinePix</strong> <strong>S602</strong> <strong>ZOOM</strong> SERVICE MANUAL<br />
LENS CONST<br />
CCD FPC<br />
B<br />
to<br />
B<br />
CN100<br />
CAM PWB ASSY<br />
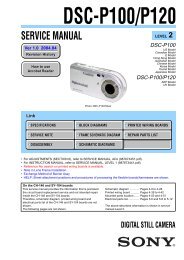
3-5. Overall<br />
CF<br />
CONNECTOR<br />
MAIN PWB ASSY<br />
CN207<br />
SSFDC<br />
CONNECTOR<br />
CN206<br />
USB JACK<br />
AV JACK<br />
SPEAKER CN501<br />
MIC CN500<br />
LENS UNIT MAIN FPC<br />
CN600<br />
CN101<br />
FPC<br />
B<br />
to<br />
B<br />
CN201<br />
CN204<br />
CN203<br />
AF<br />
SENSOR<br />
UNIT<br />
FPC FPC<br />
CN401 CN400 CN800<br />
CN202<br />
B<br />
to<br />
B<br />
F<br />
P<br />
C<br />
F<br />
P<br />
C<br />
CN904<br />
LCD<br />
Monitor<br />
LCD_BL<br />
EVF_BL<br />
EVF<br />
Monitor<br />
FFC<br />
SIDE<br />
MODULE<br />
UNIT<br />
DCST PWB ASSY<br />
CN900<br />
DC JACK<br />
CN1000<br />
CN1001<br />
CN902<br />
CN903<br />
CN901<br />
KEY PWB ASSY<br />
CN1202<br />
CN1201<br />
CN1200<br />
F<br />
P<br />
C<br />
F<br />
P<br />
C<br />
BATTERY<br />
HOLDER<br />
Xe<br />
TRIGER<br />
CDS<br />
HOT SHOE<br />
C DIAL<br />
UNIT<br />
MODE<br />
DIAL<br />
UNIT<br />
30
<strong>FinePix</strong> <strong>S602</strong> <strong>ZOOM</strong> SERVICE MANUAL<br />
4. Adjustment<br />
4. Adjustment<br />
4-1.Adjustments to Primary Components Following Replacement<br />
The adjustments indicated by 'Number' below are required to follow when the component bellow is<br />
replaced.<br />
AF sensor CCD data input Photography Zoom AF Flash Battery Mode dial Final setup<br />
LENS CONST 1 2*1 3 4 5 6 7 8*3<br />
CAM PWB ASSY 1 2 3 4 5*3<br />
MAIN PWB ASSY 1 2*2 3 4 5 6 7 8*3<br />
DCST PWB ASSY 1 2 3 4 5*3<br />
KEY PWB ASSY 1 2*3<br />
AF sensor 1 2*3<br />
Flash unit 1 2 3*3<br />
Mode dial 1 2 3*3<br />
Disassembly<br />
and assembly*4<br />
1 2*3<br />
*1 : Use the CCD data floppy disk supplied with the lens assembly.<br />
*2 : A new MAIN PWB assembly does not contain CCD data. When replacing the MAIN PWB assembly,<br />
remove the FLASH_ROM (IC212) from the defective board and fit it to the MAIN PWB assembly, or<br />
create a CCD data floppy disk.<br />
CCD damage data and adjustment data are written to the FLASH_ROM (IC212).<br />
*3 : The camera will remain in the Jig mode unless the final settings are entered. Always enter the final<br />
settings after adjustment is complete.<br />
*4 : Irrespective of whether or not components have been replaced, if the two screws (M1.7 x 5.5)<br />
holding the AF sensor in place are removed, the AF sensor will be displaced horizontally and<br />
vertically in relation to the lens, and AF Sensor Adjustment is therefore always required. The<br />
screws are located as shown below.<br />
39
4. Adjustment <strong>FinePix</strong> <strong>S602</strong> <strong>ZOOM</strong> SERVICE MANUAL<br />
4-2.Preparation for adjustments<br />
4-2-1.Measuring Equipments<br />
Names<br />
Stabilized Power Supply<br />
Pattern Box<br />
Waveform Monitor<br />
Vecrot Monitor<br />
Digital Voltmeter<br />
Personal Computer<br />
TV Monitor<br />
Brightness meter<br />
Color meter<br />
Flash meter<br />
Remarks<br />
General adjustment<br />
Comparable to the PTB450 or equivalent<br />
For inspecions<br />
For inspecions<br />
General adjustment<br />
DOS-V (PC-AT) / OS:Windows98,98SE<br />
TV monitor 600 resolutions (14-21inch)<br />
LS-110 (Made by Minolta) or equivalent<br />
COLOR METER 3F (Made by Minolta) or equivalent<br />
AUTO MATER 4F (Made by Minolta) or equivalent<br />
4-2-2.Jigs and Charts<br />
Product / Model Parts No. Usage Remarks<br />
Filter LB140 (HOYA) ZJ00006-100 CAM Common with DX--9,DX-7,DS-7<br />
Gray Chart ZJ00254-100 Flash Common with MX-700<br />
Siemens Star Chart J-6080-875-A AF Common with 8mm VTR (Note 1)<br />
f=600mm Conversion Lens ZJ00007-100 AF Common with 8mm VTR (Note 2)<br />
Lens Holder ZJ00008-100 AF Common with 8mm VTR (Note 2)<br />
Lens Stand ZJ00009-100 AF Common with 8mm VTR (Note 2)<br />
Lens Base Plate ZJ00010-100 AF Common with 8mm VTR (Note 2)<br />
f=900mm Conversion Lens ZJ00287-100 AF Sensor Common with 8mm VTR (Note 2)<br />
AF Sensor Adjustment Chart (700mm) ZJ00542-100 AF Sensor Chart only for 700mm adjustment<br />
AF Sensor Adjustment Chart (1000mm) ZJ00543-100 AF Sensor Chart only for 1000mm adjustment<br />
DSC jig driver ZJ00476-100 General Common with <strong>FinePix</strong>4900 (Note3)<br />
<strong>FinePix</strong> <strong>S602</strong><strong>ZOOM</strong> ZJ00544-100 General Custom software (Note3)<br />
PC adjustment software<br />
Only operate at Win98,98SE<br />
CCD Defect Data ZJ00535-100 CCD Common with <strong>FinePix</strong> F601 (Note3)<br />
Power Cable Jig ZJ00213-100 General Common with DX-5<br />
AC Adaptor (AC-5V) ----------------- General Accessories<br />
USB Cable ----------------- General Accessories<br />
CD-ROM ----------------- General Accessories<br />
Note 1 : Please do the expansion copy to the A3 size and use the Siemens Star Chart.<br />
Note 2 : This is a holder set for holding the conversion lens. For details, see the figure below.<br />
Note 3 : Please download them from the web server (http://fujifilm-di.intranets.com/).<br />
40
<strong>FinePix</strong> <strong>S602</strong> <strong>ZOOM</strong> SERVICE MANUAL<br />
4. Adjustment<br />
Conversion lens complete set<br />
Lens Holder<br />
Lens Stand<br />
Lens Base Plate<br />
Attention when conversion lens is used.<br />
Convex side : Subject side.<br />
Plane : Camera lens side.<br />
4-2-3.Connection<br />
USB Cable<br />
PC<br />
Video Cable<br />
<strong>FinePix</strong> <strong>S602</strong>Zoom<br />
TV Monitor<br />
Power Cable Jig<br />
Connection<br />
Stabilized Power Supply<br />
41
4. Adjustment <strong>FinePix</strong> <strong>S602</strong> <strong>ZOOM</strong> SERVICE MANUAL<br />
4-2-4.Environmental Settings for Adjustment<br />
1. Remove the chart from the pattern box, and adjust the color temperature and luminance of the light source.<br />
Firmly attach the LB140 filter to the surface of the pattern box.<br />
Adjust color temperature with the color temperature meter touching the LB140 filter.<br />
Color temperature : 6100+/-50°K (with LB140 filter fitted)<br />
Center of pattern box without chart<br />
30+-5mm<br />
Minolta 3F digital color meter<br />
2. Adjust luminance with the luminance meter touching the LB140 filter.<br />
Luminance : 160+/-5cd/m2 (with LB140 filter fitted)<br />
LB140 FILTER<br />
Center of pattern box without chart<br />
PATTERN<br />
Minolta LS-110 luminance meter<br />
BOX<br />
3. Arrange the camera and pattern box as shown in the diagram.<br />
Distance between pattern box and camera : 30+/-5mm<br />
<strong>FinePix</strong> <strong>S602</strong><br />
4-2-5.Preparations for AF Sensor Adjustment<br />
1. Prepare as follows using non-defective equipment.<br />
2. Mount the camera on a tripod, and place the AF sensor chart (for 1000mm) at a distance of 1000mm from the<br />
front face of the AF sensor window.<br />
3. Set the camera power lever to the Photography mode, and display the through screen on the TV monitor.<br />
4. Set the lens position to TELE END while holding the camera zoom button [T] down.<br />
5. Adjust the camera position so that the AF target symbol (yellow) displayed on the TV monitor overlaps the '+'<br />
symbol (red) near the center of the AF sensor chart (for 1000mm).<br />
6. Attach an OHP sheet to the TV monitor.<br />
7. Place a mark in the center of the target mark displayed on the TV monitor.<br />
8. Draw a circle on the OHP sheet with the marked point as the center.<br />
The size of the circle will differ from the TV monitor used. The circle sizes for the various TV monitors are as follows.<br />
14" to 16" : 5mm radius<br />
17" to 19" : 6mm radius<br />
20" to 21" : 7mm radius<br />
9. This completes preparations for AF Sensor Adjustment.<br />
4-2-6.Environmental Settings for AF Sensor Adjustment<br />
1. Set up the conversion lens (f=900 mm) and the two types of AF sensor chart as shown below.<br />
2. Illuminate the AF sensor chart (1000mm) using one or two light sources. Adjustment is impossible if the<br />
illumination does not match.<br />
The distance between the light sources and the AF sensor chart must be approximately 5cm.<br />
AF sensor chart reflective luminance : 8.0Ev to 9.0Ev<br />
3. Place the conversion lens concentric with the front face of the AF sensor window.<br />
4. If the center of the conversion lens and the center of the AF sensor window are significantly misaligned, an<br />
error will occur during AF Sensor Adjustment, and adjustment will become impossible.<br />
Front face of AF<br />
sensor AF<br />
window<br />
100mm+-5mm<br />
Light source<br />
(fluorescent () lamp)<br />
Top <br />
+<br />
<strong>FinePix</strong> <strong>S602</strong><br />
Bottom <br />
Adjustment PC<br />
<br />
f=900mm<br />
<br />
f=900mm conversion lens<br />
AF(1000mm)<br />
sensor chart Position f=900mm<br />
of conversion lens<br />
<br />
Light source<br />
()<br />
(fluorescent lamp)<br />
700mm:1000mm+-5mm<br />
adjustment: 1000mm+/-5mm<br />
AF<br />
chart<br />
(700mm)<br />
TV monitor<br />
TV<br />
1000mm:1000mm+-5mm<br />
adjustment: 1000mm+/-5mm<br />
42
<strong>FinePix</strong> <strong>S602</strong> <strong>ZOOM</strong> SERVICE MANUAL<br />
4. Adjustment<br />
4-2-7.Environmental settings for AF adjustment<br />
1. It sets it by using the f=600mm conversion lens and siemens star chart as shown below.<br />
2. It illuminate on the siemens star chart by using the 2 light source. When the illuminance is insufficient, it<br />
is not possible to adjust it by "Brightness shortage". It is necessary to adjust the source of light and the<br />
distance of siemens star chart to about 5cm.<br />
*The siemens star chart reflection brightness: 8.0-10.0Ev<br />
3. Please set the lens position of the camera on the concentric circle about conversion lens.<br />
4. It becomes "Pnmod error" while AF adjusting if the center of conversion lens and the center of the camera<br />
lens come off largely and it is set and it cannot AF adjustment.<br />
40mm+-5mm<br />
Light(Fluorescent lamp stand)<br />
PC<br />
<strong>FinePix</strong> <strong>S602</strong><br />
Siemens<br />
star chart<br />
INF Adjustment: :640mm+-5mm<br />
(with f=600mm conversion lens)<br />
900mm Adjustment :940mm+-5mm<br />
500mm Adjustment :540mm+-5mm<br />
100mm Adjustment :140mm+-5mm<br />
TV Monitor<br />
4-2-8.Environmental settings for Flash adjustment<br />
1. When adjusting the flash, it is easy to be influenced by external light, so be sure to perform the adjustment<br />
in an environment that satisfies the following conditions.<br />
2. In order to eliminate the influence of external light, make the area around the gray chart as dark as possible.<br />
3. The distance between the gray chart used during the flash adjustment and the camera should be 100cm.<br />
Surface of flash<br />
1000mm<br />
<strong>FinePix</strong> <strong>S602</strong>Zoom<br />
Gray chart<br />
43
4. Adjustment <strong>FinePix</strong> <strong>S602</strong> <strong>ZOOM</strong> SERVICE MANUAL<br />
4-3.About the Adjustment PC Soft<br />
4-3-1.Attention at DSC jig driver<br />
<strong>FinePix</strong> <strong>S602</strong>Zoom uses the USB cable to communicate with the personal computer.<br />
When <strong>FinePix</strong> <strong>S602</strong>Zoom adjusted, the installation of the DSC jig driver is necessary.<br />
The download, decompression and installation procedure is recorded as follows.<br />
[Download and decompression]<br />
1) Download the compressed DSC jig driver from Web server (http://fujifilm-di.intranets.com/).<br />
2) Defrost the downloaded compression file.<br />
(Note)<br />
The DSC jig driver in this server is compression file of ZIP form.<br />
Therefore, after downloading this compression file from the Web server, the decompression of the file is necessary.<br />
In the decompression software, if the decompression of the ZIP form can be done, any software is OK.<br />
Please prepare each one for the decompression software.<br />
[Installation]<br />
1) The unzipped DSC jig driver (ZJ00476-100) folder is opened.<br />
2) Please double-click the "Setup.exe", start the installation of "FUJI FILM DSC jig driver".<br />
3) "FUJI FILM DSC jig driver" is installed according to the instruction of the screen .<br />
Note: If the FUJI FILM digital camera (example <strong>FinePix</strong>4900zoom) has already been repaired, the installation of<br />
the DSC jig driver is not necessary.<br />
click<br />
check a install folder<br />
click<br />
1st step (start the installation)<br />
2nd step (install folder)<br />
click<br />
click<br />
3rd step (install)<br />
4th step (Finish)<br />
44
<strong>FinePix</strong> <strong>S602</strong> <strong>ZOOM</strong> SERVICE MANUAL<br />
4. Adjustment<br />
4-3-2.Attention at PC adjustment soft<br />
This adjustment software can perform adjustments to each block using the user program (Fx<strong>S602</strong>Z.ff) in the base<br />
program (FFW.exe). A basic program is <strong>FinePix</strong> <strong>S602</strong>Zoom exclusive use.<br />
The download, decompression and installation procedure is recorded as follows.<br />
[Download and decompression]<br />
1) Download the compressed PC adjustment software from Web server (http://fujifilm-di.intranets.com/).<br />
2) Defrost the downloaded compression file.<br />
(Note)<br />
The PC adjustment software in this server is compression file of ZIP form.<br />
Therefore, after downloading this compression file from the Web server, the decompression of the file is necessary.<br />
In the decompression software, if the decompression of the ZIP form can be done, any software is OK.<br />
Please prepare each one for the decompression software.<br />
The decompression and the preservation method of the PC adjustment software are described as an example of<br />
<strong>FinePix</strong>2300.<br />
As the PC adjustment software is different in each model, the compression file name is also different.<br />
Specify the preservation drive for C drive if it is decompression software which can specify the preservation drive.<br />
Similarly, defrost without making a new folder if it is decompression software that can be defrosted without making<br />
a new folder.<br />
Defrost simply if the decompression software which you cannot specify the drive specification and the folder<br />
making.<br />
[Install]<br />
1) When the decompression is only done, the folder named ZJ00481-100 is automatically made. <br />
2) Copy the folder named <strong>FinePix</strong>2300UE in this folder in C drive, installation is finished. <br />
The folder of ZJ00481-100 becomes unnecessary at the end , and delete this folder.<br />
My Computer<br />
3 1 / 2<br />
Floppy [A:]<br />
[C:]<br />
ZJ00481_100<br />
<strong>FinePix</strong>2300U E<br />
My Computer<br />
3 1 / 2<br />
Floppy [A:]<br />
[C:]<br />
ZJ00481_100<br />
<strong>FinePix</strong>2300U E<br />
1st step (Decompression)<br />
2nd step (Finish)<br />
(Caution)[Important]<br />
*: PC adjustment software can not start when there is folder of <strong>FinePix</strong>2300UE in folder<br />
named ZJ00481-100 (Fig.3-5).<br />
*: Please preserve the folder of <strong>FinePix</strong>2300UE right under C drive (Fig.3-6).<br />
*: Please do not change the folder named <strong>FinePix</strong>2300UE.<br />
*: PC adjustment software can not start when folder name is changed.<br />
45
4. Adjustment <strong>FinePix</strong> <strong>S602</strong> <strong>ZOOM</strong> SERVICE MANUAL<br />
4-3-3.Attention at Firmware<br />
The firmware is not needing downloaded as long as there is usually no instruction.<br />
[Download and decompression]<br />
1) Download the compressed firmware from Web server (http://fujifilm-di.intranets.com/).<br />
2) Defrost the downloaded compression software.<br />
3) The folder named ZJ00482-100 *1 can be made by simply defrosting .<br />
4) The imfidx10 folder is included in the folder (ZJ00482-100).<br />
5) The imfidx10 folder is copied onto Smart Media (more than 4MB, 3.3V).<br />
(Note)<br />
*1: The decompression and the preservation method of the firmware are described as an example of <strong>FinePix</strong>2300.<br />
Firmware in this server is compression file of ZIP form.<br />
Therefore, after downloading this compression file from the Web server, the decompression of the file is necessary.<br />
In the decompression software, if the decompression of the ZIP form can be done, any software is OK.<br />
Please prepare each one for the decompression software<br />
As the Firmware is different in each model, the compression file name is also different.<br />
My Computer<br />
3 1 / 2<br />
Floppy [A:]<br />
[C:]<br />
ZJ00482_100<br />
imfidx10<br />
5)<br />
<br />
(Caution)[Important]<br />
*: Download should use Smart Media.<br />
*: Please format Smart Media with the camera.<br />
*: When the folder named imfidx10 is changed, the firmware cannot be downloaded.<br />
46
<strong>FinePix</strong> <strong>S602</strong> <strong>ZOOM</strong> SERVICE MANUAL<br />
4. Adjustment<br />
4-3-4.Content of Adjustment Software<br />
This adjustment software uses the basic program (FFW.exe), together with a number of specialized user<br />
programs, for Adjustment.<br />
Fx<strong>S602</strong>Z.ff has the following nine components.<br />
[F1] : Battery voltage adjustment<br />
[F2] : Mode dial voltage adjustment<br />
[F4] : CCD data input<br />
[F5] : CAM adjustment<br />
[F6] : Zoom/AF adjustment<br />
[F7] : Flash adjustment<br />
[F11] : AF sensor adjustment<br />
[F12] : End setting<br />
4-3-5.Starting the Adjustment Software<br />
1) Double-click on ‘FFW.exe’ in the ‘<strong>FinePix</strong> <strong>S602</strong>’ folder previously copied to the C drive.<br />
2) The ‘FFW.exe(0)’ dialog box appears on the screen .<br />
3) See the next page for details of customizing adjustment software.<br />
Fx<strong>S602</strong>J.ff<br />
FFW.exe(0) Screen<br />
47
4. Adjustment <strong>FinePix</strong> <strong>S602</strong> <strong>ZOOM</strong> SERVICE MANUAL<br />
4-3-6.Customizing of Adjustment Software<br />
Customizing for the adjustment software is<br />
explained below.<br />
1.Compiles<br />
Procedure <br />
1) Click on Mode Setting from the basic software<br />
program’s menu bar. The “Customize” dialog box<br />
will be displayed.<br />
2) From the “Customize” dialog box, select “Compile.”<br />
3) Click the Select User Program button, then select<br />
the file ‘Fx<strong>S602</strong>Z.ff’.<br />
4) Click the Select Editor button, then select<br />
‘Write.exe.’<br />
c:\finepix_s602zoom\fx<strong>S602</strong>z.ff<br />
Fx<strong>S602</strong>Z.ff<br />
<strong>FinePix</strong>_<strong>S602</strong>Zoom<br />
3)<br />
4)<br />
2.EVR<br />
Procedure <br />
1) Select “EVR” from the “Customize” dialog box.<br />
2) Conditions<br />
Compile<br />
2)<br />
etc(-V2)<br />
LANC page check<br />
Check<br />
Check<br />
EVR<br />
3.Hardware<br />
Procedure <br />
1) Select “Hardware” from the “Customize” dialog box.<br />
2) Conditions<br />
2)<br />
Etc 7 Segment (-7)<br />
Debug Mode<br />
Ignore Focus I/O<br />
Hardware<br />
48
<strong>FinePix</strong> <strong>S602</strong> <strong>ZOOM</strong> SERVICE MANUAL<br />
4. Adjustment<br />
4.Other<br />
Procedure <br />
1) Select “Other” from the “Customize” dialog box.<br />
2) Select the “Other Conditions” setting.<br />
3) Conditions<br />
2)<br />
Auto measurement count 0<br />
Don't show OK/NG Check<br />
Other<br />
5.Save<br />
Procedure <br />
*: If all the settings have been completed, be sure to click on the “Apply” button and save the settings.<br />
*<br />
Save<br />
Cautions when making adjustments<br />
*: When all customizing ends, "FFW.exe" is ended once. Please restart "FFW.exe".<br />
*: After adjustments are completed, turn the camera’s power switch Off and finish with the<br />
adjustments.<br />
*: If the “NG” message appears and you stop the program during the PC adjustments, turn<br />
the camera’s power switch OFF one time, then carry out the adjustment again.<br />
49
4. Adjustment <strong>FinePix</strong> <strong>S602</strong> <strong>ZOOM</strong> SERVICE MANUAL<br />
4-3-7.Use of each command<br />
An explanation and the use of each command when it changes the user's program.<br />
Fx<strong>S602</strong>Z.ff<br />
Menu Command Content<br />
Operation Start General operation command (starts the user program).<br />
Stop<br />
General operation command (ends the user program).<br />
Halt<br />
General operation command (Halts the user program temporarily).<br />
Step 0<br />
General operation command (Execute step0 of the user program).<br />
Exit<br />
General operation command (Closes the user program).<br />
Program Re load Reloads the user program (*.ff).<br />
(Be sure to reload the user program after editing.)<br />
Select<br />
Selects the user program (*.ff).<br />
(Selects ‘sj8.ff’ when selecting the user program.)<br />
Edit<br />
Edits the user program (*.ff).<br />
(Use this when it is necessary to edit the user program.)<br />
Data ad[] Do not use this command.<br />
rd[]<br />
Do not use this command.<br />
SW<br />
Do not use this command.<br />
fsw<br />
Do not use this command.<br />
EVR<br />
Do not use this command.<br />
Mode File Recording Do not use this command.<br />
NGSTOP<br />
Stops the program if an adjustment is NG.<br />
STEP<br />
Do not use this command.<br />
LINE<br />
Do not use this command.<br />
AUTO<br />
Do not use this command.<br />
Setting OKNG clearr Do not use this command.<br />
Customize Performs setting of each mode.<br />
Auto Adjustment Performs ‘Auto Adjust’ settings in the user program.<br />
Help Help This command cannot be used.<br />
Help (FF) This command cannot be used.<br />
FOCAS<br />
This command cannot be used.<br />
Version<br />
Version information on the basic software.<br />
It is possible to edit the user program, but it is possible that trouble could occur after changes are<br />
made. So, please do not edit program unless instructed to do so.<br />
50
<strong>FinePix</strong> <strong>S602</strong> <strong>ZOOM</strong> SERVICE MANUAL<br />
4. Adjustment<br />
4-4.Adjustment of Components (for PC adjustment)<br />
4-4-1.Starting the Adjustment Software (cautions during use)<br />
Procedure<br />
1) When the initial setup for the adjustment software (see 4-3-6.) is complete, terminate [FFW.exe] and start it again.<br />
2) appears on the screen.<br />
3) Press the [Enter] key on the PC and set the camera in the jig mode in accordance with the instructions on the screen.<br />
Fx<strong>S602</strong>Z.ff<br />
<strong>FinePix</strong> <strong>S602</strong> Zoom PC adjustment software<br />
<br />
1) The content of the adjustment is different<br />
because of replaced parts.<br />
2) Refer to the service manual for the adjustment done<br />
after parts are replaced.<br />
3) Use [Power supply cable jig] at all the adjustments.<br />
4) Execute the end setting when using this adjustment software.<br />
5) Notes have been described to the service manual besides the<br />
above-mentioned, and advance the adjustment after it refers.<br />
Advance to the jig mode setting screen<br />
when you press [Enter] key of PC.<br />
Program Start-up Screen<br />
4-4-2.Camera Jig Mode Procedure<br />
Procedure<br />
1) Set the mode dial to the [SET-UP] mode.<br />
2) Open the card cover.<br />
3) Connect the camera to the PC using the USB cable.<br />
4) Connect the power supply cable jig to the camera to supply 5.00+/-0.01V.<br />
5) While pressing the shutter button, set the power switch to [Photography] mode.<br />
6) The camera is in the Jig mode if the LED beside the card cover is green.<br />
Fx<strong>S602</strong>Z.ff<br />
<strong>FinePix</strong> <strong>S602</strong> Zoom PC adjustment software<br />
1) Set the mode dial to the [SET-UP] mode.<br />
2) Open the card cover.<br />
3) Connect the camera to the PC using the USB cable.<br />
4) Connect the power supply cable jig to the camera<br />
to supply 5.00V+/-0.01V.<br />
5) While pressing the shutter button,<br />
set the power switch to [Photography] mode.<br />
6) The camera is in the Jig mode<br />
if the LED beside the card cover is green.<br />
Press [Enter] key of PC when the procedure of 1-6 is completed.<br />
Camera Jig Mode Setup Procedure Screen<br />
*1 : The PC is not recognized as a removable disk when connected with the camera in the Jig mode.<br />
*2 : If NG occurs during camera adjustment and the software is terminated, remove all cables and commence<br />
adjustment again.<br />
*3 : Select [Final Setting] in the adjustment software to terminate the camera Jig mode.<br />
51
4. Adjustment <strong>FinePix</strong> <strong>S602</strong> <strong>ZOOM</strong> SERVICE MANUAL<br />
4-4-3.AF Sensor Adjustment<br />
Cautions During Adjustment<br />
Irrespective of whether or not components have been replaced, the AF sensor must be adjusted if the two<br />
screws (M1.7 x 5.5) holding the AF sensor in place are removed.<br />
As the accuracy of AF distance measurement with the AF sensor unit changes with temperature, this adjustment<br />
should be performed immediately after the camera power supply is switched ON.<br />
Errors will occur, and adjustment will become impossible, if adjustment is performed after the internal<br />
temperature of the camera has increased to 35°C or more.<br />
If an adjustment error is displayed when the 900mm conversion lens is used, switch camera power OFF,<br />
wait, and perform the adjustment again.<br />
Purpose : Mechanical adjustment in the horizontal and vertical directions of the AF sensor (passive) in relation to<br />
the optical axis of the lens assembly.<br />
Procedure<br />
1) Make the necessary preparations and environmental setup for AF Sensor Adjustment.<br />
See 4-2-5. Preparations for AF Sensor Adjustment and 4-2-6. Environmental Settings for AF Sensor Adjustment.<br />
2) Press the PC [F11] key in the Adjustment Items Select Screen to select AF Sensor Adjustment.<br />
3) Pop-up the flash and remove the AF plate.<br />
4) Make the adjustment preparations (1) in accordance with the instructions from the adjustment software.<br />
1000mm chart setup distance : 1000mm+/-5mm from front face of AF sensor window.<br />
Chart surface reflective luminance : 8.0Ev to 9.0Ev<br />
5) When preparations are complete, press the [Enter] key on the PC to measure the surface reflective luminance<br />
of the chart.<br />
6) When the surface reflective luminance of the chart has been measured, make the adjustment preparations<br />
(2) in accordance with the instructions from the adjustment software.<br />
Adjust the screen angle so that the '+' symbol (red) displayed on the TV monitor is within the circle.<br />
7) When preparations are complete, press the [Enter] key on the PC to begin AF Sensor Adjustment (1000mm).<br />
8) Adjust the AF sensor by turning the AF Sensor Adjustment screw (silver colored) with a + screwdriver in<br />
accordance with the instructions from the adjustment software.<br />
Turn the adjustment screw while viewing the WAVE No.0 dialog box to increase the speed of adjustment.<br />
Fx<strong>S602</strong>Z.ff<br />
Fx<strong>S602</strong>Z.ff<br />
<strong>FinePix</strong> <strong>S602</strong> Zoom PC adjustment software<br />
AF sensor adjustment<br />
<br />
[F1] : Battery voltage adjustment<br />
[F2] : Mode dial voltage adjustment<br />
[F4] : CCD data input<br />
[F5] : CAM adjustment<br />
[F6] : Zoom / AF adjustment<br />
[F7] : Flash adjustment<br />
[F11] : AF sensor adjustment<br />
[F12] : End setting<br />
<br />
Complete the preparation for the AF sensor adjustment.<br />
* Refer to the service manual for details.<br />
Pop-up the flash.<br />
Remove AF PLATE.<br />
* Refer to the service manual for remove.[F7] : Flash adjustment<br />
Press the [Enter] key when it is possible to prepare.<br />
Adjustment Items Select Menu Screen<br />
AF Sensor Adjustment Preparation (1) Screen<br />
Fx<strong>S602</strong>Z.ff<br />
AF sensor adjustment<br />
<br />
Prepare the AF sensor chart for 1000mm.<br />
* Note it in the top and bottom of the AF sensor chart.<br />
* The distance is 1000mm+/-5mm from the AF sensor window.<br />
Turn on the fluorescent lamp,<br />
and measure the reflection brightness of the AF sensor chart.<br />
* Reflection brightness : 8.0-9.0Ev<br />
Press the [Enter] key when it is possible to prepare.<br />
Top<br />
+<br />
Bottom<br />
+ symbol<br />
AF Sensor Adjustment Preparation (2) Screen<br />
52<br />
AF Adjustment Chart (1000mm)
<strong>FinePix</strong> <strong>S602</strong> <strong>ZOOM</strong> SERVICE MANUAL<br />
4. Adjustment<br />
9) When [Adjustment OK!] appears on the screen, press the [Enter] key on the PC and make adjustment preparations<br />
(900 mm) in accordance with the instructions from the adjustment software.<br />
900mm conversion lens setup distance : 100mm+/-5mm from front face of AF sensor window.<br />
Chart surface reflective luminance : 6.0Ev to 8.0Ev<br />
10) When preparations are complete, press the [Enter] key on the PC to perform AF sensor operation adjustment.<br />
If an adjustment error is displayed, switch camera power OFF, wait, and perform the adjustment again.<br />
11) When AF sensor operation adjustment is complete, press the [Enter] key on the PC and adjust the AF sensor<br />
left-right difference in accordance with the instructions from the adjustment software.<br />
700mm chart setup distance : 700mm+/-5mm from front face of AF sensor window.<br />
Chart surface reflective luminance : 8.0Ev to 9.0Ev<br />
12) When preparations are complete, press the [Enter] key on the PC and commence sensor left-right difference adjustment.<br />
13) When sensor left-right difference adjustment is complete, terminate AF Sensor Adjustment. Press the [Enter]<br />
key on the PC to return to the Adjustment Items Select Screen.<br />
Fx<strong>S602</strong>Z.ff<br />
AF sensor adjustment<br />
AF sensor<br />
AF<br />
adjustment screw<br />
Turn and adjust the AF sensor adjustment screw (silver).<br />
Press [Q] key when it is not possible to adjust it.<br />
+<br />
Turn the adjustment screw clockwise.<br />
AF Sensor Adjustment Screen<br />
Position of AF Sensor Adjustment Screw<br />
Fx<strong>S602</strong>Z.ff<br />
AF sensor operation adjustment<br />
<br />
Set the f=900mm conversion lens<br />
on a center line in the AF sensor.<br />
* The distance is 100mm+-5mm from the AF sensor.<br />
Press the [Enter] key when it is possible to prepare.<br />
WAVE No.0 Dialog Box OK Screen<br />
Adjustment Preparation (900mm) Screen<br />
Fx<strong>S602</strong>Z.ff<br />
Fx<strong>S602</strong>Z.ff<br />
AF sensor left-right diffarence adjustment<br />
<br />
Remove 900mm conversion lens.<br />
Prepare the AF sensor chart for 700mm.<br />
* The distance is 700mm+-5mm from the AF sensor.<br />
Measure the reflection brightness of the AF sensor chart.<br />
* Reflection brightness : 8.0-9.0Ev<br />
Press the [Enter] key when it is possible to prepare.<br />
AF sensor adjustment complete.<br />
Press the [Enter] key, return to the menu screen.<br />
AF Sensor Left-Right Difference Adjustment Preparations Screen<br />
AF Sensor Adjustment complete Screen<br />
53
4. Adjustment <strong>FinePix</strong> <strong>S602</strong> <strong>ZOOM</strong> SERVICE MANUAL<br />
4-4-4.CCD Data Input<br />
Purpose<br />
CCD damage compensation (discreet white defects/discreet black defects/continuous white defects/continuous<br />
black defects).<br />
Procedure<br />
1) This adjustment writes the CCD data based on the data on the [Damage Data FD] supplied with the LENS CONST.<br />
2) Press the PC [F4] key in the Adjustment Items Select Screen to select CCD data input.<br />
3) Enter the eight-digit number on the label of the [Damage Data FD] supplied with the LENS CONST in the<br />
[CCD Data Input Dialog Box].<br />
4) When the eight-digit number has been entered, insert the [Damage Data FD] in the floppy disk drive.<br />
5) When preparations are complete, click on the [OK] button in the [CCD data input dialog box] to enter the CCD<br />
data.<br />
6) When the CCD data has been entered correctly, press the [Enter] key on the PC to return to the Adjustment<br />
Items Select Screen.<br />
Fx<strong>S602</strong>Z.ff<br />
Fx<strong>S602</strong>Z.ff<br />
<strong>FinePix</strong> <strong>S602</strong> Zoom PC adjustment software<br />
<br />
[F1] : Battery voltage adjustment<br />
[F2] : Mode dial voltage adjustment<br />
[F4] : CCD data input<br />
[F5] : CAM adjustment<br />
[F6] : Zoom / AF adjustment<br />
[F7] : Flash adjustment<br />
[F11] : AF sensor adjustment<br />
[F12] : End setting<br />
CCD data input<br />
<br />
1) Input the number of 8 digits of CCD defect data (FD)<br />
attached to LENS CONST to CCD data input dialog box.<br />
2) Insert CCD defect data (FD) in the FD drive of PC.<br />
3) Click the OK button of CCD data input dialog box<br />
when the preparation is completed.<br />
Adjustment Items Select Menu Screen<br />
CCD Data Input Start Screen<br />
CCD Data Input Dialog Box Screen<br />
Fx<strong>S602</strong>Z.ff<br />
Fx<strong>S602</strong>Z.ff<br />
All pixels defect data processing.<br />
Defect data processing of thinning out 1 mode.<br />
CCD data input complete.<br />
Press the [Enter] key, return to the menu screen.<br />
CCD Data Input Screen<br />
CCD Data Input complete Screen<br />
54
<strong>FinePix</strong> <strong>S602</strong> <strong>ZOOM</strong> SERVICE MANUAL<br />
4. Adjustment<br />
4-4-5.Preparing the CCD Defect Data (FD)<br />
Purpose<br />
The CCD defect data file used when replacing the MAIN PWB ASSY is prepared as follows.<br />
* The serial number in the diagram at right is used as an example.(Fig.16)<br />
Procedure<br />
1) Record the CCD serial number on the LENS CONST when replacing the MAIN PWB ASSY.<br />
The numbers in the diagram at right are as follows.<br />
Top: 0148400 (seven digits)<br />
Bottom:0750 (four digits)<br />
The name of the defect data file containing the numbers is [14840750.dat].<br />
The first, and last two, of the top seven digits are ignored, and only the second, third, fourth, and fifth digits<br />
are read. The top four digits which are read are combined with the bottom four digits to form the CCD defect<br />
data file name. Copy this file name to a sheet of paper.<br />
[Note]<br />
1. Always ensure that the CCD serial number is read correctly. If the file name is read incorrectly, the defect data<br />
for the that file name (ie defect data for another CCD) will be used.<br />
2) Download the ZIP file of top four digits from Web server (http://fujifilm-di.intranets.com/).<br />
Open ZJ00535-100[(Fig.17-(1)] in the CCD defect data folder, and download "1484.zip[Fig.17-(2)]".<br />
3) Decompress "1484.zip".<br />
-->"1484 folders" including "14840750.dat" is made.<br />
4) Insert a writable floppy disk into the floppy disk drive on the computer.<br />
5) Open in "1484 folders", search for "14840750.dat [Fig.17-(3)] ", and copy it onto thefloppy disk.<br />
[Note]<br />
1. The file identifier for the CCD defect data is ".dat". With some Windows settings, the identifier is not displayed.<br />
Change the setting in such cases.<br />
2. In some cases the CCD serial number includes letters as well as numbers. In such cases the file name is<br />
formed in exactly the same way.<br />
3. Do not create a folder on the floppy disk when copying the file.<br />
4. The defect data file may be used after copying to the C: drive on the computer, however it should be labeled<br />
clearly to ensure that it is recognizable as <strong>FinePix</strong> <strong>S602</strong> CCD defecte data, and kept in a safe place.<br />
6) Using the defect data in the floppy disk prepared in Step 5, perform 4-4-4.CCD deta input.<br />
(http://fujifilm-di.intranets.com/).<br />
(2) (3)<br />
0148400<br />
0750<br />
0148400<br />
0750<br />
(1)<br />
CCD Serial Number<br />
< Fig.17> Defect data making procedure chart<br />
55
4. Adjustment <strong>FinePix</strong> <strong>S602</strong> <strong>ZOOM</strong> SERVICE MANUAL<br />
4-4-6.CAM Adjustment<br />
Cautions During Adjustment<br />
1. Switch ON power for the light box used for adjustment and wait until luminance and color temperature<br />
stabilize.<br />
2. Ensure that CCD data has been entered before the CAM adjustment.<br />
Purpose<br />
To adjust the shutter/aperture sensitivity/ISO sensitivity/white balance/AE, and /offset level as necessary for<br />
photography.<br />
Procedure<br />
1) Press the PC [F5] key in the Adjustment Items Select Screen to select CAM adjustment.<br />
2) Check that the color temperature and luminance of the light box are according to specifications.<br />
Color temperature : 6100+/-50ºK (with LB140 filter fitted)<br />
Luminance : 160+/-5cd/m2 (with LB140 filter fitted)<br />
3) With the LB140 filter removed, place the camera 30+/-5mm from the light box.<br />
4) When the settings required for photography are complete, press the [Enter] key on the PC to begin CAM<br />
adjustment.<br />
Perform CAM adjustment in accordance with the instructions from the adjustment software.<br />
5) When CAM adjustment is complete, press the [Enter] key on the PC to return to the Adjustment Items Select<br />
Screen.<br />
Fx<strong>S602</strong>Z.ff<br />
Fx<strong>S602</strong>Z.ff<br />
<strong>FinePix</strong> <strong>S602</strong> Zoom PC adjustment software<br />
<br />
[F1] : Battery voltage adjustment<br />
[F2] : Mode dial voltage adjustment<br />
[F4] : CCD data input<br />
[F5] : CAM adjustment<br />
[F6] : Zoom / AF adjustment<br />
[F7] : Flash adjustment<br />
[F11] : AF sensor adjustment<br />
CAM adjustment<br />
Confirm the color temperature and brightness of pattern box.<br />
Temperature : 6100+/-50K (with LB140 filter)<br />
Brightness : 160+/-5cd/m2 (with LB140 filter)<br />
Remove the LB140 filter, and set up the camera.<br />
* The distance is 30mm+-5mm from the lens side.<br />
Press the [Enter] key when it is possible to prepare.<br />
[F12] : End setting<br />
Adjustment Items Select Menu Screen<br />
CAM Adjustment Preparation Screen<br />
Fx<strong>S602</strong>Z.ff<br />
Fx<strong>S602</strong>Z.ff<br />
Aperture sensibility decrease rate adjustment<br />
Set up the LB140 filter between lens and pattern Box.<br />
Press the [Enter] key when it is possible to prepare.<br />
CAM adjustment complete.<br />
Press the [Enter] key, return to the menu screen.<br />
LB140 Filter Preparations Screen<br />
CAM Adjustment Complete Screen<br />
56
<strong>FinePix</strong> <strong>S602</strong> <strong>ZOOM</strong> SERVICE MANUAL<br />
4. Adjustment<br />
4-4-7.Zoom/AF Adjustment<br />
Cautions During Adjustment<br />
1. Set the camera and Siemens star chart in place in accordance with the instructions on the screen.<br />
2. Adjust the distance between the Siemens star chart and the camera as described in 4-2-6. Environmental<br />
Settings for AF Sensor Adjustment.<br />
3. A 600mm conversion lens is required for AF adjustment.<br />
4. Ensure that CAM adjustment is complete before performing AF adjustment.<br />
5. Set the AF/MF selector switch to [AF].<br />
Purpose<br />
To adjust zoom position and autofocus.<br />
Procedure<br />
1) Press the PC [F6] key in the Adjustment Items Select Screen to select Zoom/AF adjustment.<br />
2) Adjust the zoom position. Do not place the camera with the lens downwards.<br />
3) When the zoom position has been adjusted, make the preparations necessary for AF adjustment in accordance<br />
with the instructions from the adjustment software.<br />
Setup distance for Siemens star chart : 640 mm+/-5mm from end of focusing ring<br />
Setup distance for 600 mm conversion lens : 40mm+/-5mm<br />
Reflective luminance of Siemens star chart : 8.0Ev to 10.0Ev<br />
4) When the setup necessary for AF adjustment is complete, press the [Enter] key on the PC to begin AF adjustment.<br />
Perform AF adjustment in accordance with the instructions from the adjustment software.<br />
5) When Zoom/AF adjustment is completed normally, press the [Enter] key on the PC to return to the Adjustment<br />
Items Select Screen.<br />
Fx<strong>S602</strong>Z.ff<br />
Fx<strong>S602</strong>Z.ff<br />
<strong>FinePix</strong> <strong>S602</strong> Zoom PC adjustment software<br />
Zoom adjustment...<br />
<br />
[F1] : Battery voltage adjustment<br />
[F2] : Mode dial voltage adjustment<br />
[F4] : CCD data input<br />
[F5] : CAM adjustment<br />
[F6] : Zoom / AF adjustment<br />
[F7] : Flash adjustment<br />
[F11] : AF sensor adjustment<br />
[F12] : End setting<br />
Adjustment Items Select Menu Screen<br />
Zoom Adjustment Start Screen<br />
Fx<strong>S602</strong>Z.ff<br />
Fx<strong>S602</strong>Z.ff<br />
AF adjustment<br />
<br />
<br />
Set the AF chart 640mm+-5mm from the focus ring.<br />
Turn on the fluorescent lamp, and measure<br />
the reflection brightness of the AF chart.<br />
* The reflection brightness of the AF chart is 8.0-10.0Ev.<br />
Press the [Enter] key when it is possible to prepare.<br />
Zoom / AF adjustment complete.<br />
Press the [Enter] key, return to the menu screen.<br />
AF Adjustment Preparations (1) Screen<br />
Zoom/AF Adjustment Complete Screen<br />
57
4. Adjustment <strong>FinePix</strong> <strong>S602</strong> <strong>ZOOM</strong> SERVICE MANUAL<br />
4-4-8.Flash Adjustment<br />
Cautions During Adjustment<br />
1. Set the camera and gray chart in place in accordance with the instructions on the screen.<br />
2. Adjust the distance between the gray chart and the camera as described in 4-2-7. Environmental Settings<br />
for Flash Adjustment.<br />
3. An AC adapter cannot be used for adjustment. Always use a regulated power supply.<br />
4. Ensure that CAM adjustment is complete before performing flash adjustment.<br />
5. Darken the area around the gray chart as much as possible to eliminate the effects of external light during<br />
flash adjustment.<br />
Purpose<br />
To make adjustment is so that optimum flash intensity is obtained during flash photography.<br />
Procedure<br />
1) Press the PC [F7] key in the Adjustment Items Select Screen to select flash adjustment.<br />
2) Prepare the gray chart.<br />
Distance between gray chart and camera : 100cm from surface of flash<br />
3) Pop-up the flash.<br />
4) Set the AF/MF selector switch to AF.<br />
5) When the setup necessary for flash adjustment is complete, press the [Enter] key on the PC to begin flash<br />
adjustment. Perform flash adjustment in accordance with the instructions from the adjustment software.<br />
6) When flash adjustment is completed normally, press the [Enter] key on the PC to return to the Adjustment<br />
Items Select Screen.<br />
Fx<strong>S602</strong>Z.ff<br />
Fx<strong>S602</strong>Z.ff<br />
<strong>FinePix</strong> <strong>S602</strong> Zoom PC adjustment software<br />
Flash adjustment<br />
<br />
[F1] : Battery voltage adjustment<br />
[F2] : Mode dial voltage adjustment<br />
[F4] : CCD data input<br />
[F5] : CAM adjustment<br />
[F6] : Zoom / AF adjustment<br />
[F7] : Flash adjustment<br />
[F11] : AF sensor adjustment<br />
Set the gray chart 1000mm+-10mm from Flash luminescence face.<br />
Darken the surrounding so as not to receive the influence<br />
from the outside light when adjusting it.<br />
Press the [Enter] key when it is possible to prepare.<br />
[F12] : End setting<br />
Adjustment Items Select Menu Screen<br />
Flash Adjustment Preparations Screen<br />
Fx<strong>S602</strong>Z.ff<br />
Fx<strong>S602</strong>Z.ff<br />
Flash adjustment<br />
Charge - luminescence (1st time) = 23<br />
Charge - luminescence (2nd time) = 24<br />
Charge - luminescence (3rd time) = 24<br />
Average value(hex) = 24<br />
Correction value = 3<br />
Flash adjustment complete.<br />
Press the [Enter] key, return to the menu screen.<br />
Adjusting Flash Screen<br />
Flash Adjustment Complete Screen<br />
58
<strong>FinePix</strong> <strong>S602</strong> <strong>ZOOM</strong> SERVICE MANUAL<br />
4. Adjustment<br />
4-4-9.Battery Adjustment<br />
Purpose<br />
To adjust the various battery voltages for display of the battery preend/end warnings.<br />
Procedure<br />
1) Check the voltage remotely to ensure that it does not drop.<br />
2) Press the PC [F1] key in the Adjustment Items Select Screen to select battery adjustment.<br />
3) Adjust battery preend in accordance with the instructions on the PC screen.<br />
Use the power supply cable jig to supply 3.80V (+0.02V, -0.00V) from the DC-IN jack. When preparations are<br />
complete, press the [Enter] key on the PC to begin battery preend adjustment.<br />
4) Adjust battery end in accordance with the instructions on the PC screen.<br />
Use the power supply cable Jig to supply 3.60V (+0.02V, -0.00V) from the DC-IN jack. When preparations are<br />
complete, press the [Enter] key on the PC to begin battery end adjustment.<br />
5) Change the input voltage in accordance with the instructions on the PC screen.<br />
Use the power supply cable Jig to supply 5.00V(+/-0.01V) from the DC-IN jack.<br />
6) When the input voltage has been set, press the [Enter] key on the PC to write the adjusted value.<br />
7) When battery adjustment is completed normally, press the [Enter] key on the PC to return to the Adjustment<br />
Items Select Screen.<br />
Adjustment address<br />
Data limits<br />
P4 E3 (BATT_PREEND) 65h-85h<br />
E4 (BATT_END) 5Fh-7Fh<br />
Fx<strong>S602</strong>Z.ff<br />
Fx<strong>S602</strong>Z.ff<br />
<strong>FinePix</strong> <strong>S602</strong> Zoom PC adjustment software<br />
Battery adjustment<br />
<br />
[F1] : Battery voltage adjustment<br />
[F2] : Mode dial voltage adjustment<br />
[F4] : CCD data input<br />
[F5] : CAM adjustment<br />
[F6] : Zoom / AF adjustment<br />
[F7] : Flash adjustment<br />
[F11] : AF sensor adjustment<br />
1) Input 3.80V(+0.02V,-0.00V) from the battery cable jig.<br />
Press the [Enter] key when it is possible to prepare.<br />
[F12] : End setting<br />
Adjustment Items Select Menu Screen<br />
Battery Preend Adjustment Start Screen<br />
Fx<strong>S602</strong>Z.ff<br />
Fx<strong>S602</strong>Z.ff<br />
Battery adjustment<br />
1) Input 3.80V(+0.02V,-0.00V) from the battery cable jig.<br />
Press the [Enter] key when it is possible to prepare.<br />
PRE END Spec = h65-h85<br />
PRR END Value = h75<br />
2) Input 3.60V(+0.02V,-0.00V) from the battery cable jig.<br />
Press the [Enter] key when it is possible to prepare.<br />
Battery voltage adjustment complete.<br />
Press the [Enter] key, return to the menu screen.<br />
Battery End Adjustment Start Screen<br />
Battery Adjustment Complete Screen<br />
59
4. Adjustment <strong>FinePix</strong> <strong>S602</strong> <strong>ZOOM</strong> SERVICE MANUAL<br />
4-4-10.Mode Dial Voltage Adjustment<br />
Purpose<br />
To adjust the mode dial voltage (center value).<br />
Procedure<br />
1) Check the voltage remotely to ensure that it does not drop.<br />
2) Press the PC [F2] key in the Adjustment Items Select Screen to select mode dial voltage adjustment.<br />
3) Adjust mode dial voltage in accordance with the instructions on the PC screen.<br />
Use the power supply cable Jig to supply 5.00V(+/-0.01V) from the DC-IN jack. When preparations are complete,<br />
press the [Enter] key on the PC to begin mode dial adjustment.<br />
4) Press the [Enter] key on the PC to write the adjusted data values to the Flash_ROM.<br />
5) When mode dial voltage adjustment is completed normally, press the [Enter] key on the PC to return to the<br />
Adjustment Items Select Screen.<br />
Adjustment address<br />
Data limits<br />
P4 E5 (MODE) D1h-F1h<br />
Fx<strong>S602</strong>Z.ff<br />
Fx<strong>S602</strong>Z.ff<br />
<strong>FinePix</strong> <strong>S602</strong> Zoom PC adjustment software<br />
Mode dial voltage adjustment<br />
<br />
1) The mode dial is [SET-UP] position.<br />
[F1] : Battery voltage adjustment<br />
[F2] : Mode dial voltage adjustment<br />
[F4] : CCD data input<br />
[F5] : CAM adjustment<br />
[F6] : Zoom / AF adjustment<br />
[F7] : Flash adjustment<br />
[F11] : AF sensor adjustment<br />
2) Input 5.00V(+/-0.01V) from the battery cable jig.<br />
Press the [Enter] key when it is possible to prepare.<br />
[F12] : End setting<br />
Adjustment Items Select Menu Screen<br />
Mode Dial Adjustment Start Screen<br />
Fx<strong>S602</strong>Z.ff<br />
Fx<strong>S602</strong>Z.ff<br />
Mode dial voltage adjustment<br />
1) The mode dial is [SET-UP] position.<br />
2) Input 5.00V(+/-0.01V) from the battery cable jig.<br />
Press the [Enter] key when it is possible to prepare.<br />
Spec = hD1-hF1<br />
Value = hE1<br />
3) Press the [Enter] Key of PC.<br />
Mode dial voltage adjustment complete.<br />
Press the [Enter] key, return to the menu screen.<br />
Adjustment Value Measurement Screen<br />
Mode Dial Adjustment Complete Screen<br />
60
<strong>FinePix</strong> <strong>S602</strong> <strong>ZOOM</strong> SERVICE MANUAL<br />
4. Adjustment<br />
4-4-11.End Setting<br />
Purpose<br />
To return the camera to the product mode from the camera Jig mode used during adjustment.<br />
Unless End Setting is run, the camera will not be recognized as [Mass Storage] when it is connected to the PC.<br />
Procedure<br />
1) When all adjustments are complete, press the PC [F12] key in the Adjustment Items Select Screen to run end<br />
setting.<br />
2) Select the [USB ID] in accordance with the instructions on the PC screen.<br />
3) Select the [Repair base ID] in accordance with the instructions on the PC screen.<br />
4) Switch the camera power supply [OFF] in accordance with the instructions on the PC screen, and remove all<br />
cables.<br />
Caution : The camera is not in the Jig mode following end setting.<br />
Set the camera in the camera Jig mode again to make further adjustments.<br />
Fx<strong>S602</strong>Z.ff<br />
Fx<strong>S602</strong>Z.ff<br />
<strong>FinePix</strong> <strong>S602</strong> Zoom PC adjustment software<br />
<br />
[F1] : Battery voltage adjustment<br />
[F2] : Mode dial voltage adjustment<br />
[F4] : CCD data input<br />
[F5] : CAM adjustment<br />
[F6] : Zoom / AF adjustment<br />
[F7] : Flash adjustment<br />
[F11] : AF sensor adjustment<br />
USB ID<br />
The model is selected from an undermentioned list.<br />
<strong>FinePix</strong> <strong>S602</strong> Zoom U-model<br />
<strong>FinePix</strong> <strong>S602</strong> Zoom E-model<br />
<strong>FinePix</strong> <strong>S602</strong> Zoom EG-model<br />
[F12] : End setting<br />
Adjustment Items Select Screen<br />
USB ID Entry Screen<br />
USB ID<br />
Repair base ID input menu<br />
The repair base is selected from an undermentioned list.<br />
USA<br />
CANADA<br />
HAWAI<br />
TAIWAN<br />
OTHERS<br />
Fx<strong>S602</strong>Z.ff<br />
End setting<br />
Fx<strong>S602</strong>Z.ff<br />
USB ID data writing completion.<br />
Turn off the power switch of the camera.<br />
Remove all cables from the camera.<br />
Press the [Enter] key, ALL adjustment complete.<br />
Repair base ID Entry Screen<br />
Adjustment Complete Screen<br />
61
5. Inspection <strong>FinePix</strong> <strong>S602</strong> <strong>ZOOM</strong> SERVICE MANUAL<br />
5. Inspection<br />
5-1.Preparation for inspection<br />
5-1-1.Measuring Equipments<br />
Names<br />
Stabilized Power Supply<br />
Pattern Box<br />
Waveform Monitor<br />
Vector Monitor<br />
TV Monitor<br />
Ammeter<br />
Voltmeter<br />
Parsonal Computer<br />
Brightness meter<br />
Color meter<br />
Remark<br />
General inspection<br />
Comparable to the PTB450 or equivalent<br />
General inspection<br />
General inspection<br />
NTSC_TV monitor 600 resolutions (14-21inch)<br />
General inspection<br />
General inspection<br />
DOS-V (PC-AT) / OS:Windows98,98SE<br />
LS-110 (Made by Minolta) or equivalent<br />
COLOR METER 3F (Made by Minolta) or equivalent<br />
5-1-2.Jigs and Charts<br />
Product / Model Parts No. Remarks<br />
Micro drive with image ZJ00397-100 LCD/EVF inspection (Note 1)<br />
Gray Chart ZJ00254-100 Flash inspection<br />
Inspection Chart ZJ00540-100 Resolution inspection<br />
Power Cable Jig ZJ00213-100 General inspection<br />
AC Adaptor (AC-5V) ----------------- General inspection (Accessories)<br />
USB Cable ----------------- General inspection (Accessories)<br />
CD-ROM ----------------- General inspection (Accessories)<br />
(Note1) : The image contents included on the standard card are as shown below.<br />
File Name<br />
DSC00001.jpg<br />
DSC00002.jpg<br />
DSC00003.jpg<br />
DSC00004.jpg<br />
DSC00005.jpg<br />
DSC00006.jpg<br />
Image Contents<br />
75% Color Bar<br />
Monoscope<br />
Full White<br />
Full Black<br />
Brightness Adjustment Chart<br />
Natural Picture<br />
62
<strong>FinePix</strong> <strong>S602</strong> <strong>ZOOM</strong> SERVICE MANUAL<br />
5. Inspection<br />
5-1-3.Connection<br />
<strong>FinePix</strong> <strong>S602</strong> Zoom<br />
VIDEO Cable<br />
Power Cable Jig<br />
Vector Monitor Waveform Monitor TV Monitor<br />
Stabilized Power Supply<br />
Ammeter<br />
Voltmeter<br />
Connection<br />
63
5. Inspection <strong>FinePix</strong> <strong>S602</strong> <strong>ZOOM</strong> SERVICE MANUAL<br />
5-2.Inspection<br />
5-2-1.External Inspection<br />
Procedure and Checks<br />
1) Check the camera visually for damage to the exterior.<br />
2) Check that there are no problems (eg dust, clouding) with the EVF and<br />
LCD monitors.<br />
5-2-2.Power Supply Switch Check<br />
Procedure and Checks<br />
1) Use the power supply cable jig to supply 4.50V (+/-0.05V) from the DC-IN<br />
jack.<br />
When supplying power from the DC-IN jack, check remotely to ensure<br />
that the voltage does not drop at the DC-IN pin.<br />
2) Set the mode dial to AUTO.<br />
3) Set the camera power lever to the Photography mode.<br />
· Check that the indicator lamp is green.<br />
· Check that the lens extends.<br />
· Check that the date setup screen is displayed.<br />
4) Press the BACK button once.<br />
· Check that the date etc is displayed on the LCD monitor for approximately<br />
two seconds.<br />
* Date format differs with region.<br />
J : YYYY.MM.DD<br />
U : MM/DD/YYYY<br />
E/EG : DD.MM.YYYY<br />
5-2-3.Checking Shock Noise in the Movie Mode<br />
Procedure and Checks<br />
1) Apply an appropriate shock to the camera.<br />
* Do not apply a shock directly to the lens or card cover.<br />
· Check for problems with the LCD monitor.<br />
· Check that the camera recovers from sync disturbance.<br />
· Check that the camera power is not OFF.<br />
5-2-4.EVF Check<br />
Procedure and Checks<br />
1) Press the EVF/LCD button.<br />
· Check that the LCD monitor is switched OFF, and that a normal<br />
through image appears on the EVF.<br />
2) Turn the diopter adjustment dial up-down.<br />
· Check that the out-of-focus on the EVF screen changes.<br />
· Turn the zoom between upper and lower limits.<br />
3) After checking the EVF, press the EVF/LCD button again.<br />
· Check that the EVF is switched OFF, and that a normal through image<br />
appears on the LCD monitor again.<br />
64
<strong>FinePix</strong> <strong>S602</strong> <strong>ZOOM</strong> SERVICE MANUAL<br />
5. Inspection<br />
5-2-5.Resolution Check<br />
Procedure and Checks<br />
1) Prepare the resolution inspection chart.<br />
2) Insert the smart media into the camera.<br />
3) Set the zoom position to TELE END.<br />
· Check that the zoom operates smoothly.<br />
4) Half-press the release button.<br />
· Operate the AF and check focusing.<br />
· Check that the indicator lamp blinks green, and that Standby is<br />
displayed.<br />
5) Position the camera so that the resolution inspection chart fills the<br />
entire LCD monitor.<br />
6) Press the release button to take a photo.<br />
· Check that the indicator lamp blinks green, and then changes to<br />
orange.<br />
· Check that the shutter sound is heard.<br />
7) Set the camera power lever to the Playback mode.<br />
· Check that the photographed resolution inspection chart is displayed.<br />
8) Check the resolution on the TV monitor.<br />
· Center : Minimum of 350 lines on monitor.<br />
· Periphery : Minimum of 300 lines on monitor.<br />
Minimum resolution of 300 lines at four corners.<br />
Minimum resolution of 350 lines at center<br />
[Caution]<br />
The resolution values noted here are not those of the previous<br />
[<strong>FinePix</strong> <strong>S602</strong>], but are for the resolution inspection chart when the jig<br />
is setup. The values noted above are therefore for service purposes<br />
and should only be used for inspections conducted within the company.<br />
65
5. Inspection <strong>FinePix</strong> <strong>S602</strong> <strong>ZOOM</strong> SERVICE MANUAL<br />
5-2-6.Y Level Check<br />
Procedure and Checks<br />
1) Prepare the pattern box.<br />
· Color temperature : 6100+/-50°K (with LB140 filter fitted)<br />
· Luminance : 160+/-5cd/m2 (with LB140 filter fitted)<br />
2) Insert the smart media into the camera.<br />
3) Make the necessary settings for the Y level check.<br />
· Recording pixels : VGA (640 x 480)<br />
· Photography mode : M<br />
· WB : Electric bulb mode<br />
· Flash : OFF<br />
· AF/MF selector switch : MF<br />
4) Press the release button to take a photo.<br />
· Check that the indicator lamp blinks green, and then changes to<br />
orange.<br />
· Check that the shutter sound is heard.<br />
5) Set the camera power lever to the Playback mode.<br />
· Check that the photographed image is displayed.<br />
6) Check the Y level using a waveform monitor.<br />
· Y level : 83+/-12IRE (waveform monitor)<br />
83+-12IRE<br />
Waveform Monitor Display<br />
66
<strong>FinePix</strong> <strong>S602</strong> <strong>ZOOM</strong> SERVICE MANUAL<br />
5. Inspection<br />
5-2-7.Flash Photography Check<br />
Procedure and Checks<br />
1) Prepare the gray chart.<br />
2) Make the necessary settings for flash photography.<br />
· Distance between gray chart and camera : 1000mm from surface of<br />
flash<br />
· Recording pixels : VGA (640 x 480)<br />
· Photography mode : M<br />
· WB : AUTO<br />
· Flash : Raised<br />
· Shutter speed : 1/60<br />
· Aperture : F5.6<br />
3) Press the release button to take a photo.<br />
· Check that the indicator lamp blinks green, and then changes to<br />
orange.<br />
· Check that the shutter sound is heard.<br />
· Check that the flash is lit.<br />
4) Retract the flash.<br />
· Check that the flash symbol disappears.<br />
5) Set the camera power lever to the Playback mode.<br />
· Check that the photographed gray chart is displayed.<br />
6) Check the light adjustment level and WB using the waveform monitor<br />
and vector scope.<br />
· Light adjustment level : (Waveform monitor)<br />
49+-12IRE<br />
Waveform Monitor<br />
· WB : Within a circle of 10% of the radius, and centered on X=0%,<br />
Y=+1% on the vector scope (distance from center of vector scope to<br />
circle as 100%).<br />
Check that luminescent<br />
spot <br />
is within specifications.<br />
1%<br />
<br />
Center of vector scope<br />
10%<br />
of<br />
radius<br />
Vector scope<br />
67
5. Inspection <strong>FinePix</strong> <strong>S602</strong> <strong>ZOOM</strong> SERVICE MANUAL<br />
5-2-8.<strong>Manual</strong> Focus Check<br />
Procedure and Checks<br />
5-2-9.Macro Operation Check<br />
Procedure and Checks<br />
1) Set the AF/MF selector switch to MF.<br />
· Check that the MF symbol remains on the LCD monitor.<br />
2) Turn the focusing ring.<br />
· Check that the focus moves.<br />
3) Set the AF/MF selector switch to AF.<br />
· Check that the MF symbol disappears.<br />
1) Press the macro button.<br />
· Check that the tulip symbol appears on the LCD monitor.<br />
2) Press the macro button again twice.<br />
· Check that the tulip symbol disappears.<br />
5-2-10.External Flash Operation Check<br />
Procedure and Checks<br />
1) Connect the multimeter to the external flash shoe.<br />
· Check that the multimeter resistance value is open.<br />
2) Press the menu button to select the external flash mode.<br />
3) Press the release button to take a photo.<br />
· Check that the resistance value drops immediately and returns to<br />
the open status again.<br />
4) Press the menu button to return to the internal flash mode.<br />
5-2-11.Command Dial Check<br />
Procedure and Checks<br />
5-2-12.Movie/Audio Check<br />
Procedure and Checks<br />
5-2-13.Erase Mode Check<br />
Procedure and Checks<br />
1) Turn the command dial left-right.<br />
· Check that the F value at bottom-left of the LCD monitor changes.<br />
1) Set the mode dial to the movie photography mode.<br />
· Check that Standby is displayed on the LCD monitor.<br />
2) Press the release button to begin movie photography.<br />
· Check that movie/audio recording begins.<br />
· Check that the Recording display appears on the LCD monitor.<br />
3) Press the release button after five seconds.<br />
· Check that the movie/audio recording finishes, and that it has been<br />
recorded on the smart media.<br />
4) Select the playback mode.<br />
5) Press the bottom of the four keys to playback the movie.<br />
· Check that the movie is played back on the LCD monitor.<br />
· Check that the audio is played back from the speaker.<br />
1) Press the menu button, select a format, and press the OK button.<br />
· Check that OK is displayed on the LCD monitor.<br />
2) Press the MENU/OK button again.<br />
· Check that the played back image disappears.<br />
68
<strong>FinePix</strong> <strong>S602</strong> <strong>ZOOM</strong> SERVICE MANUAL<br />
5. Inspection<br />
5-2-14.Low Battery Check<br />
Procedure and Checks<br />
1) Set to the preend check voltage.<br />
· 3.70+/-0.01V<br />
· Check that the preend symbol is displayed on the LCD monitor.<br />
2) Set to the end check voltage.<br />
· 3.50+/-0.01V<br />
· Check that the end symbol is displayed on the LCD monitor, and that<br />
the camera is switched OFF.<br />
5-2-15.Current Consumption Check<br />
Procedure and Checks<br />
1) Remove the card (SSFDC) and insert a microdrive containing images.<br />
2) Use the power supply cable Jig to supply the following voltage from the<br />
DC-IN jack.<br />
· 5.00+/-0.05V<br />
3) Set the camera power lever to the Photography mode.<br />
4) Press the BACK button.<br />
· Check that the date setup display disappears.<br />
5) Check the current consumption.<br />
· Maximum of 0.70A.<br />
5-2-16. LCD Display Image Check<br />
Procedure and Checks<br />
1) Insert a microdrive containing images, and playback completely black.<br />
· Check that there is no noticeable dust or contamination (eg luminescent<br />
spots) on the LCD monitor screen.<br />
Standards for luminescent spots on LCD monitor<br />
1/4<br />
B<br />
1/4<br />
A<br />
1/2<br />
H<br />
1/4<br />
1/2<br />
1/4<br />
V<br />
<br />
A zone : 1<br />
<br />
B zone : 3<br />
Total : 4 <br />
<br />
Minimum distance between luminescent spots : 5mm<br />
<br />
Maximum number of adjacent luminescent spots : 1<br />
2) Playback completely white (75%).<br />
· Check that there is no noticeable dust or contamination (eg unevenness,<br />
dropout spots) on the LCD monitor screen.<br />
Standards for dropout spots on LCD monitor<br />
B<br />
1/4<br />
A<br />
1/2<br />
H<br />
1/4<br />
1/4<br />
1/2<br />
1/4<br />
V<br />
A zone : 3<br />
B zone : 4 <br />
Total : 7 <br />
Maximum number of adjacent dropout spots in<br />
horizontal direction : 2 <br />
Maximum number of adjacent dropout spots in vertical<br />
<br />
direction : None<br />
<br />
Minimum distance between dropout spots : 5mm<br />
3) Select the adjustment menu by pressing the shift and DISP simultaneously,<br />
select the brightness, and then press the left-right key.<br />
· Check that brightness changes on the LCD monitor.<br />
69
5. Inspection <strong>FinePix</strong> <strong>S602</strong> <strong>ZOOM</strong> SERVICE MANUAL<br />
5-2-17. EVF Display Image Check<br />
Procedure and Checks<br />
1) Insert a microdrive containing images, and playback completely black.<br />
· Check that there is no noticeable dust or contamination (eg luminescent<br />
spots) on the EVF monitor screen.<br />
Standards for luminescent spots on EVF monitor<br />
1/4<br />
B<br />
A<br />
1/2<br />
V<br />
1/4<br />
1/4<br />
1/2<br />
H<br />
1/4<br />
Maximum <br />
of two for R, G, and B total, however<br />
B <br />
is a maximum of one for the A zone.<br />
2) Playback completely white (75%).<br />
· Check that there is no noticeable dust or contamination (eg unevenness,<br />
dropout spots) on the EVF monitor screen.<br />
Standards for dropout spots on EVF monitor<br />
1/4<br />
B<br />
A<br />
1/2<br />
V<br />
1/4<br />
1/2<br />
H<br />
1/4<br />
1/4<br />
<br />
A zone : 1<br />
B<br />
<br />
zone : 2<br />
<br />
Total : 3 <br />
3) Select the adjustment menu by pressing the shift and DISP simultaneously,<br />
select the brightness, and then press the left-right key.<br />
· Check that brightness changes on the EVF monitor.<br />
5-2-18.Power OFF Operation Check<br />
Procedure and Checks<br />
1) Set the camera power lever to the Photography mode, and set the mode<br />
dial to SETUP.<br />
2) Press the bottom of the four keys to select full reset, and press the<br />
MENU/OK button.<br />
3) Set the camera power lever to OFF.<br />
· Check that the lens retracts.<br />
70
<strong>FinePix</strong> <strong>S602</strong> <strong>ZOOM</strong> SERVICE MANUAL<br />
5. Inspection<br />
5-2-19.Settings at Shipment<br />
Procedure and Checks<br />
5-2-20.Clock Setup and Clear<br />
Procedure and Checks<br />
1) Mode dial : Auto photography<br />
2) Check that the battery and memory card are not inserted.<br />
3) Card cover : Closed<br />
4) Battery cover : Closed<br />
5) Flash : Retracted<br />
6) Power lever : OFF<br />
7) AF/MF selector switch : AF<br />
8) EVF diopter adjustment dial : Set to central position.<br />
9) Jack cover : Closed<br />
10) DC cap : Closed<br />
1) Connect the USB cable between the PC and the camera.<br />
· Check that the PC is switched ON.<br />
2) Open the card cover, and with the release button pressed, switch power<br />
ON.<br />
3) Set the camera power lever to OFF.<br />
· No operation is needed at the PC.<br />
4) Remove the USB cable and connect it again.<br />
5) Close the card cover and set the camera power lever to the Playback<br />
mode.<br />
· Check that the USB card reader symbol is displayed on the LCD<br />
monitor.<br />
· Check that the PC is recognized as a removable disk.<br />
6) Set the camera power lever to OFF.<br />
· Check that camera power is OFF.<br />
71
6. Parts List<br />
<strong>FinePix</strong> <strong>S602</strong> <strong>ZOOM</strong> SERVICE MANUAL<br />
6. Parts List<br />
6-1. U-Model<br />
6-1-1. Packing and Accessories (U)<br />
A117<br />
A111<br />
A110<br />
A105<br />
A113<br />
A115<br />
A114<br />
A119<br />
A118<br />
A120<br />
A103<br />
A109<br />
A121<br />
A102<br />
A106<br />
A107<br />
A108<br />
A107<br />
A112<br />
A104<br />
A101<br />
Ref No. Parts No. Description Common Ref No. Parts No. Description Common<br />
A101 FZ04708-100 UNITARY BOX<br />
A111 FZ04741-100 VIDEO CABLE<br />
A102 FZ04711-100 SHEET MOLD<br />
A112 FZ04403-101 CD-ROM<br />
A103 AZF0000-321 HDPE BAG No.12<br />
A113 BB11327-100 SSFDC LABEL<br />
A104 BB12943-100 BAR CODE LABEL BLANK<br />
A114 BF02317-200 SSFDC ASSY 16MB<br />
A105 AZF0000-111 BAG PLASTIC No.11<br />
A115 BB04598-400 SSFDC DUST COVER<br />
A106 BB03538-100 IMPORTANT SAFETY<br />
A107 BL00120-200 I/F MANUAL ENGLISH<br />
A108 BL00135-200 OWNERS MANUAL ENGLISH<br />
A109 BB07792-101 WARRANTY US<br />
A110 FZ03529-200 USB CABLE<br />
A116 BL00162-100 QUICK START GUIDE<br />
A117 BL00187-100 INFO PAPER (MOVIE)<br />
A118 BB12402-100 LENSCAP HOLDER<br />
A119 BU02578-100 SHOULDER BELT ASSY<br />
A120 BU01815-300 LENS CAP ASSY<br />
A121 FZ04793-100 ALKALINE BATTERY LR6 1.5V<br />
72
<strong>FinePix</strong> <strong>S602</strong> <strong>ZOOM</strong> SERVICE MANUAL<br />
6. Parts List<br />
6-1-2.Cabinet F (U)<br />
M214<br />
M210<br />
M212<br />
M211<br />
M210<br />
M213<br />
M207<br />
M216<br />
M209<br />
M204<br />
M202<br />
M201<br />
M203<br />
M208<br />
M206<br />
M205<br />
M202<br />
M215<br />
Ref No. Parts No. Description Common Ref No. Parts No. Description Common<br />
M201 BU01956-200 LENS CABI ASSY U<br />
M211 BB13201-100 LENS FRAME<br />
M202 BB13148-100 SCREW M1.7X3.5BC (x3)<br />
M212 CB0892-A100 CAM PWB ASSY<br />
M203 BU01957-100 F CABI ASSY ABS<br />
M213 CB0895-A101 MC PWB ASSY MAIN-CAM<br />
M204 FZ04690-100 MIC ASSY<br />
M214 FZ04692-100 BATT HOLDER UNIT<br />
M205 FZ04691-100 SIDE MODULE UNIT<br />
M215 BU01959-100 BATTERY LID ASSY<br />
M206 UBFZZ0020A DC JACK COVER<br />
M207 BB13205-100 STRAP R<br />
M208 BB13148-200 SCREW M1.7X5.0BC (x1)<br />
M209 BU02572-100 LENS CONST<br />
M210 BB13149-200 SCREW M1.7X5.0BC GN (x5)<br />
M216 FZ04693-100 AF SENSOR UNIT<br />
73
6. Parts List<br />
<strong>FinePix</strong> <strong>S602</strong> <strong>ZOOM</strong> SERVICE MANUAL<br />
6-1-3. Internal (U)<br />
M316<br />
M317<br />
M315<br />
M320<br />
M318<br />
M323<br />
M305<br />
M314<br />
M316<br />
M304<br />
M312<br />
M311<br />
M322<br />
M321<br />
M318<br />
M318<br />
M319<br />
M306<br />
M306<br />
M301<br />
M302<br />
M308<br />
M306<br />
M303<br />
M310<br />
M309<br />
M307<br />
M306<br />
M313<br />
Ref No. Parts No. Description Common Ref No. Parts No. Description Common<br />
M301 BB13202-100 LCD FRAME<br />
M311 BF03968-100 LCD ASSY 1.8inch<br />
M302 BB13207-100 TRIPOD SCREW<br />
M312 BB13182-100 SHEET FRAME<br />
M303 CB0890-A103 MAIN PWB ASSY<br />
M313 FZ04701-100 WIRE HARNESS DCST-LCD<br />
M304 BB13177-100 SHEET CF<br />
M314 BU01955-100 TOP CABI ASSY ABS<br />
M305 FZ04356-100 EJECTOR<br />
M315 BU02573-100 ST ASSY CONST<br />
M306 BB12548-100 SP SCREW M1.7X3.0 (x4)<br />
M307 FZ04700-100 FFC MAIN-KEY<br />
M308 CB0891-A100 DCST PWB ASSY<br />
M309 BB13209-100 INSULATING TUBE<br />
M310 BB13183-100 CONTACT PLT<br />
M316 BB11621-100 ST SHAFT<br />
M317 BB13193-200 ST TOP U<br />
M318 BB13149-100 SCREW M1.7X4.0BC GN (x8)<br />
M319 FZ04694-100 MODE DIAL UNIT<br />
M320 BU02571-100 EVF CONST<br />
M321 BB13204-100 HOLDER EVF<br />
M322 FZ04695-100 SPEAKER ASSY<br />
M323 BB13149-300 SCREW M1.7X5.5BC GN (x2)<br />
74
<strong>FinePix</strong> <strong>S602</strong> <strong>ZOOM</strong> SERVICE MANUAL<br />
6. Parts List<br />
6-1-4. Cabinet R (U)<br />
M410<br />
M401<br />
M403<br />
M405<br />
M404<br />
N.S<br />
M411<br />
M409<br />
M402<br />
M406<br />
M409<br />
M407<br />
M408<br />
Ref No. Parts No. Description Common Ref No. Parts No. Description Common<br />
M401 BU01958-100 R CABI ASSY ABS<br />
M411 FZ04696-101 C DIAL UNIT<br />
M402 BB13187-100 LCD CUSHION<br />
M403 BB13170-100 <strong>ZOOM</strong> BUTTON<br />
M404 BB13172-100 REAR BUTTON<br />
M405 BB13174-100 LED LENS<br />
M406 BB13178-100 SHEET SW<br />
M407 BB13169-100 OK BUTTON<br />
M408 CB0893-A101 KEY PWB ASSY<br />
M409 BB13149-100 SCREW M1.7X4.0BC GN (x4)<br />
M410 BB13206-100 STRAP L<br />
75
6. Parts List<br />
<strong>FinePix</strong> <strong>S602</strong> <strong>ZOOM</strong> SERVICE MANUAL<br />
6-1-5. External (U)<br />
M507<br />
M502<br />
M503<br />
M501<br />
M506<br />
M508<br />
M501<br />
M505<br />
M501<br />
M504<br />
M510<br />
M509<br />
Ref No. Parts No. Description Common Ref No. Parts No. Description Common<br />
M501 BB13148-200 SCREW M1.7X5.0BC (x6)<br />
M502 BB13148-300 SCREW M1.7X8.0BC (x1)<br />
M503 BB13149-300 SCREW M1.7X5.5BC GN (x1)<br />
M504 BB13134-100 ST BUTTON<br />
M505 BB13160-100 CSP(ST BUTTON)<br />
M506 BB13208-100 LCD WINDOW<br />
M507 BB13212-100 AF PLATE<br />
M508 BB10000-200 CCD BADGE S U<br />
M509 BB13211-200 PRODUCT LABEL<br />
M510 BB09250-200 PL SEAL (U)<br />
76
<strong>FinePix</strong> <strong>S602</strong> <strong>ZOOM</strong> SERVICE MANUAL<br />
6. Parts List<br />
6-2. E-Model<br />
6-2-1. Packing and Accessories (E)<br />
A119<br />
A109<br />
A108<br />
A105<br />
A111<br />
A113<br />
A112<br />
A121<br />
A120<br />
A122<br />
A103<br />
A118<br />
A123<br />
A102<br />
A107<br />
A116<br />
A117<br />
A106<br />
A114<br />
A115<br />
A110<br />
A104<br />
A101<br />
Ref No. Parts No. Description Common Ref No. Parts No. Description Common<br />
A101 FZ04709-100 UNITARY BOX<br />
A111 BB11327-100 SSFDC LABEL<br />
A102 FZ04711-100 SHEET MOLD<br />
A112 BF02317-200 SSFDC ASSY 16MB<br />
A103 AZF0000-321 HDPE BAG No.12<br />
A113 BB04598-400 SSFDC DUST COVER<br />
A104 BB12943-100 BAR CODE LABEL BLANK<br />
A114 BL00120-300 I/F MANUAL FRENCH<br />
A105 AZF0000-111 BAG PLASTIC No.11<br />
A115 BL00120-400 I/F MANUAL GERMAN<br />
A106 BL00120-200 I/F MANUAL ENGLISH<br />
A107 BL00135-200 OWNERS MANUAL ENGLISH<br />
A108 FZ03529-200 USB CABLE<br />
A109 FZ04741-100 VIDEO CABLE<br />
A110 FZ04403-101 CD-ROM<br />
A116 BL00135-300 OWNERS MANUAL FRENCH<br />
A117 BL00135-400 OWNERS MANUAL GERMAN<br />
A118 BL00162-100 QUICK START GUIDE<br />
A119 BL00187-100 INFO PAPER (MOVIE)<br />
A120 BB12402-100 LENSCAP HOLDER<br />
A121 BU02578-100 SHOULDER BELT ASSY<br />
A122 BU01815-300 LENS CAP ASSY<br />
A123 FZ04793-100 ALKALINE BATTERY LR6 1.5V<br />
77
6. Parts List<br />
<strong>FinePix</strong> <strong>S602</strong> <strong>ZOOM</strong> SERVICE MANUAL<br />
6-2-2.Cabinet F (E)<br />
M214<br />
M210<br />
M212<br />
M211<br />
M210<br />
M213<br />
M207<br />
M216<br />
M209<br />
M204<br />
M202<br />
M201<br />
M203<br />
M208<br />
M206<br />
M205<br />
M202<br />
M215<br />
Ref No. Parts No. Description Common Ref No. Parts No. Description Common<br />
M201 BU01956-200 LENS CABI ASSY U<br />
M211 BB13201-100 LENS FRAME<br />
M202 BB13148-100 SCREW M1.7X3.5BC (x3)<br />
M212 CB0892-A100 CAM PWB ASSY<br />
M203 BU01957-100 F CABI ASSY ABS<br />
M213 CB0895-A101 MC PWB ASSY MAIN-CAM<br />
M204 FZ04690-100 MIC ASSY<br />
M214 FZ04692-100 BATT HOLDER UNIT<br />
M205 FZ04691-100 SIDE MODULE UNIT<br />
M215 BU01959-100 BATTERY LID ASSY<br />
M206 UBFZZ0020A DC JACK COVER<br />
M207 BB13205-100 STRAP R<br />
M208 BB13148-200 SCREW M1.7X5.0BC (x1)<br />
M209 BU02572-100 LENS CONST<br />
M210 BB13149-200 SCREW M1.7X5.0BC GN (x5)<br />
M216 FZ04693-100 AF SENSOR UNIT<br />
78
<strong>FinePix</strong> <strong>S602</strong> <strong>ZOOM</strong> SERVICE MANUAL<br />
6. Parts List<br />
6-2-3. Internal (E)<br />
M316<br />
M317<br />
M315<br />
M320<br />
M318<br />
M323<br />
M305<br />
M314<br />
M316<br />
M304<br />
M312<br />
M311<br />
M322<br />
M321<br />
M318<br />
M318<br />
M319<br />
M306<br />
M306<br />
M301<br />
M302<br />
M308<br />
M306<br />
M303<br />
M310<br />
M309<br />
M307<br />
M306<br />
M313<br />
Ref No. Parts No. Description Common Ref No. Parts No. Description Common<br />
M301 BB13202-100 LCD FRAME<br />
M311 BF03968-100 LCD ASSY 1.8inch<br />
M302 BB13207-100 TRIPOD SCREW<br />
M312 BB13182-100 SHEET FRAME<br />
M303 CB0890-B103 MAIN E PWB ASSY<br />
M313 FZ04701-100 WIRE HARNESS DCST-LCD<br />
M304 BB13177-100 SHEET CF<br />
M314 BU01955-100 TOP CABI ASSY ABS<br />
M305 FZ04356-100 EJECTOR<br />
M315 BU02573-100 ST ASSY CONST<br />
M306 BB12548-100 SCREW M1.7X3.0 (x4)<br />
M307 FZ04700-100 FFC MAIN-KEY<br />
M308 CB0891-A100 DCST PWB ASSY<br />
M309 BB13209-100 INSULATING TUBE<br />
M310 BB13183-100 CONTACT PLT<br />
M316 BB11621-100 ST SHAFT<br />
M317 BB13193-200 ST TOP U<br />
M318 BB13149-100 SCREW M1.7X4.0BC GN (x8)<br />
M319 FZ04694-100 MODE DIAL UNIT<br />
M320 BU02571-100 EVF CONST<br />
M321 BB13204-100 HOLDER EVF<br />
M322 FZ04695-100 SPEAKER ASSY<br />
M323 BB13149-300 SCREW M1.7X5.5BC GN (x2)<br />
79
6. Parts List<br />
<strong>FinePix</strong> <strong>S602</strong> <strong>ZOOM</strong> SERVICE MANUAL<br />
6-2-4. Cabinet R (E)<br />
M410<br />
M401<br />
M403<br />
M405<br />
M404<br />
N.S<br />
M411<br />
M409<br />
M402<br />
M406<br />
M409<br />
M407<br />
M408<br />
Ref No. Parts No. Description Common Ref No. Parts No. Description Common<br />
M401 BU01958-100 R CABI ASSY ABS<br />
M411 FZ04696-101 C DIAL UNIT<br />
M402 BB13187-100 LCD CUSHION<br />
M403 BB13170-100 <strong>ZOOM</strong> BUTTON<br />
M404 BB13172-100 REAR BUTTON<br />
M405 BB13174-100 LED LENS<br />
M406 BB13178-100 SHEET SW<br />
M407 BB13169-100 OK BUTTON<br />
M408 CB0893-A101 KEY PWB ASSY<br />
M409 BB13149-100 SCREW M1.7X4.0BC GN (x4)<br />
M410 BB13206-100 STRAP L<br />
80
<strong>FinePix</strong> <strong>S602</strong> <strong>ZOOM</strong> SERVICE MANUAL<br />
6. Parts List<br />
6-2-5. External (E)<br />
M507<br />
M502<br />
M503<br />
M501<br />
M506<br />
M508<br />
M501<br />
M505<br />
M501<br />
M504<br />
M509<br />
Ref No. Parts No. Description Common Ref No. Parts No. Description Common<br />
M501 BB13148-200 SCREW M1.7X5.0BC (x6)<br />
M502 BB13148-300 SCREW M1.7X8.0BC (x1)<br />
M503 BB13149-300 SCREW M1.7X5.5BC GN (x1)<br />
M504 BB13134-100 ST BUTTON<br />
M505 BB13160-100 CSP(ST BUTTON)<br />
M506 BB13208-100 LCD WINDOW<br />
M507 BB13212-100 AF PLATE<br />
M508 BB10000-200 CCD BADGE S U<br />
M509 BB13211-200 PRODUCT LABEL<br />
81
6. Parts List<br />
<strong>FinePix</strong> <strong>S602</strong> <strong>ZOOM</strong> SERVICE MANUAL<br />
6-3. EG-Model<br />
6-3-1. Packing and Accessories (EG)<br />
A115<br />
A109<br />
A108<br />
A105<br />
A117<br />
A116<br />
A111<br />
A113<br />
A112<br />
A103<br />
A118<br />
A114<br />
A119<br />
A102<br />
A107<br />
A106<br />
A110<br />
A104<br />
A101<br />
Ref No. Parts No. Description Common Ref No. Parts No. Description Common<br />
A101 FZ04708-200 UNITARY BOX<br />
A111 BB11327-100 SSFDC LABEL<br />
A102 FZ04711-100 SHEET MOLD<br />
A112 BF02317-200 SSFDC ASSY 16MB<br />
A103 AZF0000-321 HDPE BAG No.12<br />
A113 BB04598-400 SSFDC DUST COVER<br />
A104 BB12943-100 BAR CODE LABEL BLANK<br />
A114 BL00162-100 QUICK START GUIDE<br />
A105 AZF0000-111 BAG PLASTIC No.11<br />
A115 BL00187-100 INFO PAPER (MOVIE)<br />
A106 BL00120-200 I/F MANUAL ENGLISH<br />
A107 BL00135-200 OWNERS MANUAL ENGLISH<br />
A108 FZ03529-200 USB CABLE<br />
A109 FZ04741-100 VIDEO CABLE<br />
A110 FZ04403-101 CD-ROM<br />
A116 BB12402-100 LENSCAP HOLDER<br />
A117 BU02578-100 SHOULDER BELT ASSY<br />
A118 BU01815-300 LENS CAP ASSY<br />
A119 FZ04793-100 ALKALINE BATTERY LR6 1.5V<br />
82
<strong>FinePix</strong> <strong>S602</strong> <strong>ZOOM</strong> SERVICE MANUAL<br />
6. Parts List<br />
6-3-2.Cabinet F (EG)<br />
M214<br />
M210<br />
M212<br />
M211<br />
M210<br />
M213<br />
M207<br />
M216<br />
M209<br />
M204<br />
M202<br />
M201<br />
M203<br />
M208<br />
M206<br />
M205<br />
M202<br />
M215<br />
Ref No. Parts No. Description Common Ref No. Parts No. Description Common<br />
M201 BU01956-200 LENS CABI ASSY U<br />
M211 BB13201-100 LENS FRAME<br />
M202 BB13148-100 SCREW M1.7X3.5BC (x3)<br />
M212 CB0892-A100 CAM PWB ASSY<br />
M203 BU01957-100 F CABI ASSY ABS<br />
M213 CB0895-A101 MC PWB ASSY MAIN-CAM<br />
M204 FZ04690-100 MIC ASSY<br />
M214 FZ04692-100 BATT HOLDER UNIT<br />
M205 FZ04691-100 SIDE MODULE UNIT<br />
M215 BU01959-100 BATTERY LID ASSY<br />
M206 UBFZZ0020A DC JACK COVER<br />
M207 BB13205-100 STRAP R<br />
M208 BB13148-200 SCREW M1.7X5.0BC (x1)<br />
M209 BU02572-100 LENS CONST<br />
M210 BB13149-200 SCREW M1.7X5.0BC GN (x5)<br />
M216 FZ04693-100 AF SENSOR UNIT<br />
83
6. Parts List<br />
<strong>FinePix</strong> <strong>S602</strong> <strong>ZOOM</strong> SERVICE MANUAL<br />
6-3-3. Internal (EG)<br />
M316<br />
M317<br />
M315<br />
M320<br />
M318<br />
M323<br />
M305<br />
M314<br />
M316<br />
M304<br />
M312<br />
M311<br />
M322<br />
M321<br />
M318<br />
M318<br />
M319<br />
M306<br />
M306<br />
M301<br />
M302<br />
M308<br />
M306<br />
M303<br />
M310<br />
M309<br />
M307<br />
M306<br />
M313<br />
Ref No. Parts No. Description Common Ref No. Parts No. Description Common<br />
M301 BB13202-100 LCD FRAME<br />
M311 BF03968-100 LCD ASSY 1.8inch<br />
M302 BB13207-100 TRIPOD SCREW<br />
M312 BB13182-100 SHEET FRAME<br />
M303 CB0890-B103 MAIN E PWB ASSY<br />
M313 FZ04701-100 WIRE HARNESS DCST-LCD<br />
M304 BB13177-100 SHEET CF<br />
M314 BU01955-100 TOP CABI ASSY ABS<br />
M305 FZ04356-100 EJECTOR<br />
M315 BU02573-100 ST ASSY CONST<br />
M306 BB12548-100 SP SCREW M1.7X3.0 (x4)<br />
M307 FZ04700-100 FFC MAIN-KEY<br />
M308 CB0891-A100 DCST PWB ASSY<br />
M309 BB13209-100 INSULATING TUBE<br />
M310 BB13183-100 CONTACT PLT<br />
M316 BB11621-100 ST SHAFT<br />
M317 BB13193-200 ST TOP U<br />
M318 BB13149-100 SCREW M1.7X4.0BC GN (x8)<br />
M319 FZ04694-100 MODE DIAL UNIT<br />
M320 BU02571-100 EVF CONST<br />
M321 BB13204-100 HOLDER EVF<br />
M322 FZ04695-100 SPEAKER ASSY<br />
M323 BB13149-300 SCREW M1.7X5.5BC GN (x2)<br />
84
<strong>FinePix</strong> <strong>S602</strong> <strong>ZOOM</strong> SERVICE MANUAL<br />
6. Parts List<br />
6-3-4. Cabinet R (EG)<br />
M410<br />
M401<br />
M403<br />
M405<br />
M404<br />
N.S<br />
M411<br />
M409<br />
M402<br />
M406<br />
M409<br />
M407<br />
M408<br />
Ref No. Parts No. Description Common Ref No. Parts No. Description Common<br />
M401 BU01958-100 R CABI ASSY ABS<br />
M411 FZ04696-101 C DIAL UNIT<br />
M402 BB13187-100 LCD CUSHION<br />
M403 BB13170-100 <strong>ZOOM</strong> BUTTON<br />
M404 BB13172-100 REAR BUTTON<br />
M405 BB13174-100 LED LENS<br />
M406 BB13178-100 SHEET SW<br />
M407 BB13169-100 OK BUTTON<br />
M408 CB0893-A101 KEY PWB ASSY<br />
M409 BB13149-100 SCREW M1.7X4.0BC GN (x4)<br />
M410 BB13206-100 STRAP L<br />
85
6. Parts List<br />
<strong>FinePix</strong> <strong>S602</strong> <strong>ZOOM</strong> SERVICE MANUAL<br />
6-3-5. External (EG)<br />
M507<br />
M502<br />
M503<br />
M501<br />
M506<br />
M508<br />
M501<br />
M505<br />
M501<br />
M504<br />
M509<br />
Ref No. Parts No. Description Common Ref No. Parts No. Description Common<br />
M501 BB13148-200 SCREW M1.7X5.0BC (x6)<br />
M502 BB13148-300 SCREW M1.7X8.0BC (x1)<br />
M503 BB13149-300 SCREW M1.7X5.5BC GN (x1)<br />
M504 BB13134-100 ST BUTTON<br />
M505 BB13160-100 CSP(ST BUTTON)<br />
M506 BB13208-100 LCD WINDOW<br />
M507 BB13212-100 AF PLATE<br />
M508 BB10000-200 CCD BADGE S U<br />
M509 BB13211-200 PRODUCT LABEL<br />
86
<strong>FinePix</strong> <strong>S602</strong> <strong>ZOOM</strong> SERVICE MANUAL<br />
6. Parts List<br />
6-4. Electrical Parts (U/E/EG-Model commonness)<br />
[NOTE]<br />
The components indicated by mark are critical for safety.<br />
When indicated parts by reference number,please include<br />
the board name.<br />
* Due to standardization,replacement in the parts list may be<br />
different form the parts list specified in the circuit or the<br />
components used on the set.<br />
Ref.No. Part No.<br />
Description<br />
*******************************************************************<br />
Ref.No. Part No.<br />
Description<br />
*******************************************************************<br />
CAM PWB ASSY<br />
*******************************************<br />
----- CONNECTOR -----<br />
DCST PWB ASSY<br />
*******************************************<br />
----- CONNECTOR -----<br />
CN100 FGC142-0401 CONNECTOR CJ 40P BN 0.5MM RV<br />
CN101 FGB071-0451 CONNECTOR CJ 45P FN 0.3MM NN<br />
*******************************************************************<br />
MAIN PWB ASSY<br />
*******************************************<br />
CN1000 FGA157-0041 CONNECTOR LJ 4P SN 2.0MM RV<br />
CN1001 FGA058-0021 CONNECTOR CJ 2P RN 1.25MM PN<br />
CN900 FGA113-0021 CONNECTOR CJ 2P RN 1.5MM PH<br />
CN901 FGA113-0021 CONNECTOR CJ 2P RN 1.5MM PH<br />
CN902 FGA155-0021 CONNECTOR CJ 2P SN 0.8MM RH<br />
CN903 FGA096-0021 CONNECTOR CJ 2P RN 1.0MM PH<br />
CN904 FGC143-0701 CONNECTOR CJ 70P BN 0.5MM RV<br />
----- CONNECTOR -----<br />
----- JACK -----<br />
CN201 FGC142-0501 CONNECTOR CJ 50P BN 0.5MM RV<br />
CN202 FGB103-0221 CONNECTOR CJ 22P FN 0.5MM NH<br />
CN203 FGB031-0101 CONNECTOR CJ 10P FN 0.5MM NV<br />
CN204 FGB105-0111 CONNECTOR CJ 11P FN 0.5MM NH<br />
CN206 FGY047-0261 CONNECTOR CJ 26P B 1.1MM NH<br />
CN207 FGY057-0501 CONNECTOR CJ 50P B 0.635MM NH<br />
CN400 FGB103-0241 CONNECTOR CJ 24P FN 0.5MM NH<br />
CN401 FGB106-0161 CONNECTOR CJ 16P FN 0.5MM NH<br />
CN500 FGA129-0021 CONNECTOR CJ 2P SN 1MM RH<br />
CN501 FGA096-0021 CONNECTOR CJ 2P RN 1.0MM PH<br />
J900 FZ02412-100 JACK DC IN<br />
----- FUSE -----<br />
F900 FP00018-253 FUSE 2.5A 125V JIS<br />
F901 FP00039-203 FUSE 2A 32V UL<br />
F902 FP00039-253 FUSE 2.5A 32V UL<br />
F903 FP00039-253 FUSE 2.5A 32V UL<br />
F905 FP00039-103 FUSE 1A 32V UL<br />
*******************************************************************<br />
CN600 FGB056-0241 CONNECTOR CJ 24P FN 0.5MM NH<br />
CN800 FGC125-0701 CONNECTOR CJ 70P BN 0.5MM PV<br />
----- JACK -----<br />
CN205 FZ03803-100 JACK USB<br />
J700 FZ04344-100 JACK VIDEO<br />
----- FUSE -----<br />
KEY PWB ASSY<br />
*******************************************<br />
----- CONNECTOR -----<br />
CN1200 FGB103-0221 CONNECTOR CJ 22P FN 0.5MM NH<br />
CN1201 FGB103-0241 CONNECTOR CJ 24P FN 0.5MM NH<br />
CN1202 FGB106-0081 CONNECTOR CJ 8P FN 0.5MM NH<br />
F300 FP00036-502 FUSE 0.5A 32V UL<br />
----- SWITCH -----<br />
SW1200 FZ01045-100 SWITCH CARD COVER<br />
SW1201 FZ03055-100 SWITCH EVF/LCD<br />
SW1202 FZ03055-100 SWITCH DISP<br />
SW1203 FZ03055-100 SWITCH BACK<br />
SW1204 FZ03055-100 SWITCH MENU/OK<br />
SW1205 FZ03055-100 SWITCH FOCUS CHECK<br />
SW1206 FZ03055-100 SWITCH AE-L<br />
SW1207 FZ02630-100 SWITCH UP<br />
SW1208 FZ02630-100 SWITCH DOWN<br />
SW1209 FZ02630-100 SWITCH RIGHT<br />
SW1210 FZ02630-100 SWITCH LEFT<br />
87
7. Appendix <strong>FinePix</strong> <strong>S602</strong> <strong>ZOOM</strong> SERVICE MANUAL<br />
7. Appendix<br />
7-1.List of Related Technical Updates Issued<br />
To ensure that after-sales srevice is performed accuratety, keep a record here of the technical updates<br />
issued that cover this device.<br />
Technical Update No. Date Title Details/Other<br />
88
FUJI PHOTO FILM CO., LTD.<br />
26-30, Nishiazabu 2-chome, Minato-ku, Tokyo 106-8620, Japan.