KODAK EASYSHARE C182 Digital Camera
KODAK EASYSHARE C182 Digital Camera
KODAK EASYSHARE C182 Digital Camera

Create successful ePaper yourself
Turn your PDF publications into a flip-book with our unique Google optimized e-Paper software.
<strong>KODAK</strong> <strong>EASYSHARE</strong> <strong>C182</strong><br />
<strong>Digital</strong> <strong>Camera</strong><br />
Extended user guide<br />
www.kodak.com<br />
For interactive tutorials:<br />
www.kodak.com/go/howto<br />
For help with your camera:<br />
www.kodak.com/go/c182support
Eastman Kodak Company<br />
Rochester, New York 14650<br />
© Kodak, 2009<br />
All screen images are simulated.<br />
Kodak, EasyShare, Max, and Perfect Touch are trademarks of Eastman Kodak<br />
Company.<br />
4H6513_en
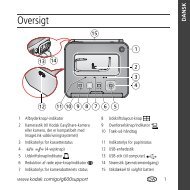
Front view<br />
Flash<br />
Selftimer<br />
light<br />
Shutter<br />
button<br />
Mode dial<br />
Flash button<br />
Power button<br />
Microphone<br />
Product features<br />
Lens/<br />
Cover<br />
www.kodak.com/go/support i
Product features<br />
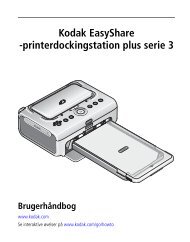
Back view<br />
LCD<br />
Tripod<br />
socket<br />
Delete, Menu,<br />
Info buttons<br />
Zoom<br />
(Telephoto,<br />
Wide Angle)<br />
buttons<br />
USB port<br />
Strap post<br />
OK button<br />
Share button<br />
Review button<br />
SD/SDHC Card slot/<br />
Battery compartment<br />
ii www.kodak.com/go/support
Table of contents 1<br />
1 Setting up your camera .........................................................................1<br />
Attaching the strap .......................................................................................1<br />
Loading the AA batteries...............................................................................2<br />
Turning on the camera ..................................................................................2<br />
Setting the language and date/time...............................................................3<br />
Storing pictures on an SD or SDHC Card ........................................................4<br />
2 Taking pictures/videos ...........................................................................5<br />
Taking pictures..............................................................................................5<br />
Using the optical and digital zoom ................................................................6<br />
Using the flash..............................................................................................7<br />
Using different modes ...................................................................................8<br />
Taking a video ............................................................................................10<br />
Using shortcuts ...........................................................................................10<br />
Using the self-timer.....................................................................................11<br />
Taking panoramic pictures...........................................................................12<br />
Understanding the picture-taking icons........................................................13<br />
3 Working with pictures/videos ..............................................................14<br />
Reviewing pictures/videos ...........................................................................14<br />
Deleting pictures/videos ..............................................................................15<br />
Viewing pictures/videos in different ways.....................................................16<br />
Selecting multiple pictures/videos ................................................................16<br />
Running a slide show ..................................................................................17<br />
Using the menu button in review.................................................................18<br />
Cropping pictures........................................................................................19<br />
Using <strong>KODAK</strong> PERFECT TOUCH Technology.................................................19<br />
Rotating pictures.........................................................................................20<br />
Copying pictures/videos...............................................................................20<br />
Editing videos .............................................................................................21<br />
Understanding the review icons...................................................................23<br />
www.kodak.com/go/support iii
Table of contents<br />
4 Doing more with your camera .............................................................24<br />
Using the menu button to change settings...................................................24<br />
Using the Capture tab .................................................................................24<br />
Video settings .............................................................................................27<br />
Using the Setup tab ....................................................................................28<br />
5 Transferring, printing, tagging ............................................................30<br />
Installing the software.................................................................................30<br />
Transferring pictures/videos.........................................................................31<br />
Printing pictures..........................................................................................32<br />
Marking/tagging your pictures.....................................................................34<br />
6 Getting help ........................................................................................38<br />
Getting help from your camera ....................................................................38<br />
Troubleshooting..........................................................................................39<br />
Getting help on the Web.............................................................................43<br />
7 Appendix .............................................................................................44<br />
<strong>Camera</strong> specifications .................................................................................44<br />
Care and maintenance ................................................................................46<br />
Upgrading your software and firmware........................................................47<br />
Storage capacities .......................................................................................47<br />
Important safety instructions .......................................................................47<br />
Battery replacement, battery life..................................................................48<br />
Limited warranty .........................................................................................49<br />
Regulatory compliance ................................................................................51<br />
iv www.kodak.com/go/support
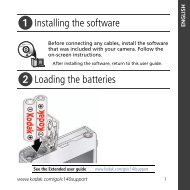
1 Setting up your camera<br />
IMPORTANT: For package contents, see your product package.<br />
Attaching the strap<br />
www.kodak.com/go/support 1
Setting up your camera<br />
Loading the AA batteries<br />
Purchase cost-effective rechargeable<br />
batteries and battery charger<br />
Extend battery life See page 48.<br />
Turning on the camera<br />
Press the Power button.<br />
www.kodak.com/go/c182accessories<br />
2 www.kodak.com/go/support
Setting the language and date/time<br />
OK (press)<br />
Language:<br />
to change.<br />
OK to accept.<br />
NOTE: To change language or date/time in the future, use the Setup menu (see page 28).<br />
Setting up your camera<br />
Date/Time:<br />
At the prompt, press OK.<br />
to change current field.<br />
for previous/next field.<br />
OK to accept.<br />
www.kodak.com/go/support 3
Setting up your camera<br />
Storing pictures on an SD or SDHC Card<br />
Your camera has internal memory. You can purchase an SD or SDHC Card to<br />
conveniently store more pictures/videos. (Maximum supported card size is 32 GB.)<br />
CAUTION:<br />
A card can only be inserted one way; forcing it may cause<br />
damage. Inserting or removing a card while the camera is on may<br />
damage the pictures, the card, or the camera.<br />
1 Turn off the camera.<br />
2 Insert or remove the<br />
optional card.<br />
3 Turn on the camera.<br />
Purchase accessories www.kodak.com/go/c182accessories<br />
4 www.kodak.com/go/support
2 Taking pictures/videos<br />
Taking pictures<br />
Using the framing marks<br />
Framing marks<br />
To get the best pictures:<br />
1 Turn the Mode dial to Smart Capture . Then<br />
press the Power button to turn on the camera.<br />
2 Compose the picture.<br />
3 Press the Shutter button halfway to focus and<br />
set exposure. When the framing marks turn green,<br />
press the Shutter button completely down.<br />
Framing marks indicate the camera focus area.<br />
1 Press the Shutter button halfway.<br />
If the camera is not focusing on the desired subject,<br />
release the Shutter button and recompose the scene.<br />
2 Press the Shutter button completely down to<br />
take the picture.<br />
NOTE: Framing marks do not appear in all modes. Multiple framing<br />
marks may appear when faces are detected.<br />
www.kodak.com/go/support 5
Taking pictures/videos<br />
Reviewing the picture/video just taken<br />
After you take a picture/video, the LCD displays a quickview for approximately 5<br />
seconds. (To exit the quickview sooner, press the Shutter button halfway.)<br />
To review pictures/videos anytime, see page 14.<br />
Using the optical and digital zoom<br />
Using digital zoom<br />
Delete the current picture/video<br />
OK Play/pause a video<br />
1 Use the LCD to frame your subject.<br />
2 To zoom in, press Telephoto (T).<br />
To zoom out, press Wide Angle (W).<br />
3 Take the picture.<br />
NOTE: For focus distances, see <strong>Camera</strong> Specifications starting on<br />
page 44.<br />
Use digital zoom to get up to 5X magnification beyond optical zoom when taking<br />
pictures/videos. Press Telephoto (T) until the slider on the LCD is at the end of the<br />
optical zoom range. Release Telephoto (T), then press it again.<br />
NOTE: You may notice decreased image quality when using digital zoom. The slider pauses and turns red<br />
when the picture quality reaches the limit for an acceptable 4 x 6-in. (10 x 15 cm) print.<br />
6 www.kodak.com/go/support
Using the flash<br />
Flash modes Flash fires<br />
Auto When the lighting conditions require it.<br />
Taking pictures/videos<br />
Fill (Flash On) Every time you take a picture, regardless of the lighting<br />
conditions. Use when the subject is in shadow or is<br />
“backlit” (when the light is behind the subject). In low<br />
light, hold the camera steady or use a tripod.<br />
Red Eye<br />
Your camera can correct<br />
red-eye using 2<br />
methods. To choose a<br />
red eye setting, see the<br />
Setup tab.<br />
Press the flash button repeatedly to scroll through flash modes.<br />
The current flash mode is shown on the LCD.<br />
Preflash A preflash fires, shrinking the eye pupil, before the<br />
picture is taken.<br />
<strong>Digital</strong><br />
Correction<br />
Off Never<br />
A preflash does not fire; the camera corrects red eye.<br />
www.kodak.com/go/support 7
Taking pictures/videos<br />
Using different modes<br />
Use this mode For<br />
P<br />
Smart<br />
Capture<br />
General picture taking—it offers excellent image quality and ease<br />
of use. The scene is analyzed for other content and for lighting.<br />
You can choose the best picture size and aspect ratio for your<br />
needs—just press the Menu button and choose Picture Size.<br />
Close-Up Close range. Use available light instead of flash, if possible.<br />
Sport Subjects that are in motion.<br />
Turn the Mode dial to the mode<br />
that best suits your subjects and<br />
surroundings.<br />
Scene Point-and-shoot simplicity when taking pictures in practically any<br />
situation. (See page 9.)<br />
Video Capturing video with sound. (See page 10.)<br />
NOTE: Sound cannot be played on the camera. Sound is heard after the<br />
video is transferred to your computer.<br />
Blur Reducing blur caused by camera shake or subject motion.<br />
Reduction<br />
Program Access to more manual settings than Smart Capture mode.<br />
8 www.kodak.com/go/support
Using Scene (SCN) modes<br />
Choose a Scene mode—for great pictures in practically any situation!<br />
1 Turn the Mode dial to SCN.<br />
2 Press to view scene mode descriptions.<br />
If the mode description turns off before you finish reading it, press OK.<br />
3 Press OK to choose a Scene mode.<br />
SCN mode For<br />
Portrait Full-frame portraits of people.<br />
Landscape Distant scenes.<br />
Flower Close-ups of flowers or other small subjects in bright light.<br />
Sunset Subjects at dusk.<br />
Backlight Subjects that are in shadow or “backlit.”<br />
Candle Light Subjects illuminated by candle light.<br />
Children Action pictures of children in bright light.<br />
Manner/<br />
Museum<br />
Taking pictures/videos<br />
Quiet occasions, like a wedding or lecture. Flash and sound are disabled.<br />
Place the camera on a steady surface or tripod.<br />
Text Documents. Place the camera on a steady surface or tripod.<br />
Beach Bright beach scenes.<br />
Snow Bright snow scenes.<br />
Fireworks Fireworks. Place the camera on a steady surface or tripod.<br />
Self-<br />
Portrait<br />
Close-ups of yourself. Assures proper focus and minimizes red eye.<br />
Night Portrait Reduces red eye of people in night scenes or low-light conditions.<br />
Night Landscape Distant scenery at night. Flash does not fire.<br />
High ISO People indoors, in low-light scenes.<br />
Panorama<br />
(R-L, L-R)<br />
“Stitching” 2 or 3 pictures into 1 panoramic scene. (See page 12.)<br />
Panning Shot Emphasizing horizontal motion, keeping the subject sharp.<br />
www.kodak.com/go/support 9
Taking pictures/videos<br />
Taking a video<br />
Using shortcuts<br />
1 Turn the Mode dial to Video .<br />
2 Press the Shutter button completely down,<br />
then release it. To stop recording, press and release<br />
the Shutter button again.<br />
To review and work with videos, see page 14.<br />
NOTE: Sound cannot be played on the camera. Sound is heard after<br />
the video is transferred to your computer.<br />
Your camera has a clean, uncluttered interface. For quick access to the most popular<br />
functions:<br />
1 Press the Info button.<br />
The shortcuts appear.<br />
2 Press to access functions like Exposure Compensation, Self-timer, and Auto<br />
focus. (You’ll see different functions in different modes.)<br />
3 Press to choose a setting.<br />
To hide the shortcuts, press .<br />
Shortcuts<br />
10 www.kodak.com/go/support
Using the self-timer<br />
Taking pictures/videos<br />
Use the self-timer when you want to be included in a picture, or to ensure a steady<br />
Shutter button press. Place the camera on a tripod or flat surface.<br />
1 In any picture-taking mode, press the Info button to turn on the shortcut icons.<br />
2 Press to highlight the self-timer icon. Press to choose a setting:<br />
10 seconds— A picture is taken after a 10-second delay (so you have time<br />
10<br />
to get into the scene).<br />
2 seconds— A picture is taken after a 2-second delay (for a steady, shutter<br />
2<br />
release on a tripod).<br />
2 shot— The first picture is taken after a 10-second delay. A second picture<br />
2x<br />
is taken 8 seconds later.<br />
3 Compose the scene. Press the Shutter button halfway, then completely down.<br />
The camera takes the picture/pictures after the delay.<br />
Use the same procedure to take a 2- or 10-second self-timer video, but press the<br />
Shutter button completely down.<br />
www.kodak.com/go/support 11
Taking pictures/videos<br />
Taking panoramic pictures<br />
Use panorama to “stitch” up to 3 pictures into a panoramic scene.<br />
NOTE: For best results, use a tripod. Only the panoramic picture is saved; individual pictures are not.<br />
(Exposure and white balance are set with the first picture. The flash is set to Off.)<br />
1 Turn the Mode dial to SCN.<br />
2 Press to highlight Panorama Left-Right or Panorama Right-Left (depending<br />
on the direction you want to pan), then press OK.<br />
3 Take the first picture.<br />
After a quickview, the LCD displays the liveview and an “overlay” from the first picture.<br />
4 Compose the second picture. Make the overlay from the first picture cover the<br />
same portion in the new picture. (You can press the Delete button to re-take a<br />
picture.)<br />
5 If you are taking only 2 pictures, press OK to stitch them together.<br />
After you take 3 pictures, the pictures are automatically stitched together.<br />
Take 2 or 3<br />
pictures.<br />
Get 1<br />
panoramic<br />
picture.<br />
NOTE: To use the self-timer 10-second or 2-second setting, see page 11.<br />
12 www.kodak.com/go/support
Understanding the picture-taking icons<br />
Focus mode*<br />
Self timer*<br />
Exposure compensation*<br />
Flash mode<br />
Capture mode<br />
Tag name<br />
* To learn more about shortcuts, see page 10.<br />
Taking pictures/videos<br />
Pictures/time remaining<br />
Zoom slider<br />
Battery level<br />
www.kodak.com/go/support 13<br />
Date
3 Working with pictures/videos<br />
Reviewing pictures/videos<br />
Magnifying a picture<br />
Playing a video<br />
Playback speed<br />
4X 2X 1X 2X 4X<br />
Reverse<br />
Forward<br />
1 Press the Review button.<br />
2 Press for previous/next picture/video.<br />
■ Press the Shutter button halfway down to return<br />
to Capture mode.<br />
■ To view pictures/videos as thumbnails, see<br />
page 16.<br />
1 Press T to magnify 1X–8X.<br />
2 Press<br />
picture.<br />
to view other parts of a<br />
■ Press OK to return to 1X.<br />
Press OK to play a video. Press OK to pause/resume.<br />
During playback:<br />
■ Press to play at 2X speed; press again for 4X.<br />
■ Press to reverse at 2X speed; press again for 4X.<br />
NOTE: Sound cannot be played on the camera. Sound is heard after<br />
the video is transferred to your computer.<br />
14 www.kodak.com/go/support
Deleting pictures/videos<br />
1 Press the Review button.<br />
2 Press for previous/next picture/video.<br />
3 Press the Delete button.<br />
4 Follow the screen prompts.<br />
Working with pictures/videos<br />
NOTE: To delete protected pictures/videos, remove protection before deleting. (See Protecting<br />
pictures/videos from deletion.)<br />
Using the undo delete feature<br />
If you accidentally delete a picture, you may be able to use Undo Delete to retrieve it.<br />
This feature is only available immediately after you delete a picture.<br />
Protecting pictures/videos from deletion<br />
1 Press the Review button.<br />
2 Press for previous/next picture/video.<br />
3 Press the Menu button.<br />
4 Press to highlight Protect, then press OK.<br />
The picture/video is protected and cannot be deleted. The Protect icon appears<br />
with the protected picture/video.<br />
■ Press the Shutter button halfway down to return to Capture mode.<br />
IMPORTANT: Your camera offers a built-in Help system. See page 38.<br />
NOTE: Formatting internal memory or an SD or SDHC Card deletes all (including protected) pictures/videos.<br />
(Formatting internal memory also deletes email addresses and tag names. To restore them, see<br />
<strong>EASYSHARE</strong> Software Help.)<br />
www.kodak.com/go/support 15
Working with pictures/videos<br />
Viewing pictures/videos in different ways<br />
Viewing as thumbnails (multi-up)<br />
1 Press the Review button.<br />
The camera shows the last picture that was taken.<br />
2 Press the Wide Angle (W) button to view pictures/videos as thumbnails. (Press it<br />
again to see more, smaller thumbnails.)<br />
To view all pictures/videos, highlight the All tab.<br />
To sort by favorites, date, or tagged pictures/videos, press and highlight the<br />
appropriate tab.<br />
3 To see a single picture/video, press to highlight it. Then press the Telephoto<br />
(T) button.<br />
■ To select multiple pictures/videos, see Selecting multiple pictures/videos,<br />
page 16.<br />
■ Press the Shutter button halfway down to return to Capture mode.<br />
Selecting multiple pictures/videos<br />
Use the multi-select feature when you have two or more pictures to print, transfer,<br />
delete, etc. Multi-select is used most effectively in Multi-Up mode, Viewing as<br />
thumbnails (multi-up), page 16.<br />
1 Press the Review button, then and<br />
to find a picture/video.<br />
2 Press OK to select pictures/videos.<br />
Selected<br />
pictures<br />
A check mark appears on the picture. You can now<br />
print, transfer, delete, etc. the selected pictures. You<br />
can press OK a second time to remove a check mark.<br />
16 www.kodak.com/go/support
Running a slide show<br />
Use Slide Show to display your pictures/videos on the LCD.<br />
1 Press the Review button, then press the Menu button.<br />
2 Press to highlight Slide Show, then press OK.<br />
3 Press to highlight Begin Show, then press OK.<br />
Working with pictures/videos<br />
Each picture/video is displayed once. To interrupt the Slide Show, press OK.<br />
IMPORTANT: Your camera offers a built-in Help system. See page 38.<br />
Displaying pictures/videos on a television<br />
You can display pictures/videos on a television, computer monitor, or any device<br />
equipped with a video input. To connect the camera directly to a television, use an<br />
A/V cable (may be sold separately).<br />
Purchase accessories www.kodak.com/go/c182accessories<br />
NOTE: Ensure that the Video Out setting (NTSC or PAL) is correct (see page 29). The slide show stops if you<br />
connect or disconnect the cable while the slide show is running. (Image quality on a television<br />
screen may not be as good as on a computer monitor or when printed.)<br />
www.kodak.com/go/support 17
Working with pictures/videos<br />
Using the menu button in review<br />
1 Press the Review button, then the Menu button.<br />
2 Press to highlight a tab:<br />
■ Review to view and share pictures/videos<br />
■ Edit to edit pictures/videos<br />
■ Setup to control how your camera operates<br />
3 Press to highlight a setting, then press OK.<br />
4 Highlight an option, then press OK.<br />
IMPORTANT: Your camera offers a built-in Help system. See page 38.<br />
18 www.kodak.com/go/support
Cropping pictures<br />
Working with pictures/videos<br />
You can crop a picture so that only the desired portion of the picture remains.<br />
1 Press the Review<br />
picture to crop.<br />
button, then to find a<br />
Picture Cropped picture<br />
2 Press the Menu button, then to highlight<br />
the Edit tab. Highlight Crop, then press OK.<br />
3 Press Telephoto (T) to zoom in, or to move the crop box. Press OK.<br />
4 Follow the screen prompts.<br />
The picture is cropped. (The original is saved.) Cropped pictures cannot be cropped<br />
again on the camera.<br />
■ Press the Shutter button halfway down to return to Capture mode.<br />
IMPORTANT: Your camera offers a built-in Help system. See page 38.<br />
Using <strong>KODAK</strong> PERFECT TOUCH Technology<br />
<strong>KODAK</strong> PERFECT TOUCH Technology helps ensure better, brighter pictures.<br />
1 Press the Review button, then for previous/next picture.<br />
2 Press the Menu button, then to highlight the Edit tab. Highlight<br />
PERFECT TOUCH Tech, then press OK.<br />
The enhancement is previewed. Press to view other parts of the picture.<br />
3 Press OK. Follow the screen prompts to replace the original picture or to save the<br />
enhanced picture as a new one.<br />
■ Press the Shutter button halfway down to return to Capture mode.<br />
NOTE: You cannot apply PERFECT TOUCH Technology to videos or to pictures to which<br />
PERFECT TOUCH Technology is already applied.<br />
www.kodak.com/go/support 19
Working with pictures/videos<br />
Rotating pictures<br />
You can rotate a picture to portrait or landscape orientation.<br />
1 Press the Review button, then to find the previous/next picture.<br />
2 Press the Menu button. Press to highlight the Edit tab.<br />
3 Press to highlight Rotate Picture, then press OK.<br />
4 Press to highlight an option:<br />
■ Rotate Right—rotates the picture 90 degrees clockwise.<br />
■ Rotate Left—rotates the picture 90 degrees counterclockwise.<br />
5 Press OK. Follow the screen prompts to replace the original picture or to save the<br />
rotated picture as a new one.<br />
■ Press the Shutter button halfway down to return to Capture mode.<br />
IMPORTANT: Your camera offers a built-in Help system. See page 38.<br />
Copying pictures/videos<br />
You can copy pictures/videos from a card to internal memory or from internal memory<br />
to a card.<br />
Copy pictures/videos:<br />
1 Press the Review button.<br />
2 Press the Menu button, then to highlight the Edit tab.<br />
3 Press to highlight Copy, then press OK. Highlight a choice, then press OK.<br />
NOTE: Pictures/videos are copied, not moved. To remove pictures/videos from the original location after<br />
copying, delete them (see page 15).<br />
20 www.kodak.com/go/support
Editing videos<br />
You can do incredible things with your videos!<br />
Making a picture from a video<br />
Working with pictures/videos<br />
You can choose a single frame from a video, then make a picture suitable for a<br />
4 x 6-inch (10 x 15 cm) print.<br />
1 Press the Review<br />
video.<br />
button, then to find a<br />
2 Press the Menu button, then to highlight<br />
Video Picture the Edit tab. Highlight Make Picture, then press OK.<br />
3 Follow the screen prompts.<br />
A picture is created. (The original video is saved.)<br />
■ Press the Shutter button halfway down to return<br />
to Capture mode.<br />
IMPORTANT: Your camera offers a built-in Help system. See page 38.<br />
Trimming a video<br />
You can remove an unwanted start or end from a video, saving only the desired<br />
portion.<br />
1 Press the Review<br />
video.<br />
button, then to find a<br />
2 Press the Menu button, then to highlight<br />
Video Trimmed video<br />
the Edit tab. Highlight Trim, then press OK.<br />
3 Follow the screen prompts.<br />
The video is trimmed. (You can save it as a new video<br />
or replace the original.)<br />
■ Press the Shutter button halfway down to return<br />
to Capture mode.<br />
www.kodak.com/go/support 21
Working with pictures/videos<br />
Making a video action print<br />
From a video, you can make a 9-up picture, suitable for a 4 x 6-inch<br />
(10 x 15 cm) print.<br />
1 Press the Review<br />
video.<br />
button, then to find a<br />
2 Press the Menu button, then to highlight<br />
Video 9-up picture<br />
the Edit tab. Highlight Action Print, then press OK.<br />
3 Highlight an option, then press OK.<br />
Auto: The camera includes the first and last frames,<br />
then 7 equally spaced frames.<br />
Manual: Choose the first and last frames; the<br />
camera chooses 7 equally spaced frames.<br />
A 9--up picture is created.<br />
■ Press the Shutter button halfway down to return to Capture mode.<br />
IMPORTANT: Your camera offers a built-in Help system. See page 38.<br />
22 www.kodak.com/go/support
Understanding the review icons<br />
Shortcuts<br />
Video duration<br />
Select picture<br />
Add text tag<br />
View thumbnails<br />
Play video<br />
Upload mark<br />
Favorite mark<br />
Text tag name<br />
Working with pictures/videos<br />
Print tag/number of print<br />
Protected<br />
Email mark<br />
Picture/Video number<br />
Battery level<br />
Date stamp<br />
www.kodak.com/go/support 23
4 Doing more with your camera<br />
IMPORTANT: Your camera offers a built-in Help system. To get the most from your<br />
camera, see page 38.<br />
Using the menu button to change settings<br />
You can change settings to get the best results from your camera.<br />
NOTE: Some modes offer limited settings. Some settings remain until you change them; others, until you<br />
change modes or turn off the camera.<br />
1 Press the Menu button.<br />
2 Press to highlight a tab:<br />
■ Capture/Video for the most common picture/video-taking settings<br />
■ Setup for other camera settings<br />
3 Press to highlight a setting, then press OK.<br />
4 Highlight an option, then press OK. (Some options let you use .)<br />
Using the Capture tab<br />
Press Menu, , ,<br />
and OK to access settings<br />
Exposure Compensation<br />
Make a picture lighter or<br />
darker. (Available in Smart<br />
Capture mode.) To use a<br />
shortcut, see page 10.<br />
Picture-taking Options<br />
IMPORTANT: Your camera offers a built-in Help system.<br />
See page 38.<br />
0.0, +/-0.3, +/-0.7, +/-1.0, +/-1.3, +/-1.7, +/-2.0<br />
24 www.kodak.com/go/support
Press Menu, , ,<br />
and OK to access settings<br />
Picture Size<br />
Choose a picture resolution.<br />
Focus Mode<br />
Select a large or concentrated<br />
area of focus.<br />
Burst<br />
Take up to 3 pictures in quick<br />
succession.<br />
Self-timer<br />
Take picture(s) after a timed<br />
delay.<br />
Long Time Exposure<br />
Choose how long the shutter<br />
stays open.<br />
See <strong>Camera</strong> specifications, page 44.<br />
Doing more with your camera<br />
Picture-taking Options<br />
IMPORTANT: Your camera offers a built-in Help system.<br />
See page 38.<br />
Auto—for general picture-taking.<br />
Macro—for sharpness and detail in pictures at close range.<br />
Use available light instead of flash, if possible. The camera<br />
automatically sets the focus distance depending on the zoom<br />
position.<br />
Infinity—for distant subjects; auto-focus framing marks are<br />
unavailable.<br />
Off<br />
On—press the Shutter button halfway to focus and set<br />
exposure. Press the Shutter button completely down and<br />
hold it to take pictures.<br />
10 seconds—picture is taken after a 10-second delay (so you<br />
have time to get into the scene).<br />
2 seconds—picture is taken after a 2-second delay (for a<br />
steady, shutter release on a tripod).<br />
2 shot—first picture is taken after a 10-second delay. A<br />
second picture is taken 8 seconds later.<br />
None<br />
0.5, 1.0, 2.0, 4.0, 8.0 seconds<br />
www.kodak.com/go/support 25
Doing more with your camera<br />
Press Menu, , ,<br />
and OK to access settings<br />
Color Mode<br />
Choose color tones.<br />
Unavailable in Video mode.<br />
AF Control (Still)<br />
Choose an auto-focus setting.<br />
White Balance<br />
Choose your lighting<br />
condition. (Available in Smart<br />
Capture mode.)<br />
Picture-taking Options<br />
IMPORTANT: Your camera offers a built-in Help system.<br />
See page 38.<br />
High Color<br />
Natural Color<br />
Low Color<br />
Black & White<br />
Sepia<br />
NOTE: <strong>EASYSHARE</strong> Software also lets you change a color picture to<br />
black-and-white or sepia.<br />
Continuous AF—because the camera is always focusing,<br />
there is no need to press the Shutter button halfway down to<br />
focus.<br />
Single AF—uses TTL-AF (through-the-lens auto focus) when<br />
the Shutter button is pressed halfway down.<br />
Auto—automatically corrects white balance. Ideal for general<br />
picture taking.<br />
Daylight—for pictures in natural lighting.<br />
Tungsten—corrects the orange cast of household light bulbs.<br />
Ideal for indoor pictures under tungsten or halogen lighting<br />
without flash.<br />
Fluorescent—corrects the green cast of fluorescent lighting.<br />
Ideal for indoor pictures under fluorescent lighting without<br />
flash.<br />
Open Shade—for pictures in shade in natural lighting.<br />
26 www.kodak.com/go/support
Press Menu, , ,<br />
and OK to access settings<br />
Exposure Metering<br />
Evaluate light levels at specific<br />
areas of a scene.<br />
AF Zone<br />
Select a large or concentrated<br />
area of focus.<br />
ISO Speed<br />
Control the sensitivity of the<br />
camera sensor.<br />
Sharpness<br />
Control picture sharpness.<br />
Video settings<br />
Press Menu, , ,<br />
and OK to access settings<br />
Video Size<br />
Choose a video resolution.<br />
Doing more with your camera<br />
Picture-taking Options<br />
IMPORTANT: Your camera offers a built-in Help system.<br />
See page 38.<br />
Multi-Pattern—evaluates lighting conditions throughout<br />
the image to give an optimum picture exposure. Ideal for<br />
general picture taking.<br />
Center-Weight—evaluates the lighting conditions of the<br />
subject centered in the lens. Ideal for backlit subjects.<br />
Center-Spot—similar to Center-weight, except the metering<br />
is concentrated on a smaller area of the subject centered in the<br />
LCD.<br />
Multi-Zone—evaluates 5 zones to give an even picture<br />
focus. Ideal for general picture taking.<br />
Center-Zone—evaluates the small area centered in the lens.<br />
Ideal when you need precise focus.<br />
See <strong>Camera</strong> specifications, page 44.<br />
Sharp<br />
Normal<br />
Soft<br />
Video Options<br />
IMPORTANT: Your camera offers a built-in Help system.<br />
See page 38.<br />
640 x 480 @ 30 fps (VGA)<br />
320 x 240 @ 30 fps (QVGA)<br />
www.kodak.com/go/support 27
Doing more with your camera<br />
Using the Setup tab<br />
Use Setup to customize your camera.<br />
Press Menu, to highlight<br />
Setup, then to access<br />
settings<br />
Share button<br />
Choose how pictures/videos are handled<br />
when you press the Share button.<br />
NOTE: Some online services limit video file<br />
sizes. Use <strong>EASYSHARE</strong> Software to<br />
choose a preferred online service.<br />
LCD Brightness<br />
Choose LCD brightness.<br />
Image Storage<br />
Choose a storage location for<br />
pictures/videos.<br />
Set Tag<br />
Create tag names and assign them to<br />
pictures/videos. See page 34.<br />
<strong>Camera</strong> Sounds<br />
Choose sound effects.<br />
Date & Time Set date and time.<br />
Setup Options<br />
IMPORTANT: Your camera offers a built-in<br />
Help system. See page 38.<br />
Favorite and Upload—pictures/videos are<br />
marked as Favorites and uploaded to your<br />
preferred online service when you connect to your<br />
computer or network.<br />
Favorite—pictures/videos are marked as<br />
Favorites (5-star in <strong>EASYSHARE</strong> Software, on your<br />
computer).<br />
Upload—pictures/videos are uploaded to your<br />
preferred online service when you connect to your<br />
computer or network.<br />
Power Save<br />
High Power<br />
Auto—the camera uses the card if one is in the<br />
camera. If not, the camera uses internal memory.<br />
Internal Memory—the camera always uses<br />
internal memory, even if a card is installed.<br />
New Tag—create a tag.<br />
Delete Tag—delete a tag.<br />
Clear All—selected tags are cancelled.<br />
All On<br />
Shutter Only<br />
All Off<br />
28 www.kodak.com/go/support
Press Menu, to highlight<br />
Setup, then to access<br />
settings<br />
Video Out<br />
Choose the regional setting that lets you<br />
connect the camera to a television or other<br />
external device.<br />
Language Choose your language.<br />
Reset <strong>Camera</strong><br />
Reset settings to their default.<br />
Format<br />
CAUTION:<br />
Formatting deletes all<br />
pictures/videos, including those<br />
that are protected. Removing a<br />
card during formatting may<br />
damage the card.<br />
About<br />
View camera information.<br />
Doing more with your camera<br />
Setup Options<br />
IMPORTANT: Your camera offers a built-in<br />
Help system. See page 38.<br />
NTSC—used in North America and Japan; most<br />
common format.<br />
PAL—used in Europe and China.<br />
Memory Card—deletes everything on the card;<br />
formats the card.<br />
Cancel—exits without making a change.<br />
Internal Memory—deletes everything in<br />
internal memory including email addresses and tag<br />
names; formats the internal memory.<br />
www.kodak.com/go/support 29
5 Transferring, printing, tagging<br />
CAUTION:<br />
Before connecting any cables, install the software that was<br />
included with your camera. Failure to do so may cause the<br />
software to load incorrectly.<br />
Installing the software<br />
1 Close all open software applications before starting the installation.<br />
NOTE: If running WINDOWS OS and installing <strong>EASYSHARE</strong> Software from the Kodak Web site, do not<br />
close the WinZip application. If prompted, allow <strong>EASYSHARE</strong> Software to access the Internet.<br />
2 Place the <strong>KODAK</strong> <strong>EASYSHARE</strong> Software CD into the CD-ROM drive.<br />
3 Load the software:<br />
WINDOWS OS—if the install window does not appear, choose Run from the<br />
Start menu and type d:\setup.exe where d is the drive letter that contains the<br />
CD.<br />
MAC OS X—double-click the CD icon on the desktop, then click the Install icon.<br />
4 Follow the on-screen instructions to install the software.<br />
NOTE: When prompted, register your camera and software. Registering lets you sign up for information<br />
that keeps your system up-to-date. To register later, visit www.kodak.com/go/register.<br />
5 If prompted, restart the computer.<br />
For software help, click the Help button in <strong>EASYSHARE</strong> Software.<br />
30 www.kodak.com/go/support
Transferring pictures/videos<br />
Using the USB cable<br />
1<br />
2<br />
3<br />
Turn off the camera.<br />
Connect the included<br />
<strong>KODAK</strong> USB Cable,<br />
Model U-8.<br />
Turn on the camera.<br />
Using other options<br />
You can also use a card reader to transfer your pictures/videos.<br />
Learn more about connecting www.kodak.com/go/howto<br />
Transferring, printing, tagging<br />
www.kodak.com/go/support 31
Transferring, printing, tagging<br />
Printing pictures<br />
Direct printing with a <strong>KODAK</strong> All-in-One Printer<br />
Your camera is compatible with PICTBRIDGE Technology, so you can print directly to<br />
PICTBRIDGE enabled Printers. You need a camera with fully charged batteries, a<br />
PICTBRIDGE enabled Printer, and a USB cable.<br />
Connecting the camera to a <strong>KODAK</strong> All-in-One Printer<br />
1 Turn off the camera and printer.<br />
2 Connect the appropriate USB cable from the camera to the printer.<br />
Printing from a <strong>KODAK</strong> All-in-One Printer<br />
1 Turn on the printer. Turn on the camera.<br />
The PictBridge logo is displayed, followed by the current picture and menu. (If no<br />
pictures are found, a message is displayed.) If the menu turns off, press any button to<br />
redisplay it.<br />
2 Highlight a printing option, then press OK.<br />
Current Picture—Press to choose a picture. Choose the number of copies.<br />
Tagged Pictures—If your printer is capable, print pictures that you marked for<br />
printing and choose a print size.<br />
Index Print—Print thumbnails of all pictures. (This option requires one or more<br />
sheets of paper.) If the printer is capable, choose a print size.<br />
All Pictures—Print all pictures in internal memory or on a card. Choose the<br />
number of copies.<br />
Image Storage—Access Auto or Internal Memory.<br />
NOTE: During direct printing, pictures are not permanently transferred or saved to the printer. To transfer<br />
pictures to your computer, see page 31.<br />
Purchase accessories www.kodak.com/go/c182accessories<br />
32 www.kodak.com/go/support
Transferring, printing, tagging<br />
Disconnecting the camera from a <strong>KODAK</strong> All-in-One Printer<br />
1 Turn off the camera and printer.<br />
2 Disconnect the USB cable from the camera and the printer.<br />
Using a printer that is not PICTBRIDGE enabled<br />
After you transfer pictures from the camera to your computer, you can print them from<br />
<strong>EASYSHARE</strong> Software. For details, see Help in <strong>EASYSHARE</strong> Software.<br />
Ordering prints online<br />
<strong>KODAK</strong> Gallery (www.kodakgallery.com) is one of the many online print services<br />
offered in <strong>EASYSHARE</strong> Software. You can easily:<br />
■ Upload your pictures.<br />
■ Edit, enhance, and add borders to your pictures.<br />
■ Store pictures, and share them with family and friends.<br />
■ Have prints, photo greeting cards, frames, and albums delivered to your door.<br />
Printing from an optional SD or SDHC Card<br />
■ Automatically print marked pictures when you insert your card into a printer with<br />
an SD/SDHC Card slot. See your printer user’s guide for details.<br />
■ Make prints at an SD/SDHC Card-capable <strong>KODAK</strong> Picture Kiosk. (Contact a<br />
location prior to visiting. Visit www.kodak.com/go/picturemaker.)<br />
■ Take the card to your local photo retailer for professional printing.<br />
www.kodak.com/go/support 33
Transferring, printing, tagging<br />
Marking/tagging your pictures<br />
You can mark/tag your pictures so they are easy to:<br />
■ Print<br />
■ Email<br />
■ Organize as a favorite<br />
■ Organize with a tag name that you create<br />
Marking pictures for printing<br />
1 Press the Review button. Press to locate a picture.<br />
2 Press the Menu button. Press to highlight Print, then press OK.<br />
3 Press to select the number of copies.<br />
Optional: You can apply a print quantity to other pictures. Press for<br />
previous/next. Keep the print quantity as is, or press to change it. Repeat<br />
this step until the desired print quantity is applied to the pictures.<br />
4 Press OK.<br />
The Print icon appears in the status area.<br />
■ Press the Shutter button halfway down to return to Capture mode.<br />
IMPORTANT: Your camera offers a built-in Help system. See page 38.<br />
Printing marked pictures<br />
When you transfer the marked pictures to your computer, the <strong>EASYSHARE</strong> Software<br />
print screen opens. For details on printing, see Help in <strong>EASYSHARE</strong> Software.<br />
34 www.kodak.com/go/support
Marking pictures/videos for emailing<br />
Transferring, printing, tagging<br />
First, create a new tag name. (See page 37.)<br />
1 Press the Review button. Press to locate a picture, then press OK.<br />
2 Press to highlight Email, then press OK.<br />
3 Press to locate an email address, then press OK.<br />
To mark other pictures/videos with the same address, scroll through them. When<br />
the picture you want is displayed, press OK.<br />
To send the pictures/videos to more than one address, repeat step 3.<br />
■ To remove a selection, highlight a checked address and press OK. To remove<br />
all email selections, highlight Clear All, then press OK.<br />
■ Press the Shutter button halfway down to return to Capture mode.<br />
The Email icon appears in the status area.<br />
When you transfer the marked pictures/videos to your computer, <strong>EASYSHARE</strong><br />
Software prompts you to send the pictures/videos. For details, see Help in <strong>EASYSHARE</strong><br />
Software.<br />
www.kodak.com/go/support 35
Transferring, printing, tagging<br />
Assigning the favorite mark to pictures/videos<br />
To make your favorite pictures/videos easier to locate in <strong>EASYSHARE</strong> Software, you<br />
can assign the favorite mark.<br />
1 Press the Review button, then locate a picture/video.<br />
2 Press the Share button.<br />
The favorite mark appears with the picture. When you transfer the marked<br />
pictures/videos to your computer, <strong>EASYSHARE</strong> Software opens and categorizes your<br />
pictures/videos with a 5-star rating. (To configure the Share button in different ways,<br />
see page 28.)<br />
Assigning other tags to pictures/videos<br />
First, create a new tag name. (See page 37.)<br />
1 Press the Review button, then locate a picture/video.<br />
2 Press the Menu button.<br />
3 Highlight Tag, then press OK.<br />
4 Highlight a tag name, then press OK.<br />
To assign the tag to other pictures, press to locate a picture, then press OK.<br />
The tag name appears with the picture. A plus (+) means the picture has more than one<br />
tag assigned.<br />
To remove a selection, highlight a tag name and press OK. To remove all tag<br />
selections, highlight Clear All, then press OK.<br />
When you transfer the tagged pictures/videos to your computer, <strong>EASYSHARE</strong> Software<br />
opens and categorizes your pictures/videos with the appropriate tag.<br />
IMPORTANT: Your camera offers a built-in Help system. See page 38.<br />
36 www.kodak.com/go/support
Assigning a tag to pictures/videos you take next<br />
Transferring, printing, tagging<br />
Use the Set Tag feature to assign a tag name to the next pictures/videos you take.<br />
First, create a new tag name. (Add a new email address or tag name.)<br />
1 Press the Menu button.<br />
2 Highlight the Setup tab.<br />
3 Highlight Set Tag, then press OK.<br />
4 Highlight a tag name, then press OK.<br />
The selected tag is displayed on the LCD. The tag is applied to new pictures/videos.<br />
■ Press the Shutter button halfway down to return to Capture mode.<br />
When you transfer the tagged pictures/videos to your computer, <strong>EASYSHARE</strong> Software<br />
opens and categorizes your pictures/videos with the appropriate tag.<br />
IMPORTANT: Your camera offers a built-in Help system. See page 38.<br />
Add a new email address or tag name<br />
1 Press the Review button, then the Menu button.<br />
2 Press to highlight Email or Tag, then press OK.<br />
3 Press to highlight New Email or New Tag, then press OK.<br />
4 Use the on-camera keyboard, then press OK.<br />
The email address/tag name is now available.<br />
www.kodak.com/go/support 37
6 Getting help<br />
Getting help from your camera<br />
You want the most from your camera. You want to understand:<br />
■ What it can do for you<br />
■ And how to take the best possible pictures and videos<br />
Great news!<br />
Your camera offers a built-in Help system. It describes every setting for every menu<br />
choice. If you learn nothing else about your camera, learn how to use on-camera Help.<br />
Because the more you know your camera, the more confident you become!<br />
Turning on camera Help<br />
1<br />
Press the Menu button<br />
then highlight a menu choice.<br />
2 Press the Info button.<br />
Scroll through a Help topic.<br />
38 www.kodak.com/go/support
Troubleshooting<br />
<strong>Camera</strong> problems<br />
Status Solution<br />
<strong>Camera</strong> does not<br />
turn on<br />
<strong>Camera</strong> does not turn<br />
off<br />
<strong>Camera</strong> buttons and<br />
controls do not<br />
function<br />
In Review, a blue or<br />
black screen is<br />
displayed instead of<br />
a picture<br />
Pictures remaining<br />
number does not<br />
decrease after taking a<br />
picture<br />
Getting help<br />
■ Make sure the batteries are charged and installed correctly (see<br />
page 2).<br />
■ Turn the camera off, then on again.<br />
■ Transfer all pictures to the computer (see page 31).<br />
■ Take another picture.<br />
■ Continue taking pictures. The camera is operating normally.<br />
(The camera estimates the number of pictures remaining after each<br />
picture is taken, based on picture size and content.)<br />
Flash does not fire ■ Check the flash setting, and change as needed (see page 7).<br />
NOTE: The flash does not fire in all modes.<br />
Memory card is almost<br />
or entirely full<br />
■ Transfer the pictures to the computer (see page 31).<br />
■ Delete pictures from the card (see page 15) or insert a new card.<br />
Battery life is short ■ Make sure the correct battery type is installed (see page 48).<br />
■ Wipe the contacts with a clean, dry cloth before inserting a<br />
battery in the camera.<br />
■ Insert new or charged batteries (see page 2).<br />
www.kodak.com/go/support 39
Getting help<br />
Status Solution<br />
You cannot take a<br />
picture<br />
Memory card not<br />
recognized or camera<br />
freezes with card<br />
Cannot find the<br />
desired picture/video<br />
Computer/connectivity problems<br />
Status Solution<br />
Pictures do not<br />
transfer to computer<br />
Slide Show does not<br />
run on an external<br />
video device<br />
Computer does not<br />
communicate with<br />
the camera<br />
■ Turn the camera off, then on again.<br />
■ Depress the Shutter button all the way (see page 5).<br />
■ Insert new or charged batteries (see page 2).<br />
■ Memory is full. Transfer pictures to the computer (see page 31),<br />
delete pictures (see page 15), or insert another card.<br />
■ Card may be corrupted. Format the card in the camera (see<br />
page 29).<br />
■ Use another memory card. Only SD or SDHC Cards are supported.<br />
■ To view pictures on a card or in internal memory, see page 14.<br />
■ See Help in <strong>EASYSHARE</strong> Software.<br />
■ Adjust the camera Video Out setting to NTSC or PAL (see<br />
page 29).<br />
■ Make sure the external device settings are correct. (See the<br />
device’s user’s guide).<br />
■ Make sure the batteries are charged and installed correctly (see<br />
page 2).<br />
■ Turn on the camera.<br />
■ Make sure the USB cable model U-8 is connected to the camera<br />
and the computer (see page 31).<br />
■ Make sure <strong>EASYSHARE</strong> Software is installed (see page 30).<br />
40 www.kodak.com/go/support
Picture quality problems<br />
Status Solution<br />
Getting help<br />
Picture is not clear ■ To automatically set exposure and focus, press the Shutter button<br />
halfway. When the framing marks turn green, press the Shutter<br />
button completely down to take the picture.<br />
■ Clean the lens (see page 46).<br />
■ Make sure the camera is not in Macro mode (see page 25) if you are<br />
more than 27.6 in. (70 cm) from your subject.<br />
■ Place the camera on a flat, steady surface or use a tripod (especially<br />
in high-zoom settings or in low light).<br />
Picture is too dark ■ Reposition the camera for more available light.<br />
■ Use Fill flash (see page 7) or change your position so light is not<br />
behind the subject.<br />
■ Move so that the distance between you and the subject is within the<br />
effective flash range. (See camera specifications starting on<br />
page 44.)<br />
■ To automatically set exposure and focus, press the Shutter button<br />
halfway. When the framing marks turn green, press the Shutter<br />
button completely down to take the picture.<br />
Picture is too light ■ Reposition the camera to reduce the amount of available light.<br />
■ Turn the flash off (see page 7).<br />
■ Move so that the distance between you and the subject is within the<br />
effective flash range. (See camera specifications starting on<br />
page 44.)<br />
■ To automatically set exposure and focus, press the Shutter button<br />
halfway. When the framing marks turn green, press the Shutter<br />
button completely down to take the picture.<br />
■ In Smart Capture mode, adjust the Exposure Compensation (see<br />
page 24).<br />
www.kodak.com/go/support 41
Getting help<br />
Direct printing (PICTBRIDGE enabled Printer) problems<br />
Status Solution<br />
Cannot find the<br />
desired picture<br />
■ Use the Direct printing menu to change the image storage location.<br />
The Direct printing ■ Press any camera button to redisplay the menu.<br />
menu interface turns<br />
off<br />
Cannot print pictures ■ Make sure there is a connection between the camera and the<br />
printer (see page 32).<br />
■ Make sure the printer and the camera have power.<br />
<strong>Camera</strong> or printer<br />
displays an error<br />
message<br />
■ Follow the prompts to resolve the issue.<br />
42 www.kodak.com/go/support
Getting help on the Web<br />
<strong>Camera</strong><br />
Software<br />
Other<br />
Getting help<br />
Chat, email, write, or phone Kodak<br />
www.kodak.com/go/contact<br />
(Chat not available in all languages.)<br />
Get support for your product (FAQs, troubleshooting www.kodak.com/go/c182support<br />
information, arrange for repairs, etc.)<br />
Purchase camera accessories (lenses, cards, etc.) www.kodak.com/go/c182accessories<br />
Download the latest camera firmware and software www.kodak.com/go/c182downloads<br />
See online demonstrations of your camera www.kodak.com/go/howto<br />
Register your camera www.kodak.com/go/register<br />
Get information on <strong>EASYSHARE</strong> Software www.kodak.com/go/easysharesw<br />
(or see Help in <strong>EASYSHARE</strong> Software)<br />
Get help with the WINDOWS Operating System and www.kodak.com/go/pcbasics<br />
working with digital pictures<br />
Get support for cameras, software, accessories, more www.kodak.com/go/support<br />
Get information on <strong>KODAK</strong> Inkjet Products www.kodak.com/go/inkjet<br />
Optimize your printer for truer, more vibrant colors www.kodak.com/go/onetouch<br />
www.kodak.com/go/support 43
7 Appendix<br />
<strong>Camera</strong> specifications<br />
CCD—1/2.33-type, 12 MP<br />
Effective pixels—12.4 MP (4096 x 3016)<br />
LCD—7.62 cm (3.0 in.), 230K pixels<br />
Image storage—Optional SD/SDHC Card (The SD logo is a trademark of the<br />
SD Card Association.) Maximum supported card size: 32 GB<br />
Internal storage capacity—16 MB internal memory (11 MB available for image<br />
storage. 1 MB equals one million bytes.)<br />
Taking lens—3X optical zoom; f/2.9–f/5.2; 35 mm equivalent: 32–96 mm<br />
Lens protection—Built-in<br />
<strong>Digital</strong> zoom—5X continuous<br />
Focus system—TTL-AF (through-the-lens auto focus); Auto: Multi-Zone,<br />
Center-Zone. Working range:<br />
60 cm (23.6 in.)–infinity @ wide, normal<br />
60 cm (23.6 in.)–infinity @ telephoto, normal<br />
10–70 cm (3.9–27.6 in.) @ wide, Macro mode<br />
35–70 cm (13.8–27.6 in.) @ telephoto, Macro mode<br />
10 m (32.8 ft)–infinity @ wide, Landscape mode<br />
Auto focus control—Still: Continuous and Single AF (Multi-zone, Center zone)<br />
Face detection—Up to 5 faces<br />
Shutter speed—0.5–1/1400 seconds (Long Time Exposure: 0.5–8 seconds)<br />
ISO speed—Auto: 80–250<br />
Manual: 80, 100, 200, 400, 800, 1000<br />
44 www.kodak.com/go/support
Appendix<br />
Exposure metering—TTL-AE; Multi-Pattern, Center-Weight, Center-Spot<br />
Exposure compensation—+/-2.0 EV with 1/3 EV step<br />
White Balance—Auto, Daylight, Tungsten, Fluorescent, Open Shade<br />
Electronic Flash—Auto flash; Auto, Fill, Red Eye, Off; Guide No.6; working range:<br />
@ ISO 250 in Smart Capture mode: 0.6–3.1 m (2–10.2 ft) @ wide; 0.6–1.7 m (2–5.6<br />
ft) @ telephoto<br />
Burst mode—Maximum 3 pictures @ 1.7 fps; Auto Exposure, Auto Focus, Auto<br />
White Balance executed for first shot only<br />
Capture modes—Smart Capture, Program, Sport, Close-up, Scene modes, Blur<br />
Reduction, Video<br />
Image file format—<br />
Still: EXIF 2.21 (JPEG compression); file organization DCF<br />
Video: QUICKTIME (CODEC Motion JPEG; audio: PCM)<br />
Picture size—12.0 MP (4:3): 4000 x 3000 pixels<br />
10.7 MP (3:2): 4000 x 2666 pixels<br />
9.0 MP (16:9): 4000 x 2250 pixels<br />
6.2 MP (4:3): 2880 x 2160 pixels<br />
3.1 MP (4:3): 2048 x 1536 pixels<br />
2.1 MP (16:9): 1920 x 1080 pixels<br />
1.2 MP (4:3): 1280 x 960 pixels<br />
Color modes—High Color, Natural Color, Low Color, Black & White, Sepia<br />
Sharpness modes—Sharp, Normal, Soft<br />
Video capture—< 80 minutes maximum in VGA, QVGA<br />
VGA (640 x 480 @ 30 fps)<br />
QVGA (320 x 240 @ 30 fps)<br />
Video blur reduction—Yes<br />
www.kodak.com/go/support 45
Appendix<br />
Communication with computer—USB 2.0 full speed (PIMA 15740 protocol); via<br />
USB cable model U-8<br />
Video output—NTSC or PAL<br />
Microphone—Yes<br />
Beeper—Yes<br />
PICTBRIDGE Support—Yes<br />
Power—<strong>KODAK</strong> Oxy-Alkaline <strong>Digital</strong> <strong>Camera</strong> Batteries AA; <strong>KODAK</strong> MAX Alkaline<br />
Battery AA; <strong>KODAK</strong> Ni-MH Pre-Charged Rechargeable <strong>Digital</strong> <strong>Camera</strong> Batteries AA;<br />
<strong>KODAK</strong> Ni-MH Rechargeable <strong>Digital</strong> <strong>Camera</strong> Batteries AA<br />
Tripod mount—1/4 inch<br />
Size—95.9 x 62 x 27.9 mm (3.8 x 2.4 x 1.1 in.) @ power off<br />
Weight—125 g (4.4 oz) without card or batteries<br />
Operating temperature—0–40° C (32–104° F)<br />
Care and maintenance<br />
■ If you suspect water has gotten inside the camera, remove the batteries and card.<br />
Allow all components to air-dry for at least 24 hours before using the camera.<br />
■ Blow gently on the lens or LCD to remove dust and dirt. Wipe gently with a soft,<br />
lint-free cloth or an untreated lens-cleaning tissue. Do not use cleaning solutions<br />
unless designed specifically for camera lenses. Do not allow chemicals, such as<br />
suntan lotion, to contact painted surfaces.<br />
■ Service agreements may be available in your country. Contact a dealer of <strong>KODAK</strong><br />
Products for more information.<br />
■ For digital camera disposal or recycling information, contact your local authorities.<br />
In the US, visit the Electronics Industry Alliance at www.eiae.org or<br />
www.kodak.com/go/c182support.<br />
46 www.kodak.com/go/support
Upgrading your software and firmware<br />
Appendix<br />
Download the latest versions of the software included on the <strong>KODAK</strong> <strong>EASYSHARE</strong><br />
Software CD and the camera firmware (the software that runs on the camera). Visit<br />
www.kodak.com/go/c182downloads.<br />
Storage capacities<br />
The LCD displays the approximate number of pictures (or minutes/seconds of video)<br />
remaining. For average SD Card capacities, visit www.kodak.com/go/SDcapacities.<br />
Actual storage capacity varies depending on subject composition, card size, and other<br />
factors. You may be able to store more or fewer pictures and videos. Favorites take up<br />
additional space in internal memory.<br />
Important safety instructions<br />
CAUTION:<br />
Do not disassemble this product; there are no user-serviceable parts<br />
inside. Refer servicing to qualified service personnel. <strong>KODAK</strong> AC Adapters<br />
and Battery Chargers are intended for indoor use only. The use of controls,<br />
adjustments, or procedures other than those specified herein may result in<br />
exposure to shock and/or electrical or mechanical hazards. If the LCD<br />
breaks, do not touch the glass or liquid. Contact Kodak customer support.<br />
■ The use of an accessory that is not recommended by Kodak may cause fire, electric<br />
shock, or injury. For approved accessories, see www.kodak/go/accessories.<br />
■ Use only a USB-certified computer equipped with a current-limiting motherboard.<br />
Contact your computer manufacturer if you have questions.<br />
■ If using this product in an airplane, observe all instructions of the airline.<br />
■ When removing the batteries, allow them to cool; they may be hot.<br />
■ Follow all warnings and instructions supplied by the battery manufacturer.<br />
■ Use only batteries approved for this product to avoid risk of explosion.<br />
www.kodak.com/go/support 47
Appendix<br />
■ Keep batteries out of the reach of children.<br />
■ Do not allow batteries to touch metal objects, including coins. Otherwise, a battery<br />
may short circuit, discharge energy, become hot, or leak.<br />
■ Do not disassemble, install backward, or expose batteries to liquid, moisture, fire,<br />
or extreme temperature.<br />
■ Remove the batteries when the product is stored for an extended period of time. In<br />
the unlikely event that battery fluid leaks inside the product, contact Kodak<br />
customer support.<br />
■ In the unlikely event that battery fluid leaks onto your skin, wash immediately with<br />
water and contact your local health provider. For additional health-related<br />
information, contact your local Kodak customer support.<br />
■ See www.kodak.com/go/REACH for information about the presence of substances<br />
included on the candidate list according to article 59(1) of Regulation (EC) No.<br />
1907/2006 (REACH).<br />
■ Dispose of batteries according to local and national regulations. See<br />
www.kodak.com/go/kes.<br />
■ Do not charge non-rechargeable batteries. For more information, see<br />
www.kodak.com/go/batteries<br />
Battery replacement, battery life<br />
■ <strong>KODAK</strong> Oxy-Alkaline <strong>Digital</strong> <strong>Camera</strong> Batteries AA: >200 pictures<br />
■ <strong>KODAK</strong> MAX Alkaline Battery, AA: >200 pictures<br />
■ <strong>KODAK</strong> Ni-MH Pre-Charged Rechargeable <strong>Digital</strong> <strong>Camera</strong> Batteries AA: >500<br />
pictures per charge<br />
■ <strong>KODAK</strong> Ni-MH Rechargeable <strong>Digital</strong> <strong>Camera</strong> Batteries AA: >500 pictures per<br />
charge<br />
Battery life per CIPA testing method. (Approx. number of pictures in Smart Capture<br />
mode.) Actual life may vary based on usage.<br />
48 www.kodak.com/go/support
Extending battery life<br />
■ Use power-saving features (see Using the Setup tab, page 28).<br />
Appendix<br />
■ Dirt on the battery contacts can affect battery life. Wipe the contacts with a clean,<br />
dry cloth before loading the batteries in the camera.<br />
■ Battery performance is reduced at temperatures below 41° F (5° C). When using<br />
your camera in cold weather, carry spare batteries and keep them warm. Do not<br />
discard cold batteries that do not work; when they return to room temperature,<br />
they may be usable.<br />
Limited warranty<br />
Kodak warrants its digital cameras and accessories (excluding batteries) to be free<br />
from malfunctions and defects in both materials and workmanship for the warranty<br />
period specified on your Kodak Product packaging. Retain the original dated sales<br />
receipt. Proof of purchase date is required with any request for warranty repair.<br />
Limited warranty coverage<br />
Warranty service is only available from within the country where the Products were<br />
originally purchased. You may be required to ship Products, at your expense, to the<br />
authorized service facility for the country where the Products were purchased. Kodak<br />
will repair or replace Products if they fail to function properly during the warranty<br />
period, subject to any conditions and/or limitations stated herein. Warranty service<br />
will include all labor as well as any necessary adjustments and/or replacement parts. If<br />
Kodak is unable to repair or replace a Product, Kodak will, at its option, refund the<br />
purchase price paid for the Product provided the Product has been returned to Kodak<br />
along with proof of the purchase price paid. Repair, replacement, or refund of the<br />
purchase price are the sole remedies under the warranty. If replacement parts are<br />
used in making repairs, those parts may be remanufactured, or may contain<br />
remanufactured materials. If it is necessary to replace the entire Product, it may be<br />
replaced with a remanufactured Product. Remanufactured Products, parts and<br />
materials are warranted for the remaining warranty term of the original Product, or 90<br />
days after the date of repair or replacement, whichever is longer.<br />
www.kodak.com/go/support 49
Appendix<br />
Limitations<br />
This warranty does not cover circumstances beyond Kodak's control. This warranty<br />
does not apply when failure is due to shipping damage, accident, alteration,<br />
modification, unauthorized service, misuse, abuse, use with incompatible accessories<br />
or attachments (such as third party ink or ink tanks), failure to follow Kodak's<br />
operation, maintenance or repacking instructions, failure to use items supplied by<br />
Kodak (such as adapters and cables), or claims made after the duration of this<br />
warranty.<br />
Kodak makes no other express or implied warranty for this product, and disclaims the<br />
implied warranties of merchantability and fitness for a particular purpose. In the event<br />
that the exclusion of any implied warranty is ineffective under the law, the duration of<br />
the implied warranty will be one year from the purchase date or such longer period as<br />
required by law. The option of repair, replacement, or refund is Kodak's only<br />
obligation. Kodak will not be responsible for any special, consequential or incidental<br />
damages resulting from the sale, purchase, or use of this product regardless of the<br />
cause. Liability for any special, consequential or incidental damages (including but not<br />
limited to loss of revenue or profit, downtime costs, loss of the use of the equipment,<br />
cost of substitute equipment, facilities or services, or claims of your customers for such<br />
damages resulting from the purchase use or failure of the Product), regardless of<br />
cause or for breach of any written or implied warranty is expressly disclaimed.<br />
Your rights<br />
Some states or jurisdictions do not allow exclusion or limitation of incidental or<br />
consequential damages, so the above limitation or exclusion may not apply to you.<br />
Some states or jurisdictions do not allow limitations on how long an implied warranty<br />
lasts, so the above limitation may not apply to you. This warranty gives you specific<br />
rights, and you may have other rights which vary from state to state or by jurisdiction.<br />
Outside the United States and Canada<br />
In countries other than the United States and Canada, the terms and conditions of<br />
this warranty may be different. Unless a specific Kodak warranty is communicated to<br />
the purchaser in writing by a Kodak company, no warranty or liability exists beyond<br />
any minimum requirements imposed by law, even though defect, damage, or loss may<br />
50 www.kodak.com/go/support
e by negligence or other act.<br />
Regulatory compliance<br />
FCC compliance and advisory<br />
Appendix<br />
This equipment has been tested and found to comply with the limits for a Class B<br />
digital device, pursuant to Part 15 of the FCC Rules. These limits are designed to<br />
provide reasonable protection against harmful interference in a residential<br />
installation. This equipment generates, uses, and can radiate radio frequency energy<br />
and, if not installed or used in accordance with the instructions, may cause harmful<br />
interference to radio communications. However, there is no guarantee that<br />
interference will not occur in a particular installation. If this equipment does cause<br />
harmful interference to radio or television reception, which can be determined by<br />
turning the equipment off and on, the user is encouraged to try to correct the<br />
interference by one or more of the following measures: 1) reorient or relocate the<br />
receiving antenna; 2) increase the separation between the equipment and the<br />
receiver; 3) connect the equipment to an outlet on a circuit different from that to<br />
which the receiver is connected; 4) consult the dealer or an experienced radio/TV<br />
technician for additional suggestions. Any changes or modifications not expressly<br />
approved by the party responsible for compliance could void the user’s authority to<br />
operate the equipment. Where shielded interface cables have been provided with the<br />
product or specified additional components or accessories elsewhere defined to be<br />
used with the installation of the product, they must be used in order to ensure<br />
compliance with FCC regulation.<br />
CE<br />
Hereby, Eastman Kodak Company declares that this <strong>KODAK</strong> Product is in compliance<br />
with the essential requirements and other relevant provisions of Directive 1999/5/E.<br />
www.kodak.com/go/support 51
Appendix<br />
China RoHS<br />
Russian GOST-R<br />
Korean Class B ITE<br />
VCCI Class B ITE<br />
Eastman Kodak Company<br />
Rochester, NY 14650<br />
52 www.kodak.com/go/support
Waste Electrical and Electronic Equipment labeling/battery disposal<br />
In Europe: For human/environmental protection, it is your responsibility to<br />
dispose of this equipment and batteries at a collection facility established<br />
for this purpose (separate from municipal waste.) For more information,<br />
contact your retailer, collection facility, or appropriate local authorities; or<br />
visit www.kodak.com/go/recycle. Product weight: 125 g (4.4 oz)<br />
Australian C-Tick<br />
N137<br />
Appendix<br />
Canadian DOC statement<br />
DOC Class B Compliance—This Class B digital apparatus complies with Canadian<br />
ICES-003.<br />
Observation des normes-Classe B—Cet appareil numérique de la classe B est<br />
conforme à la norme NMB-003 du Canada.<br />
www.kodak.com/go/support 53
Index 1<br />
A<br />
A/V out, 17<br />
about this camera, 29<br />
accessories, 31<br />
battery, 49<br />
buying, 43<br />
SD/SDHC Card, 4<br />
AF control (Still), 26<br />
AF zone, 27<br />
auto<br />
enhancement, 19<br />
focus control, 26<br />
focus framing marks, 5<br />
auto focus (AF)<br />
zone, 27<br />
B<br />
backlight, 9<br />
battery<br />
expected life, 48<br />
loading, 2<br />
types, 48<br />
battery guidelines, 49<br />
beach, 9<br />
button<br />
delete, 6<br />
C<br />
cable<br />
audio/video, 17<br />
USB, 31<br />
camera sounds, 28<br />
Canadian compliance, 53<br />
care & maintenance, 46<br />
care and maintenance, 46<br />
children, 9<br />
clock, setting, 3<br />
color mode, 26<br />
computer<br />
connecting camera, 30<br />
transfer to, 30<br />
connector, USB / A/V, 17, 31<br />
copy pictures<br />
card to memory, 20<br />
memory to card, 20<br />
to computer via USB cable, 30<br />
cropping pictures, 19<br />
customize camera, 28<br />
D<br />
date setting, 3<br />
deleting<br />
during quickview, 6<br />
from internal memory, 15<br />
from SD/SDHC Card, 15<br />
protecting pictures, videos, 15<br />
digital zoom, 6<br />
displaying slide show, 17<br />
disposal, recycling, 46<br />
downloading pictures, 30<br />
E<br />
EasyShare software, 30<br />
edit videos, 21<br />
54 www.kodak.com/go/support
emailing pictures, videos, 35<br />
expected battery life, 48<br />
exposure<br />
long time, 25, 28<br />
metering, 27<br />
exposure compensation, 24<br />
exposure metering, 27<br />
external video device<br />
viewing pictures, videos, 17<br />
F<br />
favorites tagging, 36<br />
FCC compliance, 51<br />
fireworks, 9<br />
firmware, upgrading, 47<br />
flash, using, 7<br />
flower, 9<br />
focus framing marks, 5<br />
focus mode, 25<br />
format, 29<br />
framing marks, 5<br />
G<br />
guidelines, battery, 49<br />
H<br />
help<br />
camera help, 38<br />
Web links, 38<br />
high ISO, 9<br />
I<br />
icons, modes, 8<br />
image storage, 28<br />
installing<br />
battery, 2<br />
SD/SDHC Card, 4<br />
software, 30<br />
ISO speed, 27<br />
K<br />
Kodak EasyShare software<br />
installing, 30<br />
upgrading, 47<br />
Kodak Perfect Touch technology, 19<br />
Kodak Web sites, 38<br />
L<br />
language, 29<br />
LCD<br />
brightness, 28<br />
reviewing pictures, 14<br />
reviewing videos, 14<br />
LCD brightness, 28<br />
lens<br />
cleaning lens, 46<br />
loading<br />
battery, 2<br />
SD/SDHC Card, 4<br />
software, 30<br />
long time exposure, 25, 28<br />
M<br />
Mac OS, installing software, 30<br />
magnify a picture, 14<br />
maintenance, camera, 46<br />
make picture from video, 21<br />
manner/museum, 9<br />
memory<br />
inserting card, 4<br />
Index<br />
www.kodak.com/go/support 55
Index<br />
menu settings, 24<br />
modes, 8<br />
backlight, 9<br />
beach, 9<br />
children, 9<br />
fireworks, 9<br />
flower, 9<br />
high ISO, 9<br />
manner/museum, 9<br />
night landscape, 9<br />
night portrait, 9<br />
scene (SCN), 9<br />
self-portrait, 9<br />
snow, 9<br />
text, 9<br />
multiple selections, 16<br />
multi-up, 16<br />
N<br />
night landscape, 9<br />
night portrait, 9<br />
O<br />
online prints, ordering, 33<br />
P<br />
panoramic pictures, 12<br />
Perfect Touch technology, 19<br />
PICTBRIDGE enabled printer, 32<br />
picture size, 24, 25<br />
pictures<br />
copying, 20<br />
cropping, 19<br />
emailing tagged, 35<br />
Kodak Perfect Touch, 19<br />
printing, 33<br />
printing tagged, 34<br />
protecting, 15<br />
review icons, 23<br />
reviewing, 14<br />
tagging, 34<br />
taking, modes, 8<br />
transfer via USB cable, 30<br />
pictures/video<br />
deleting, 15<br />
playing a video, 14<br />
power<br />
camera, 2<br />
pre-tagging, 37<br />
printing<br />
from a card, 33<br />
from computer, 33<br />
optimizing printer, 38<br />
order online, 33<br />
PICTBRIDGE, 32<br />
tagged pictures, 33<br />
protecting pictures, videos, 15<br />
Q<br />
quickview, using, 6<br />
R<br />
recycling, disposal, 46<br />
regulatory information, 51<br />
repair, 43<br />
reset camera, 29<br />
reviewing pictures/video<br />
as you take them, 6<br />
deleting, 15<br />
56 www.kodak.com/go/support
LCD, 14<br />
protecting, 15<br />
slide show, 17<br />
running slide show, 17<br />
S<br />
safety, 47<br />
scene modes (SCN), 9<br />
SD/SDHC Card<br />
inserting, 4<br />
printing from, 33<br />
select multiple pictures/videos, 16<br />
self-portrait, 9<br />
self-timer, 11<br />
set tag, 28<br />
setting<br />
AF zone, 27<br />
auto-focus, 26<br />
camera sounds, 28<br />
color mode, 26<br />
date and time, 3<br />
exposure metering, 27<br />
image storage, 28<br />
ISO, 27<br />
language, 29<br />
LCD brightness, 28<br />
long time exposure, 25, 28<br />
picture size, 24, 25<br />
picture-taking mode, 8<br />
self-timer, 11<br />
sharpness, 27<br />
video out, 29<br />
video size, 27<br />
white balance, 26<br />
setting up the camera, 1<br />
setup menu, 28<br />
Share button, 28<br />
sharpness, 27<br />
shutter<br />
problems, 40<br />
self-timer delay, 11<br />
slide show<br />
running, 17<br />
snow, 9<br />
software<br />
installing, 30<br />
upgrading, 47<br />
sounds, 28<br />
specifications, camera, 44<br />
strap, 1<br />
T<br />
tagging<br />
creating tags, 36<br />
favorites, 36<br />
for email, 35<br />
for print, 34<br />
pre-tagging, 37<br />
taking pictures, videos, 5<br />
television, slide show, 17<br />
text, 9<br />
time, setting, 3<br />
timer, shutter delay, 11<br />
transfer, via USB cable, 30<br />
trash can, deleting, 6<br />
trimming a video, 21<br />
turning camera on and off, 2<br />
Index<br />
www.kodak.com/go/support 57
Index<br />
U<br />
undelete, undo, 15<br />
upgrading software, firmware, 47<br />
URLs, Kodak Web sites, 38<br />
USB<br />
transferring pictures, 30<br />
V<br />
video<br />
action print, 22<br />
copying, 20<br />
edit, 21<br />
emailing tagged, 35<br />
out, 29<br />
playback, 14<br />
protecting, 15<br />
review icons, 23<br />
size, 27<br />
transfer to computer, 30<br />
viewing, 14<br />
video out, 29<br />
video size, 27<br />
viewing<br />
by multi-up, 16<br />
picture, after taking, 6, 14<br />
W<br />
warranty, 49<br />
white balance, 26<br />
Windows OS, installing software, 30<br />
Z<br />
zoom<br />
digital, 6<br />
58 www.kodak.com/go/support