
Related Manuals for Kodak EasyShare DX7440


Summary of Contents for Kodak EasyShare DX7440
- Page 1 Kodak EasyShare DX7440 zoom digital camera User’s guide www.kodak.com For interactive tutorials, www.kodak.com/go/howto For help with your camera, www.kodak.com/go/dx7440support...
- Page 2 Eastman Kodak Company 343 State Street Rochester, New York 14650 © Eastman Kodak Company, 2004 All screen images are simulated. Kodak and EasyShare are trademarks of Eastman Kodak Company. P/N 4J1201...
-
Page 3: Product Features
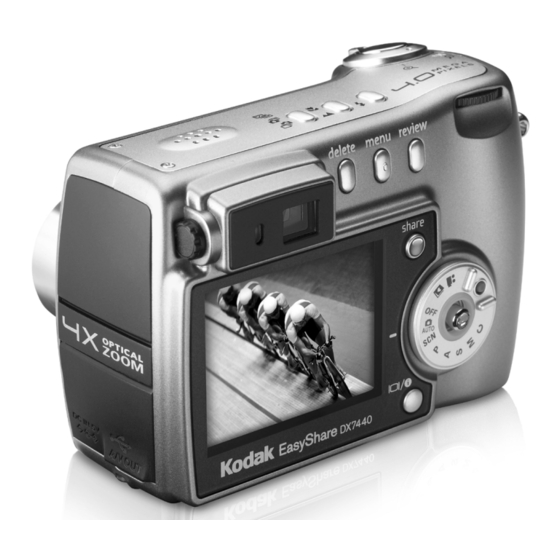
Top, Front View Wrist strap post Zoom (Wide angle/Telephoto); Magnify (when Reviewing pictures) Shutter button Flash Setting button Close-up/Landscape button Exposure Bracketing/Burst button Speaker www.kodak.com/go/support Flash unit Viewfinder 10 Lens 11 Microphone 12 Light sensor 13 Self Timer/Video light Product features... -
Page 4: Bottom View
Tripod socket/locator for EasyShare camera dock or printer dock Battery door, MMC/SD card slot 10 Jog dial 11 Share button 12 Mode dial lock 13 Joystick - move OK - press in 14 Mode dial 15 Power ring 16 Display/Info button 17 Camera screen (LCD) www.kodak.com/go/support... -
Page 5: Table Of Contents
Magnifying pictures... 30 Changing optional review settings... 30 Protecting pictures and videos from deletion... 31 Tagging pictures/videos for albums... 31 Running a slide show ... 32 Displaying pictures and videos on a television... 33 Copying pictures and videos ... 33 www.kodak.com/go/support... - Page 6 8 Getting help ... 48 Helpful links... 48 Telephone customer support ... 49 9 Appendix ... 50 Camera specifications ... 50 Tips, safety, maintenance ... 52 Storage capacities ... 53 Power-saving features... 54 Upgrading your software and firmware... 55 Regulatory compliance ... 55 www.kodak.com/go/support...
-
Page 7: Getting Started
Kodak EasyShare software CD. Contents may change without notice. Installing the software first IMPORTANT: Install the software from the Kodak EasyShare software CD before connecting the camera (or dock) to the computer. Otherwise, the software may install incorrectly. See the Start Here! guide or Installing the software, page www.kodak.com/go/support... -
Page 8: Charging The Battery
The indicator light turns red. When the indicator light turns green, remove the battery and unplug the charger. Charging takes approximately 3 hours. You can also charge the battery using an optional Kodak EasyShare printer dock or camera dock. Purchase these and other accessories at a dealer of Kodak products or visit www.kodak.com/go/accessories. -
Page 9: Important Battery Information
1700 mAh Li-Ion rechargeable battery, 1050 mAh (included with camera) We recommend using only a Kodak EasyShare Li-Ion rechargeable battery. Not all manufacturers’ 3.7V Li-Ion rechargeable batteries are compatible with the camera. Damage caused by unauthorized accessories is not covered under warranty. -
Page 10: Turning The Camera On And Off
For rechargeable battery disposal information, see the Rechargeable ■ Battery Recycling Corporation Web site at www.rbrc.com. For more information on batteries, see www.kodak.com/global/en/service/batteries/batteryUsage.jhtml Turning the camera on and off Mode dial lock Power ring Ready light... -
Page 11: Setting The Date And Time
5 When finished, press the OK button. 6 Press the Menu button to exit the menu. NOTE: Depending on your computer operating system, Kodak EasyShare software may update the camera clock when you connect the camera. See EasyShare software Help for details. -
Page 12: Storing Pictures On An Sd/Mmc Card
26.) We cannot guarantee compatibility with “high-speed” SD cards such as xSD or Ultra-2; these cards are designed primarily for video or audio. Using optional lenses Expand your creativity with a selection of Kodak accessory lenses, offered in wide angle, telephoto, and close-up. See a dealer of Kodak products or www.kodak.com/go/dx7440accessories. -
Page 13: Taking Pictures And Videos
NOTE: If you want the camera screen be off when you turn on the camera, see page Using the diopter dial You can adjust the viewfinder sharpness to your preference. Diopter dial www.kodak.com/go/support . (See page 10 for other mode 2 Use the camera screen as a viewfinder, or... -
Page 14: Taking A Video
You can change optical zoom before (but not during) video recording. 1 With the camera screen on, press the Shutter button halfway and hold. When the framing marks turn green, focus is accomplished. Center focus Center wide focus Side focus Center and side focus Left and right focus www.kodak.com/go/support... -
Page 15: Reviewing The Picture Or Video Just Taken
You can change optical zoom before (but not during) video recording. Zoom indicator Digital zoom range Optical zoom range www.kodak.com/go/support Taking pictures and videos ■ Review: If you take no action, the picture/video is saved. ■ Play (video): Press the OK button to play the video. -
Page 16: Using Digital Zoom
(See jog dial to change P, A, S, M, or C mode settings, page Press the Menu button to change other settings. Scene modes, page P, A, S, M, and C mode, page 13 www.kodak.com/go/support 12.) Using the 14.) - Page 17 Menu button to change other settings. Favorites Viewing your favorites. (See Video Capturing video with sound. (See www.kodak.com/go/support Taking pictures and videos Using the jog dial to change P, A, S, M, or 14.) Press the Menu button to change P, A, S, M, and C mode, page 13 14.) Press the Menu button to change other settings.
-
Page 18: Scene Modes
Close-ups of flowers in bright light. Manner Quiet occasions, like a wedding or lecture. Flash and sound are disabled. Self Close-ups of yourself, from 3.9 - 23.7 in. (10-60 cm). Portrait Party People indoors. 8) are not available in Landscape. www.kodak.com/go/support... - Page 19 Higher settings are more sensitive to light, but may produce unwanted “noise” in a picture. You can only use ISO 800 if you are in the 1.1 MP Picture Size setting. (See www.kodak.com/go/support Taking pictures and videos Aperture—also known as f-stop, controls the size of the lens opening, which determines the depth of field.
- Page 20 Press the jog dial to save the setting. 3 Press the Menu button to change other settings. (See 4 Take a picture. to move the cursor to a setting, such as to change the value of the setting. www.kodak.com/go/support page 23) to reset P, A, page 20.)
-
Page 21: Using The Flash
(If the lighting conditions require flash but do not require Red-eye reduction, the flash may fire only once.) NOTE: The flash is not available in all modes. See www.kodak.com/go/support Taking pictures and videos Flash Range Flash/Status... -
Page 22: Flash Settings In Each Mode
Auto, Off, Fill Flash, Red-eye Auto* Auto, Off, Fill Flash, Red-eye Auto* Auto, Off, Fill Flash, Red-eye Auto, Off Auto, Off, Fill Flash Red-eye* Auto, Off, Fill Flash, Red-eye Red-eye* Auto, Off, Fill Flash, Red-eye Auto* Auto, Off, Fill Flash, Red-eye www.kodak.com/go/support... -
Page 23: Shooting Close-Up And Landscape Pictures
Telephoto Landscape pictures Use the Landscape setting scenes. With this setting, the camera uses infinity auto-focus. Auto-focus framing marks (see page www.kodak.com/go/support Taking pictures and videos Default setting Available settings Fill Fill to take pictures of scenes that are 1 Set the Mode dial to any Capture mode. -
Page 24: Using Exposure Bracketing
2 In any Still mode, press the Burst button repeatedly to choose And if the exposure Then the exposures bracketing interval taken are is set to -0.7, 0.0, +0.3 the default +/-0.3 +0.7, +1.0, +1.3 -1.3, -1.0, -0.7 www.kodak.com/go/support 21.) -
Page 25: Using Burst
3 Press the Shutter button the rest of the way down and hold it to take the pictures. The camera stops taking pictures when you release the Shutter button, when the pictures are taken, or when there is no more storage space. www.kodak.com/go/support Taking pictures and videos First 6 pictures are saved. -
Page 26: Changing Picture-Taking Settings
(28 x 36 cm); some cropping may result. 2.1 MP—for printing up to 8 x 10 in. (20 x 25 cm); some cropping may result. 1.1 MP—for printing 4 x 6 in. (10 x 15 cm) prints, emailing, Internet, screen display, or for conserving space. www.kodak.com/go/support... - Page 27 P, A, S, M, C: This setting remains until you change it or take pictures. Auto, Scene: This setting remains until you turn the Mode dial or turn off the camera. www.kodak.com/go/support Taking pictures and videos Icon Options Standard (default) Fine NOTE: The Fine setting renders a larger file size.
- Page 28 —uses external AF sensor and TTL-AF when the Shutter button is pressed halfway down. Accessory Lens AF when optional accessory lenses are attached. Unavailable in Video mode. www.kodak.com/go/support —evaluates —evaluates the —similar to —evaluates all —evaluates the small —move the focus...
- Page 29 Liveview (Auto) Set the camera screen On/Off default for Auto mode. (Press the Display/Info button to manually turn the camera screen on or off.) www.kodak.com/go/support Taking pictures and videos Icon Options High Color Natural Color (default) Low Color Black &...
-
Page 30: Using Setup To Customize Your Camera
, then press the OK button. Icon Options On (default) Continuous —no pause between optical and digital zoom. Pause (default)—after reaching 4X optical zoom, the zoom button must be released, then activated again to begin digital zoom. None—digital zoom is disabled. www.kodak.com/go/support... - Page 31 Orientation Sensor Orient pictures so that they are displayed with the correct side up. www.kodak.com/go/support Taking pictures and videos Icon Options Pause (default)—when the blue slider on the zoom indicator pauses, the zoom button must be released and reactivated.
-
Page 32: Pre-Tagging For Album Names
First—on your computer Use Kodak EasyShare software (V 3.0 or higher, see names on your computer. Then copy up to 32 album names to the camera’s album name list the next time you connect the camera to the computer. See Kodak EasyShare software Help for details. - Page 33 6 Press the Menu button to exit the menu. Third—transfer to your computer When you transfer the tagged pictures or videos to your computer, Kodak EasyShare software opens and categorizes your pictures in the appropriate album. See the Kodak EasyShare software Help for details.
-
Page 34: Reviewing Pictures And Videos
Reviewing pictures and videos Press the Review button to view and work with your pictures and videos. To save battery power, use the optional Kodak EasyShare camera or printer dock, or Kodak 5-volt AC adapter. (See www.kodak.com/go/dx7440accessories.) Viewing single pictures and videos 1 Press the Review button. -
Page 35: Viewing Multiple Pictures And Videos
To return to the beginning of the video, move the joystick during playback. To replay the video, press the OK button. To go to the previous or next picture or video, move the joystick www.kodak.com/go/support Reviewing pictures and videos , then press the OK button. -
Page 36: Deleting Pictures And Videos
(page Image Storage (page Slide Show (page to locate a picture or video (or highlight one in to highlight an option, then press the OK button: deletes the displayed picture or video. Copy Multi-up Setup Menu www.kodak.com/go/support (page (page (page... -
Page 37: Protecting Pictures And Videos From Deletion
First—on your computer Use Kodak EasyShare software (V 3.0 or higher) to create album names on your computer. Then copy up to 32 album names to the camera’s internal memory. See Kodak EasyShare software Help for details. -
Page 38: Running A Slide Show
Third—transfer to your computer When you transfer the tagged pictures and videos to your computer, the Kodak EasyShare software opens and categorizes your pictures and videos in the appropriate album folder. See Kodak EasyShare software Help for details. Running a slide show Use the Slide Show to display your pictures and videos on the camera screen. -
Page 39: Displaying Pictures And Videos On A Television
■ The camera’s picture storage location is set to the location from which you are copying. See Image Storage, page www.kodak.com/go/support Reviewing pictures and videos to highlight On, then press the OK button. to highlight Loop, then Video Out, page... -
Page 40: Viewing Picture/Video Information
3 To view information on the next or previous picture or video, move the joystick . Press the Menu button to exit the menu. to highlight Copy to highlight an option: copies the current picture or video. www.kodak.com/go/support , then press the OK button. page 30). page... -
Page 41: Installing The Software
NOTE: This camera is not supported by Mac OS 8.6 or 9.X. You may capture pictures on a card, then use a card reader to transfer them to the computer. Mac OS X version 10.2.x or 10.3 is recommended for full functionality. To download EasyShare software, visit www.kodak.com/go/support Macintosh computers ■ Power Mac G3, G4, G5, G4 Cube, iMac;... -
Page 42: Install The Software
Install the software 1 Close all software applications that are open on your computer (including anti-virus software). 2 Place the Kodak EasyShare software CD into the CD-ROM drive. 3 Install the software: Windows OS-based computer— choose Run from the Start menu and type d:\setup.exe where d is the drive letter that contains the CD. -
Page 43: Sharing Pictures And Videos
Any time. (The most recent picture/video taken is then displayed.) Just after you take a picture/video, during Quickview (see ■ After pressing the Review button (see ■ www.kodak.com/go/support Press the Share button to “tag” your pictures and videos. When they are transferred to your computer, you can... -
Page 44: Tagging Pictures For Printing
Cancel Prints, then press the OK button. Cancel Prints is not available in Quickview. Printing tagged pictures When you transfer the tagged pictures to your computer, the Kodak EasyShare software print screen opens. For details on printing, click the Help button in the Kodak EasyShare software. -
Page 45: Tagging Pictures And Videos For Emailing
Tagging pictures and videos for emailing First—on your computer Use Kodak EasyShare software (V 3.0 or higher) to create an email address book on your computer. Then copy up to 32 email addresses to the camera’s internal memory. See the Kodak EasyShare software Help for details. -
Page 46: Tagging Pictures As Favorites
NOTE: The camera holds a limited number of favorites. Use Camera Favorites in the EasyShare software to customize the size of your camera Favorites section. For more information, click the Help button in the Kodak EasyShare software. to highlight Favorite appears in the status area. -
Page 47: Optional Settings
4 Press the Menu button to exit the menu. Preventing favorites from transferring to the camera 1 Open the Kodak EasyShare software. Click the My Collection tab. 2 Go to the Albums view. 3 Click the Camera Favorites Album for your camera. -
Page 48: Transferring And Printing Pictures
Transferring pictures/videos with the USB cable NOTE: Visit www.kodak.com/go/howto Also available for transferring You can also use these Kodak products to transfer your pictures and videos: Kodak EasyShare camera dock, Kodak EasyShare printer dock ■ ■ Kodak multi-card reader, Kodak SD multimedia card reader-writer Purchase these and other accessories at a dealer of Kodak products or www.kodak.com/go/dx7440accessories. -
Page 49: Printing Pictures From Your Computer
For details on printing pictures from your computer, click the Help button in the Kodak EasyShare software. Ordering prints online Kodak EasyShare print service (provided by Ofoto, www.ofoto.com) is one of the many online print services offered in the Kodak EasyShare software. You can easily: ■ Upload your pictures. -
Page 50: Troubleshooting
Troubleshooting When you have questions about your camera, start here. Additional technical information is available in the ReadMe file located on the Kodak EasyShare software CD. For updates to Troubleshooting information, see www.kodak.com/go/dx7440support. Camera problems If... Try one or more of the following ■... -
Page 51: Computer/Connectivity Problems
■ Slide Show does not run on an external video device ■ www.kodak.com/go/support Turn the camera off, then on again. Depress the shutter button all the way Insert a charged battery (page Wait until the ready light is green before attempting to take another picture. -
Page 52: Picture Quality Problems
(page 52). Make sure the camera is not in Close-up mode if you are more than 23.7 in. (60 cm) from your subject. Place the camera on a flat, steady surface or use a tripod. www.kodak.com/go/support (page 15). page 15). - Page 53 Memory card speed is slow. Card cannot be used to take videos. Change storage location to internal memory this card to take pictures only. Still having problems? Visit www.kodak.com/go/dx7440support, or see www.kodak.com/go/support (page 30), switch image storage locations 23), or insert a card with available memory (page 23), or use a different card.
-
Page 54: Getting Help
Other links See online demonstrations of your camera Get support for other cameras, software, accessories, more Get information on Kodak inkjet products Optimize your printer for truer, more vibrant colors Register your camera www.kodak.com/go/dx7440support www.kodak.com/go/dx7440accessories... -
Page 55: Telephone Customer Support
For the most up-to-date listings, visit: http://www.kodak.com/US/en/digital/contacts/DAIInternationalContacts.shtml www.kodak.com/go/support Amount of free hard disk space ■ ■ Camera serial number Version of Kodak EasyShare software ■ Exact error message you received ■ Netherlands 020 346 9372 New Zealand 0800 440 786... -
Page 56: Appendix
Appendix Camera specifications For more specifications, visit Kodak EasyShare DX7440 zoom digital camera CCD (charge-coupled device) 1/2.5 in. CCD, 4:3 aspect ratio Output image size 2304 x 1728 (4.0 M) pixels (image quality 2304 x 1536 (3.5 M) pixels mode) 2048 x 1536 (3.1 M) pixels... - Page 57 Kodak EasyShare DX7440 zoom digital camera Exposure Exposure metering TTL-AE Multi-pattern AE, Center-weighted AE, Center-spot AE. Exposure range AE range: EV 6.0 to 16.3 Full range: EV -3.0 to 16.3 Exposure mode Programmed AE mode: Auto, Program, and 16 Scene modes Aperture Priority AE: f/2.8, 3.4, 4, 4.8, 5.6 @ wide;...
-
Page 58: Tips, Safety, Maintenance
Review Quickview Video output NTSC or PAL Power Kodak EasyShare Li-Ion rechargeable battery (KLIC-5000), optional 5V AC adapter Communication with computer USB 2.0 (PIMA 15740 protocol) via USB cable, EasyShare camera dock or printer dock Languages English/German/Spanish/French/Italian/Portuguese/Chinese/Korean/Japanese Other features... -
Page 59: Storage Capacities
Do not allow chemicals, such as suntan lotion, to contact painted surfaces. ■ Service agreements are available in some countries. Contact a dealer of Kodak products for more information. ■ For rechargeable battery disposal information, visit the Rechargeable Battery Recycling Corporation Web site at www.rbrc.com. -
Page 60: Power-Saving Features
48 min. 9 sec. To turn it back on Press the Display/Info button. Press a button or insert/remove card. Turn Mode dial Off, then back on. www.kodak.com/go/support QVGA (320 x 240) 1 min. 43 sec. 3 min. 7 sec. 3 min. 27 sec. -
Page 61: Upgrading Your Software And Firmware
Regulatory compliance FCC compliance and advisory Kodak EasyShare DX7440 zoom digital camera This equipment has been tested and found to comply with the limits for a Class B digital device, pursuant to Part 15 of the FCC Rules. These limits are designed to provide reasonable protection against harmful interference in a residential installation. -
Page 62: Canadian Doc Statement
Install and use the equipment according to the instruction manual. MPEG-4 Use of this product in any manner that complies with the MPEG-4 visual standard is prohibited, except for use by a consumer engaging in personal and non-commercial activities. www.kodak.com/go/support... - Page 63 , 15 OK , 4 , 29 on/off , ii review , 28 share , ii , 37 www.kodak.com/go/support zoom , 9 cable audio/video , 1 , 33 USB , 1 , 42 camera dock connector on camera , ii...
- Page 64 , ii knob, diopter , 7 Kodak EasyShare software installing , 36 upgrading , 55 Kodak web sites , 48 landscape , 12 , 17 language , 26 last burst , 19 lens , i lens, accessory , 6...
- Page 65 , 12 sports , 12 text , 12 night landscape , 12 night portrait , 12 www.kodak.com/go/support OK button , 4 , 29 online prints, ordering , 43 optical zoom , 9 orientation sensor , 25 package contents, camera , 1...
- Page 66 , ii , 37 sharpness , 23 shutoff, auto , 54 shutter priority , 11 shutter speed, PASM mode , 13 shutter, problems , 45 sleep mode , 54 slide show problems , 45 running , 32 snow , 12 www.kodak.com/go/support...
- Page 67 , 9 tripod socket , ii troubleshooting , 44 turning camera on and off , 4 upgrading software, firmware , 55 URLs, Kodak web sites , 48 USB (universal serial bus) connection location , ii transferring pictures , 42 www.kodak.com/go/support...