Fuji FinePix A205 Quick Start
A review of the camera can be found at
http://www.isdntek.com/demo/camera_a205.htm
Start
- Install the two AA batteries and tiny memory card per the instructions.
- Slide open the font cover.
- Turn on your camera (slide switch on top).
- Rotate the top shutter switch to the red picture-taking camera icon on the left.

Set up your camera, if you haven't already.
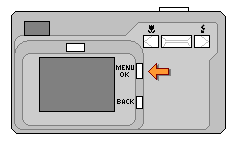
- Menu Mode. Press the Menu/OK button to view the onscreen menu.
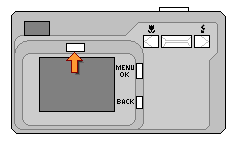
If the screen goes blank while you are trying to use it, there is a tiny silver button right on top of the display to turn it back on.
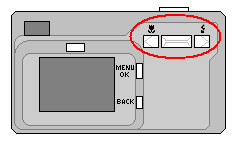
Whenever you are in the "MENU" mode, the top row of buttons are used as Up/Dn and Lt/Rt arrows.
- Set Date. The first time you use your camera or if the batteries are removed for an extended period, you will be prompted to set the date. Use the Lt/Rt arrow buttons to navigate the screen and use the Up/Dn button to select the date and time values. Keep scrolling the hours to change the AM/PM designation. Press the Menu/OK button to accept the changes and exit the menu.
- Select Modes. Click the Menu/OK button to view the onscreen menu.
-
The first screen is quality. Select the bottom option for 0.3M using the Up/Dn button.
 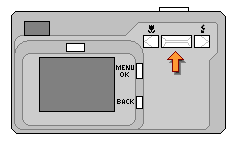
- Use the right-arrow to get to the Shooting Mode screen and be sure to start with Auto. Later on, when you get more familiar with your settings, you can switch to from Auto Mode to Manual Mode.
- Press the Menu/OK button to exit the menu and return to shooting.
Those settings will be remembered until you remove your battery.
Turn off the Flash
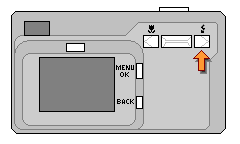 The next important step is to turn off your flash. The flash is the right-arrow button on the strip near the top of your camera.
When you are not in Menu mode, the button scrolls through a number of flash settings. You want the flash turned off. It will display as a circle with a slash through the lightning bolt on your screen. The next important step is to turn off your flash. The flash is the right-arrow button on the strip near the top of your camera.
When you are not in Menu mode, the button scrolls through a number of flash settings. You want the flash turned off. It will display as a circle with a slash through the lightning bolt on your screen.  This setting will persist unless you accidentally press the button while in shooting mode. This setting will persist unless you accidentally press the button while in shooting mode.
Taking closeups?
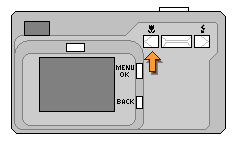 The Macro button is the left-arrow button on the strip. When you are in Macro mode, a little tulip flower will display on the screen. Macro mode goes away when you shut off your camera.
Screen goes black?
Too slow setting up your session? There is a button right above the viewer to turn it back on again.

Manual Mode for Special Lighting
- Press the Menu/OK button, and scroll RT until you find the Manual/Auto screen. Scroll up to the Manual setting and press the Menu/OK button.
a. b.
b. c.
c.
- Press the Menu/OK button again to return to the menu, and right-scroll through until you see the new EV menu and the new WB menu. You won't see those menus when the camera is set to Auto Mode.
- The EV (Exposure Compensation) menu adjusts the brightness for an overlit or underlit scene. You'll have to experiment using those settings. Scroll to the setting you would like, and then move on to the next settings.
- The WB (White Balance) adjusts the color away from blue for the outdoor sunlit shots and away from yellow for the indoor incadescent bulbs. There are cloudy day and flourescent settings in between. Scroll to the setting you would like, and then move on to the next settings.
- After setting up both of them, press the Menu/OK or Back button to exit the menu. They will be remembered and used until you return to Auto Mode.
- You will need to again turn off the flash for Manual mode, the same way it was turned off for Auto mode.
Review your photos.
- Rotate the top shutter switch to the green "play" icon in the middle.

- Use the Lt/Rt buttons to scroll through your photos, or use the Up/Dn button to zoom in.

- Erasing Photos. Photos may be erased while reviewing them in "play" mode. While looking at a photo, press the Menu/OK button to see the "Erase" menu. Click the "back" button to exit without making changes; or scroll up and select "Frame" in the menu and click the Menu/OK button when prompted to erase the picture. Another prompt will appear on the next picture in memory, where you can click OK to erase or click the "Back" button to exit.
Photos to Computer.
The camera is delivered with a CD of drivers and programs. However, the newer XP machines will automatically recognize the camera as a memory drive, so it is not necessary to install that CD. No special software is needed to move your photos from your camera to your computer.
- Plug the USB cable into your camera and computer.
- Turn on your camera. The lens cover may remain closed and the setting of the top switch doesn't matter.
- On most XP machines, a popup will ask you what program should handle the camera photos. I usually choose Windows Explorer, which is the regular file folder view. If there is no popup window, then you can usually find the FinePix drive from "My Computer".
- A file folder will open and display a "DCIM" folder, and in that folder is the "100_FUJI" folder, and in that folder you will find your photos.
- Select all the photos and move them to another folder by dragging and dropping the batch or by using the drop down "edit" menu.
- If copies of the photos still remain in your camera after successfully moving them, you can "select all" and "cut" from the edit menu. Or delete them using the camera's erase function.
- Alternatively, you may install and use the CD software to automatically download and rename your photos.
- Turn off your camera and unplug the cable.
|


 The next important step is to turn off your flash. The flash is the right-arrow button on the strip near the top of your camera.
When you are not in Menu mode, the button scrolls through a number of flash settings. You want the flash turned off. It will display as a circle with a slash through the lightning bolt on your screen.
  The Macro button is the left-arrow button on the strip. When you are in Macro mode, a little tulip flower will display on the screen. Macro mode goes away when you shut off your camera.
 b.
b. c.
c.


