EXIF tool is a widely used meta-data information recorder built on Perl by Phil Harvey. It is one of a kind open-source tool which works on a variety of file types. EXIF stands for Exchangeable Image File Format, and it is mainly used for including metadata in various file types like txt, png, jpeg, pdf, HTML and many more. With EXIF tool we can also read, write and manipulate such meta-data information.
Installation:
Exiftool is an open-source tool. The library is built with Platform Independent Perl library.
1. Clone the git repo onto your system.
git clone https://github.com/exiftool/exiftool.git
2. Test the tool with a test file present in the repository
cd exiftool
./exiftool t/images/ExifTool.jpg

Alternatively, on Ubuntu distribution you can use:
sudo apt install libimage-exiftool-perl

Or simply use the following command it will automatically capture the above command.
sudo apt install exiftool

For downloading directly from the Source, use the following commands. This will work for any Linux distro including CentOS.
wget https://sourceforge.net/projects/exiftool/files/Image-ExifTool-12.16.tar.gz
tar xvf Image-ExifTool-12.16.tar.gz
cd Image-ExifTool-12.16/
./exiftool t/images/ExifTool.jpg


To install it globally, make install the file.
Note: As it runs on Perl, you must have Perl installed on your Linux Distro.
perl Makefile.PL
make
make test
make install
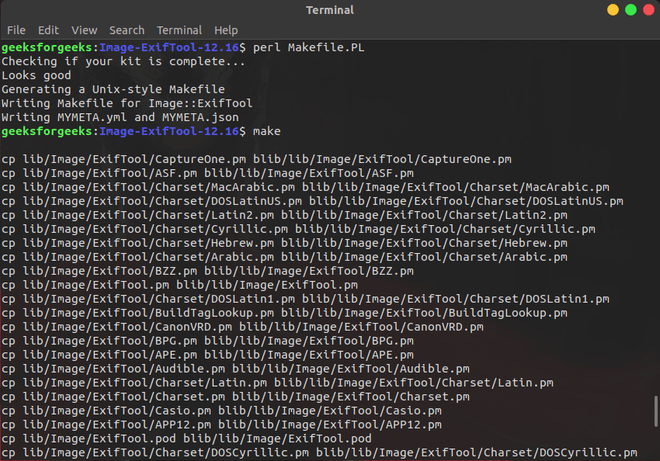


You can now run ExifTool anywhere in your terminal by typing exiftool.
Usage:
Reading Meta-Data:
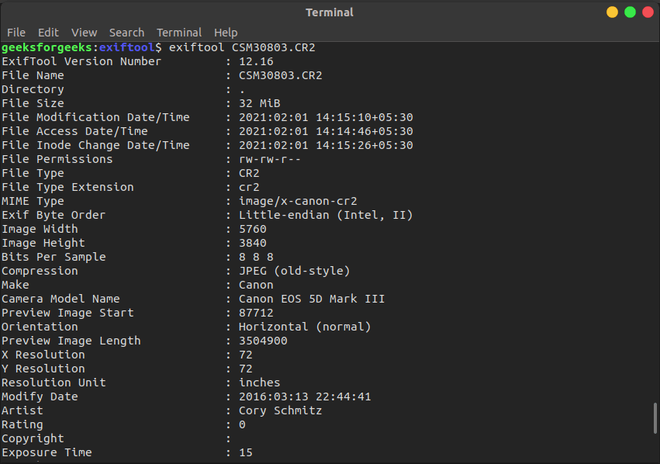
1. To extract the entire list of metadata from the file uses the following command.
exiftool <filename>
2. To extract the ids along with the Exif Tags in their Hexadecimal Format, run the above command with -H flag.
exiftool -H <filename>

3. ExifTool maintains the list of most common Exif Tags for a file, which could be viewed with the following flag.
exiftool --common <filename>

4. With ExifTool we can also extract the preview image or the thumbnail of an image file.
exiftool -PreviewImage [filename.jpg] > [Output.jpg]
exiftool -ThumbnailImage [filename.jpg] > [Output.jpg]

Example:
exiftool -b -PreviewImage CSM30803.CR2 > abc.jpg
-b to extract binary information and store the result in abc.jpg file
exiftool -b -ThumbnailImage CSM30803.CR2 > thumb.jpg

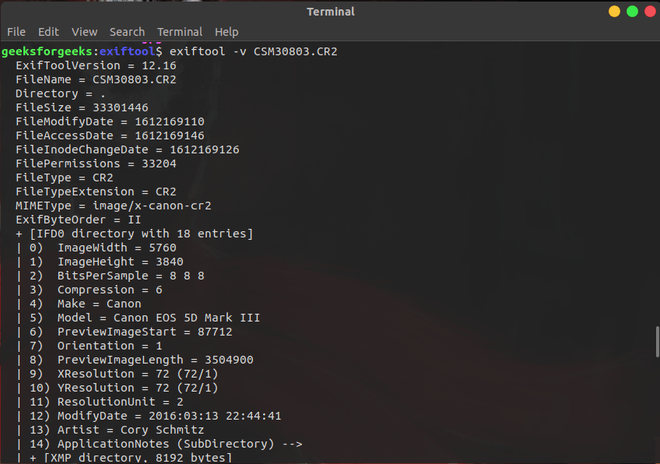
5. We can also generate extended information with verbose mode. This will display us the comprehensive data about the process that it is performing.
exiftool -v <filename>
Writing Meta-Data:
To edit any meta-data we can use it’s corresponding Exif Tag to make the changes.
Note: We can only change the tags that are not write-protected.
exiftool -<Exif Tag>= “Geek Alert” <filename>

Removing Meta-Data:
If we want to erase all the existing information within the meta tags of the file, we can use the following command . This command will remove all the Meta-Data from the file leaving all the basic or protected tag information.
exiftool -all= <filename>

Saving Meta-Data:
We can save the output of the exiftool within another file (preferably a text file) to store the info for later use.
exiftool [filename] > [meta-data.txt]
cat <meta-data.txt>
Application:
1. Sorting Image Files into Folders by Year and Month
We can combine the information from the metadata to solve variety of tasks. Suppose we have a lot of Images and we want to sort them into new folders and arrange them by year, month, or days, then we can use the following command:
The command copies the old images into directories based on their year and month.
exiftool -o '-Directory<CreateDate' -d ./newimage/%y/%y%m -r ./oldimage
- -o make copies of all the images (hereafter referred to as old images) and make new images out of them
- -Directory<CreateDate moves the images to their new destination folders using the Image Creation Date
- ./newimage/%y/%y%m is the relative path to the new directory, it follows the naming convention as year followed by subdirectory as year month.
- -r is the recursively execute the command over the source folder
- ./oldimages is the source folder where original images are stored
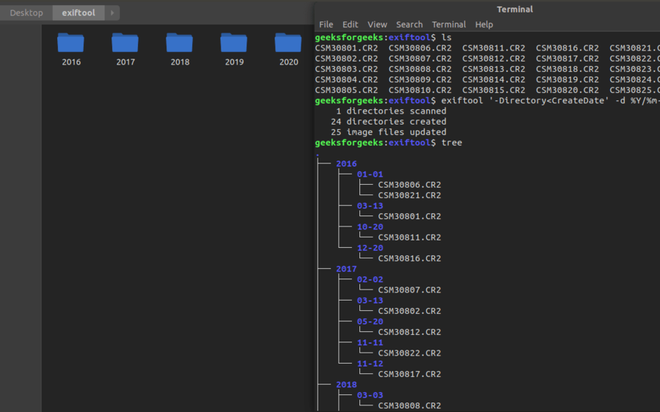
Example:
To make a change in the current directory, move the image to directories.
exiftool '-Directory<CreateDate' -d %Y/%m-%d .
We can see the images are moved into a new folder with the year and then month-day subfolders.
2. Renaming Image Files According to their Creation Date
Suppose you are working for a photography firm and you clicked photos for many events but the photos got mixed and now manually segregating each image will require a lot of wasted effort.
Here we will take advantage of the exiftool to segregate/ rename all the raw files present inside the current folder and it’s subfolder according to the exif tag of metadata Create Date and Time.
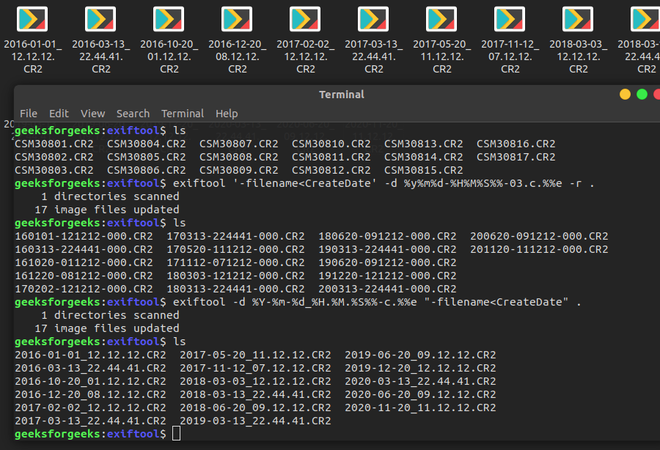
exiftool '-filename<CreateDate' -d %y%m%d-%H%M%S%%-03.c.%%e -r ./imagepath
- -filename<CreateDate renames the raw images using image’s Creation Data & Time
- -d sets the format for date/ time values
- %y%m%d-%H%M%S%%-03.c.%%e is the format to rename the file.
For Example: This would rename a file taken on Feb 1, 2021, at 14:08 to 20210201-1408-000.xxx. The three zeros after the time are a copy number put there by %%-03.c in the date format.
While renaming files, copy number keeps on incremented until it finds a filename that does not exist yet.
- .%%e keeps the original file name extension
- Use .%%le (for renaming extension in lowercase) or .%%ue (for renaming in uppercase)
- -r is the recursively execute the command over the source folder
- ./imagepath is the relative path to the directory with all your images to be renamed.

Example:
To make a change in current directory.
exiftool -d %Y-%m-%d_%H.%M.%S%%-c.%%e "-filename<CreateDate" .
ExifTool is a very powerful tool for manipulating file metadata. It got wide-ranging applications and with all those flags and options possibilities are endless.
Please Login to comment...