 The EOS 6D Mark II is a 'low-priced' full-frame DSLR aimed at enthusiasts and upgraders from APSC bodies. The photo and movie quality looks great with the default settings and delivers noticeably less noise than the 80D at high ISOs. The combination of a fully-articulated touchscreen and Dual Pixel CMOS AF means shooting movies or in Live View is a highlight with confident focusing anywhere on the frame. The viewfinder AF is less successful though with limited coverage and a lower hit rate than in Live View. The 6D II also lacks 4k video, higher frame-rate 1080p, dual card slots and headphone jacks, four features present on most mirrorless cameras at this price, albeit normally combined with smaller sensors. So it's Canon's usual story of a feature-set carefully-pruned so not to step on the toes of its higher-end models. If you're wedded to Canon's World, you'll enjoy the 6D II's excellent touch interface, easy Wifi, effortless GPS tagging, leading movie autofocus, and crisp, clean photo quality. Recommended if you desire a full-frame camera at this price point but compare closely with Nikon's D750 and Sony's A7 Mark II.
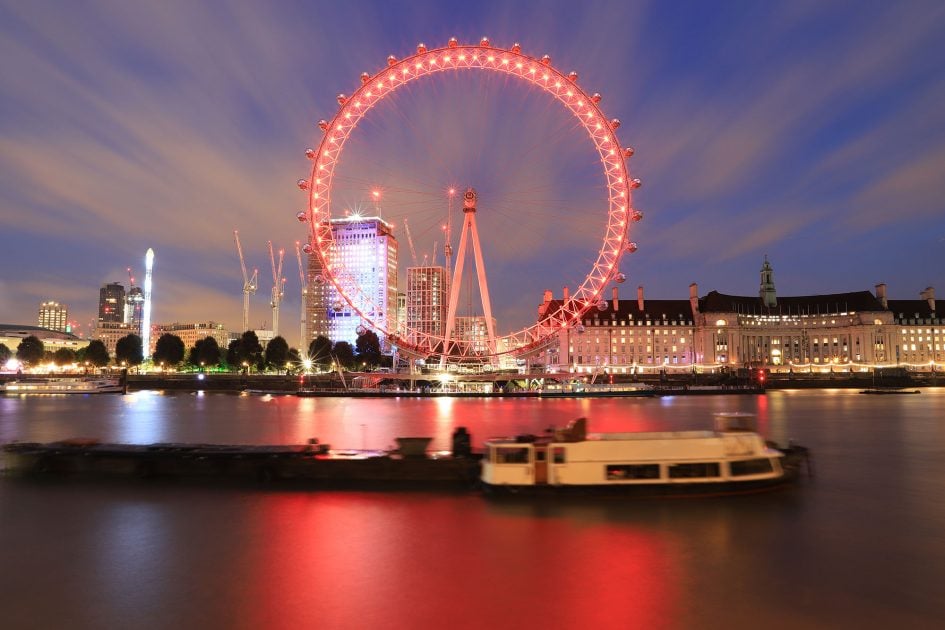
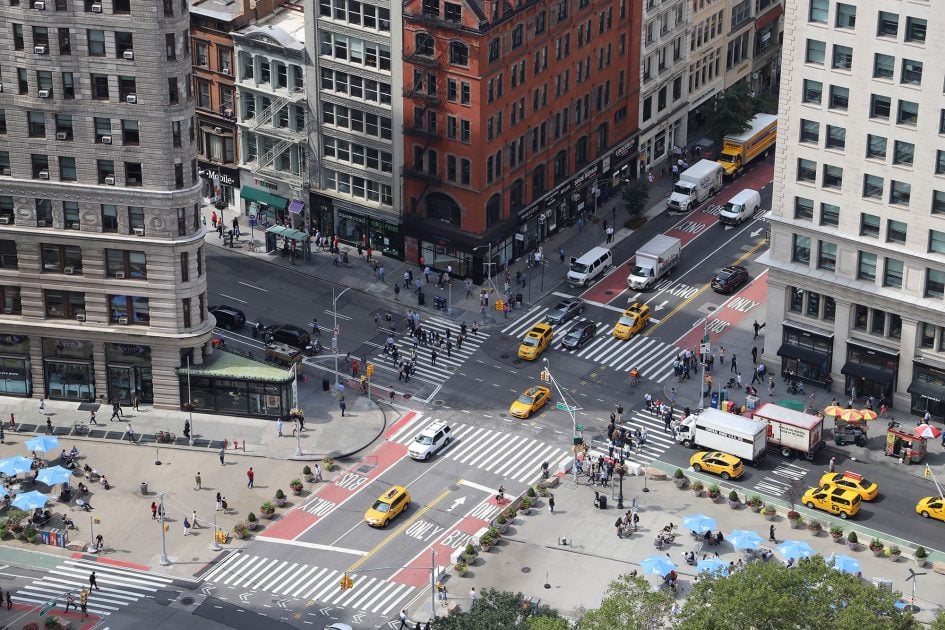
Canon EOS 6D Mark II review
-
-
Written by Gordon Laing
In depth
The Canon EOS 6D Mark II is a ‘budget’ full-frame DSLR aimed at pro-sumer and enthusiast photographers. Announced in June 2017, it replaces the almost four-year-old EOS 6D, Canon’s first attempt at a lower-cost full-framer. Like its predecessor, it’s positioned below the EOS 5D series, although enjoys some unique benefits not available elsewhere in Canon’s range.
Most notably, the EOS 6D Mark II becomes Canon’s first full-frame DSLR with a fully-articulated touch-screen monitor – a big upgrade over the original 6D who’s screen remained fixed in place and lacked touch capabilities. Under the hood, Canon’s upgraded the sensor, autofocus, burst speed and connectivity. So it’s in with a new 26.2 Megapixel sensor (vs 20.2 on the 6D), now sporting Dual Pixel CMOS AF for smooth and confident refocusing in live view and movies. The 45 point / all cross-type AF sensor of the EOS 80D has been adapted for full-frame use, representing a big upgrade over the 11-point / single cross-type array of the original 6D. Continuous shooting has accelerated from a pedestrian 4.5fps to a more useful 6.5fps, and the existing Wifi and GPS are now complemented with Bluetooth and NFC, not to mention support for the Russian GPS network in addition to the US and European systems.
Annoyingly – but not surprisingly for Canon – the 6D Mark II lacks 4k video, at least in the normal movie mode. The upgrade to DIGIC 7 means there’s now support for 4k in-camera timelapse movies, but for normal video, the upper limit is 1080 / 60p, and while there is a microphone jack, there’s still no headphone connectivity nor dual SD slots. In Canon’s World, this makes some sense to differentiate it from the 5D Mark IV, but lacking 4k is a dangerous move when its long become standard in the mirrorless world. At least the combination of Dual Pixel CMOS AF, a full-frame sensor and a fully-articulated touchscreen still make it attractive to movie makers.
Canon EOS 6D Mark II video overview
Canon EOS 6D Mark II design and controls
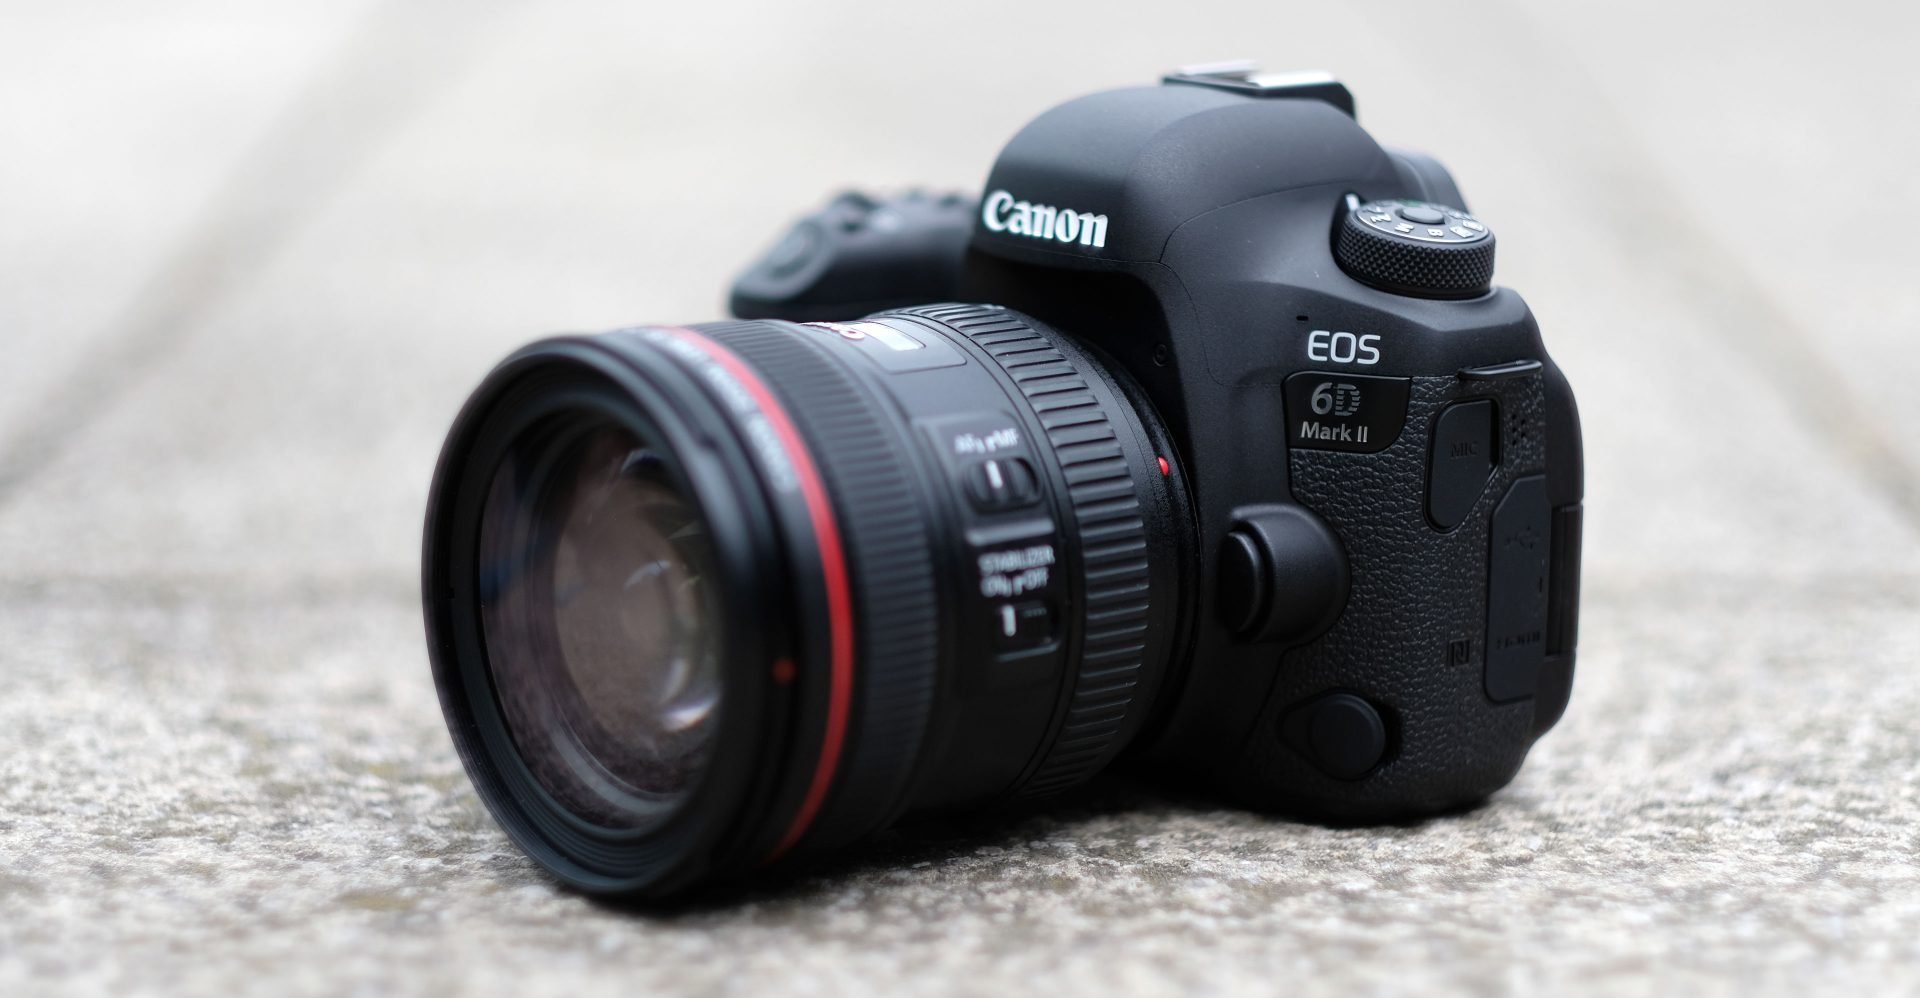
The Canon EOS 6D Mark II looks almost identical to its predecessor from the front and top with only the badge at the front to confirm which version you’re looking at. Measuring 144x111x75mm and weighing 765g with battery and memory card, it’s essentially the same width and height as the 6D Mark I, and only a tad thicker and a few grams heavier – both mostly down to accommodating the fully-articulated screen.
If you’re coming from the EOS 80D, you’ll find the 6D Mark II body fractionally wider, taller and heavier (technically 5mm wider, 5mm taller and 30g heavier), but they’re remarkably close in overall size and weight given one has a full-frame sensor and the other has a cropped APS-C sensor; certainly if you’re happy carrying the 80D, you’ll barely notice any difference accommodating the 6D II. I’ve pictured them alongside each other below.
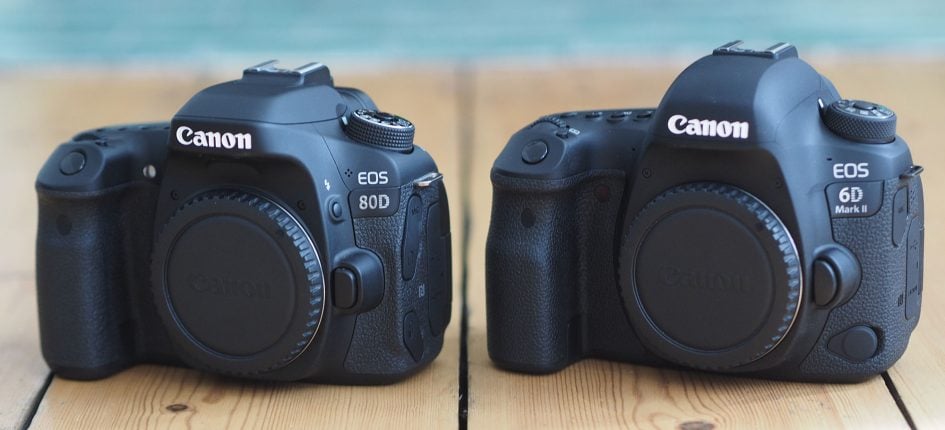
The materials used vary between models, with the 6D Mark II described as using aluminium alloy versus magnesium alloy on the Mark I, but the overall build quality and weather-sealing feels similar. Compared to the 80D though, the 6D Mark II feels a little more solid, while the absence of a popup flash means the head is more solid and impervious to knocks. That said, if you’re coming from the 80D, you may miss the presence of a popup flash – I know I find them useful for basic fills. Note the Nikon D750 has a popup flash.
Place the 6D Mark II next to the 80D and you’ll also notice the former’s grip is a little larger, the shutter release is soft-touch rather than clicked, the upper LCD screen is rectangular with room for more information and larger fonts, while the buttons running alongside the upper screen are more pronounced, and the rear thumb wheel is larger and easier to turn. There’s also a mild re-arrangement of some buttons, for example the Q button is now to the right of the playback button, allowing the 80D’s Q button to become dedicated to magnifying the image in playback.

Switching from the 80D to the 6D Mark II isn’t entirely positive though. As well as losing the popup flash, you’ll also lose the headphone jack along with the Creative Filters and No-Flash modes, and as I’ll mention in a moment, the AF array also occupies a smaller portion of the frame. I’ll go into more detail on each later in the review.
In terms of composition, the 6D Mark II lets you frame using a traditional optical viewfinder or in Live View using the fully-articulated touchscreen. The optical viewfinder employs a pentaprism with 98% coverage and 0.71x magnification, essentially the same as its predecessor. Both deliver a comfortably larger viewfinder image than the EOS 80D, although miss out on its 100% coverage. I should also add the Nikon D750 offers 100% coverage from its viewfinder with similar magnification.
While the EOS 6D Mark II’s viewfinder image is noticeably larger than the EOS 80D’s though, you’ll notice the AF array occupies a smaller portion of the frame. As you may know, the 6D Mark II inherits the 80D’s AF module, adapting it for full-frame use. This does however mean that while both share the same 45-point / all cross-type AF system, the rectangular array occupies a larger portion of the frame on the 80D thanks to its smaller APSC sensor. Indeed on the 80D, the AF array extends across roughly three quarters of the frame compared to less than half of the frame on the 6D Mark II. The bottom line is when composing through the optical viewfinder on the 6D Mark II, you’ll need to be much more careful about ensuring the subject is closer to the middle than you are with the 80D; I’ve discussed this in more detail in the AF section later.
Canon has at least progressed in the degree of information that can be presented in the viewfinder with the 6D Mark II offering a step-up over the 80D and the original 6D. Previously on the 6D Mark I, the exposure compensation scale could double-up as a single-axis leveling gauge, while the 80D gained a simple icon in the corner of the viewfinder which revealed whether the camera was squint, but not by how much. Now the 6D Mark II gains an optional overlay which shows a dual-axis leveling gauge in the upper middle with degrees of tilt in both directions. The 6D Mark II also inherits the 80D’s viewfinder warning icons for detected flicker from artificial lights and whether you’re in, say, monochrome or HDR modes.
The 6D II trumps the 80D and 6D I though with an additional strip of icons along the bottom of the viewfinder image which can optionally display the battery life, shooting mode, AF mode, image quality, drive mode, and metering mode – basically duplicating most of the information shown on the top LCD panel. This is a very welcome upgrade and you can configure the camera to show as little or as much as you like. Like the earlier models, there’s also an optional alignment grid that can be turned on or off.
Moving onto Live View, the 6D Mark II offers a similar experience to the 80D with a fully-articulated 3in / 3:2 / 1040k dot touchscreen and an autofocus system driven by a Dual Pixel CMOS sensor. As such you can flip-out and twist the screen to virtually any angle, tap, pinch and swipe your way through one of the best user interfaces in the industry, and tap to reposition the AF area or to pull-focus while filming movies with very smooth and confident refocusing.
While the experience may be similar to the 80D, it all represents one of the biggest upgrades over the original 6D Mark I which had a fixed screen with no touch controls and a live view / movie AF system which couldn’t continuously autofocus. It’s a huge difference in practice and a major reason to upgrade from the 6D Mark I if you’re into shooting in Live View and filming movies. I’ve gone into more detail in the AF and movie sections later. Note the Nikon D750’s screen is a little larger at 3.2in, but a different shape and only articulated vertically; the D750, like all Nikon DSLRs to date, also lacks any kind of effective continuous autofocusing in Live View and movie shooting, a major benefit of modern Canon bodies.
Moving onto connectivity, the 6D II is equipped with USB-2 and Type-C HDMI ports, an N3-type remote input, and a 3.5mm microphone jack. In these respects it’s the same as the 6D Mark I before it as both lack a headphone jack. Interestingly though, the EOS 80D does have a headphone jack, so if you’re upgrading to the 6D Mark II, you’ll lose the ability to monitor audio. It’s also worth noting the Nikon D750 also offers a headphone jack, although again its lack of effective movie autofocus may render it less useful for video than the Canons. The D750 also offers a PC Sync port for external lighting. Note the EOS 80D uses the more basic E3 remote switches.
In terms of wireless connectivity, the 6D Mark II sports Wifi with NFC and Bluetooth to aid connection and negotiation, as well as a built-in GPS receiver. GPS hardware was also available on the original 6D and a feature both models enjoy over the 80D, although on the 6D Mark II there’s now additional support for more satellite networks. The 6D Mark II is however the only one of the three to sport Bluetooth which, as described in detail later, greatly aids Wifi connections as well as supporting a Bluetooth remote accessory. Canon’s Wifi capabilities are superior to Nikon’s both in terms of features and ease of use.
The 6D Mark II, like the Mark I and the 80D, offers just one memory card slot, which takes SD cards and supports UHS-1 speeds; so no twin slots and no support for faster cards. In contrast, Nikon’s D750 offers twin SD memory card slots and while the age of the camera means there’s no internal benefit of using UHS-II cards, the ability to backup as you shoot, store RAW on one card and JPEGs on the other, or simply overflow from one card to another is very useful. Frustratingly Canon force you to buy the 5D Mark IV if you want twin card slots.
In terms of batteries, the 6D Mark II is powered by an LP-E6N Lithium Ion pack that’s charged in a supplied external AC unit; so still no USB charging on any DSLR to date. Canon quotes 1200 shots through the viewfinder, giving the 6D II slightly longer life than the LP-E6 on the Mark I which was quoted at 1090 shots. Interestingly the 80D is powered by the same LP-E6N as the 6D II, but is quoted as having slightly lower battery life. That said once you start filming video, shooting in live view, or using Wifi and GPS, you’ll find the battery life similar across all three and of course depleting much faster. If you’d like longer lifespan, all three Canon bodies can be used with optional battery grips, but they are different models so you can’t re-use them.
Canon EOS 6D Mark II lenses
The 6D Mark II is equipped with an EF lens mount which gives it access to Canon’s huge lens catalogue, while the full-frame sensor means there’s no field-reduction. The only restriction regards Canon’s EF-S lenses, designed for its range of DSLRs with smaller APS-C sensors; these remain incompatible with its full-frame bodies.
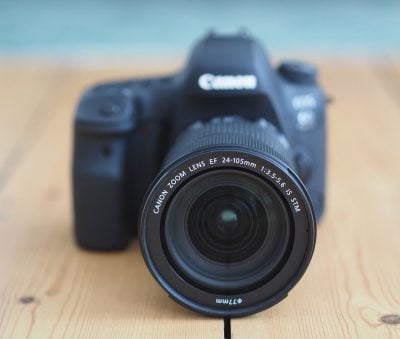
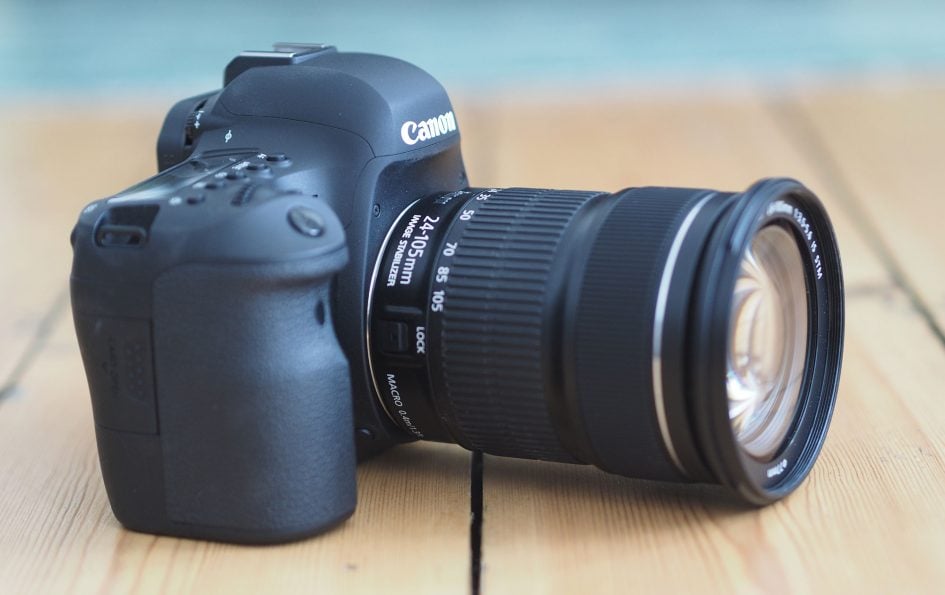
The 6D Mark II is typically sold body-alone or in a bundle with the EF 24-105mm f3.5-5.6 IS STM zoom which provides a useful general-purpose range along with quick, smooth and quiet STM focusing during Live View and movies. In my tests I was very pleasantly surprised by this lens which really punched above its weight. As a non-L lens, it may lack weather-sealing and a constant aperture, but I have no complaints over the smoothness of the focusing and zoom ring mechanics, and the optical quality impresses at every focal length and aperture.
This is important since the EF 24-105mm f3.5-5.6 IS STM is currently the only full-frame compatible lens with STM focusing, wide coverage and optical stabilisation. The only other full-frame EF lenses with STM focusing are the EF 40mm f2.8 STM pancake and EF 50mm f1.8 STM standard lenses; both are well worth adding to your collection, but again neither enjoy optical stabilisation nor wide coverage.
There’s two things to take home from this: first is that the EF 24-105mm STM is a no-brainer for the 6D Mark II – and indeed any Canon full-frame DSLR with Dual Pixel CMOS AF that’s going to be used for movies or in Live View. But secondly if you’re coming from the 80D, you’re going to have less choice when it comes to lenses with the movie-friendly STM focusing system. 80D owners with their cropped sensors, have access to both EF and EF-S lenses, allowing them to use models like the excellent ultra-wide EF-S 10-18mm STM, that’s perfect for vlogging at arm’s length. As it stands, EOS 6D Mark II owners who want to enjoy STM focusing, wide coverage and optical stabilisation have only one choice and it starts at 24mm which may not be wide enough.
This is an important consideration for EOS 80D owners, or indeed anyone thinking of using the EOS 6D II for movies. Of course you can use any Canon EF lens for video on the 6D II, but again the movie and live view focusing experience is better with STM models.
That said, I’ll conclude this section by reiterating the EF 24-105mm STM is a surprisingly good lens for the money and an essential partner for the 6D II. I’d also complement it with the EF 50mm f1.8 STM for shallow depth-of-field work at an affordable price.
Canon EOS 6D Mark II autofocus and burst shooting
The Canon EOS 6D Mark II is equipped with two autofocusing systems: a 45-point / all cross-type system when composing through the optical viewfinder and Dual Pixel CMOS AF when composing with the sensor in Live View or in movies. Both represent a significant upgrade over the original 6D Mark I which only offered a basic 11-point system with just one cross-type sensor through the viewfinder, and a contrast-based AF system in Live View and movies which didn’t allow true continuous autofocusing. Note the low-light focusing remains similar on both bodies though with the 6D Mark I and II viewfinder AF systems working down to -3EV and the Dual Pixel CMOS system on the Mark II working down to -2.5EV.
I’ll start with the 6D Mark II’s viewfinder AF system, which is actually inherited and adapted from the EOS 80D. As Canon followers will know, the EOS 80D employs a smaller cropped-frame / APS-C sensor which in turn means the viewfinder AF module covers a larger portion of the frame than it does on the 6D Mark II. As noted in the viewfinder section earlier, the AF array extended across pretty much three quarters of the frame on the 80D, whereas in its scaled-down form against a full-frame sensor on the 6D Mark II, the coverage becomes comfortably less than 50% horizontally. So when shooting through the viewfinder on the 6D Mark II, you have to ensure the subject is fairly close to the middle of the frame or it won’t be focused on.
To be fair, the 6D Mark II’s viewfinder AF coverage is still a little broader than its predecessor, the 6D Mark I. They share similar AF coverage horizontally, but rather than the diamond pattern of the earlier 6D Mark I’s AF module, the Mark II’s is more rectangular in shape. Since it also squeezes 45 points in there compared to 11 on the Mark I, the array is considerably denser too, allowing better tracking within the AF region. But the bottom line remains: on both 6D models you’ll need to compose fairly close to the centre of the frame if you want autofocus through the viewfinder. Anyone upgrading from an 80D will really notice the reduced area of AF coverage on the frame and have to be more careful where they place their subject.
When shooting through the viewfinder you can choose from auto selection (where the camera chooses which of the 45 AF points to use), a zoned region (large or standard), or a single point; sadly the 6D Mark II isn’t considered sufficiently high-end by Canon to earn itself a dedicated AF joystick so you’ll be adjusting the AF area position using the dials or cross-keys. As always, you can choose between One Shot AF for static subjects, Servo AF for moving subjects or AI Focus AF which attempts to choose between them. I’ll discuss the performance in a moment.
Switch the EOS 6D Mark II into Live View and you’ll enjoy the much broader coverage of Dual Pixel CMOS AF which allows around 80% of the sensor area to double-up as phase-detect AF points. This allows the 6D Mark II to autofocus on subjects close to the sides or corners of the frame which is impossible through the viewfinder without first using an AF point nearer the middle, locking, recomposing and hoping you’re still within the depth-of-field of the lens and aperture.
In Live View, the camera divides the large AF coverage rectangle into 63 areas, but lets you position a smaller area pretty much wherever you want. Again you can move the position of the AF area using the buttons, or thanks to the touchscreen you can simply just tap the subject you’d like the camera to focus on. Since the Live View system uses the main imaging sensor, the 6D Mark II can also deploy face detection which again works over almost the entire area of the frame, and if desired you can tap to track a subject, human or otherwise. Once again there’s the choice of single or continuous autofocus that Canon calls One Shot or Servo AF in Live View.
To put the AF systems to the test I shot a variety of subjects both static and in motion, with a selection of lenses in varying light conditions. In terms of speed with static subjects in One Shot mode, the 6D Mark II felt similar whether shooting with the viewfinder or screen. It’s not blindingly quick, but fast enough for most situations, especially when coupled with a decent lens. The low light performance also felt similar through the viewfinder and on the screen, and again while the 6D II wasn’t the fastest camera I’ve tested, I never missed any shots or opportunities because of it. If you’re used to – or demand – snappier AF performance, you may want to personally evaluate the camera before buying it.
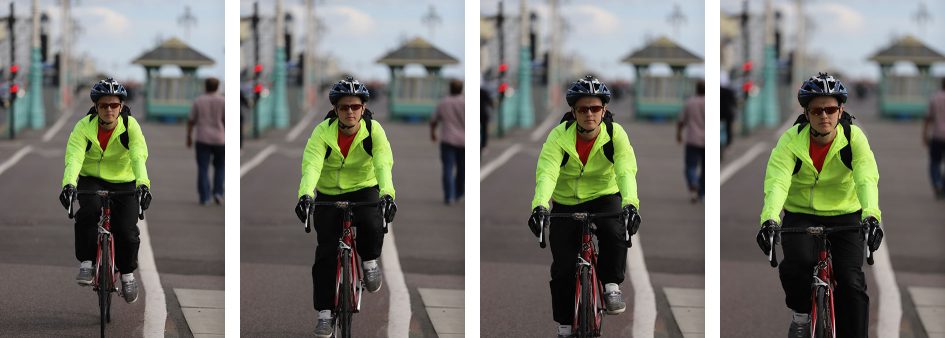
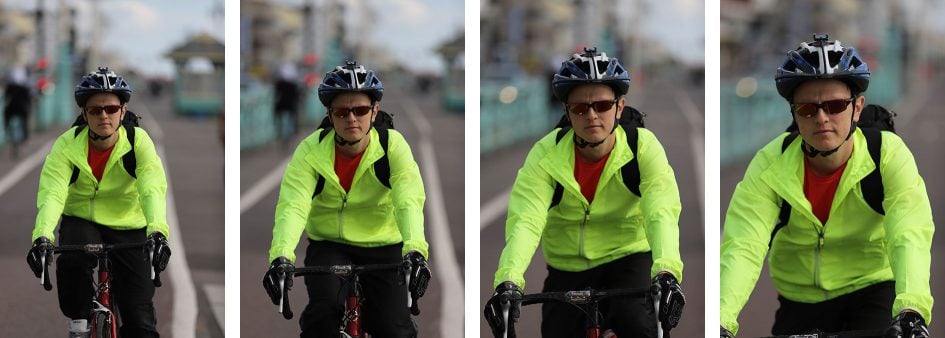
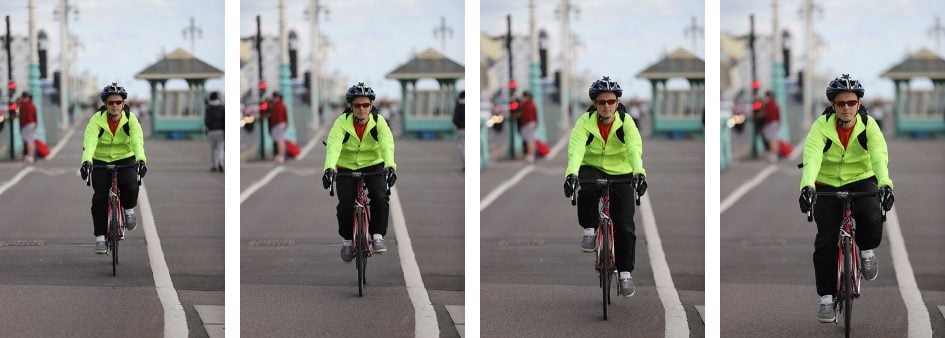
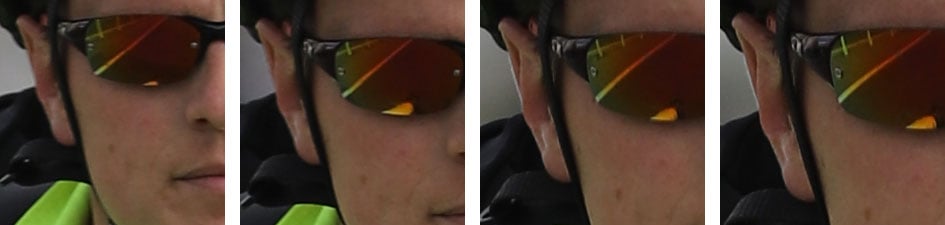
To test its performance with a subject in motion, I fitted the EF 70-200mm f2.8L IS II USM lens, set it to 200mm f2.8, turned it to the portrait orientation and aimed at my friend Ben cycling towards me on the Brighton sea-front.
Starting with the viewfinder AF system, I manually selected a single AF point at the far right edge of the array (or at the top in portrait orientation), kept it positioned over Ben’s face as he approached, and fired-off bursts in the Continuous High mode with Servo AF for continuous autofocus. I’ll discuss actual burst speeds later and concentrate on focus performance first. Here’s a sequence of 16 images in a burst shown with the full view followed by 100% crops of Ben’s face. I’d say of the 16, five of them are noticeably blurred, which gives a hit-rate of about two-thirds. I repeated the test several times with similar results. I’d also like you to notice the framing on the full images where Ben’s face is actually positioned on the outer edge of the AF array; I’d have preferred him higher on the frame, but I’d have lost autofocus when framing through the viewfinder.

Above: Canon EOS 6D II Servo AF using viewfinder with EF 70-200mm f2.8 at 200mm f2.8. Below: 100% crops

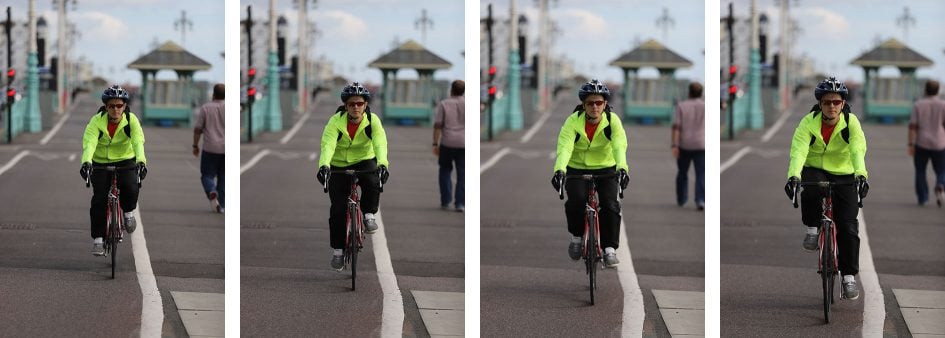
Above: Canon EOS 6D II Servo AF using viewfinder with EF 70-200mm f2.8 at 200mm f2.8. Below: 100% crops
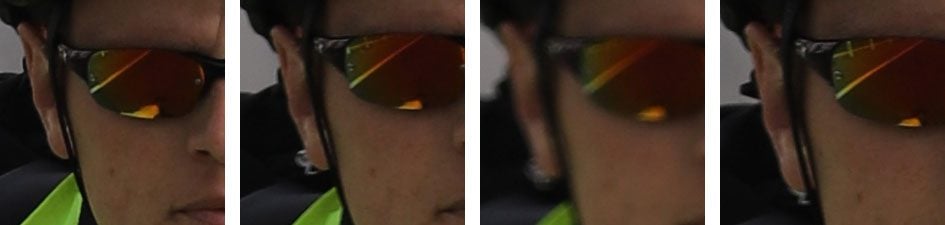
Above: Canon EOS 6D II Servo AF using viewfinder with EF 70-200mm f2.8 at 200mm f2.8. Below: 100% crops

Above: Canon EOS 6D II Servo AF using viewfinder with EF 70-200mm f2.8 at 200mm f2.8. Below: 100% crops

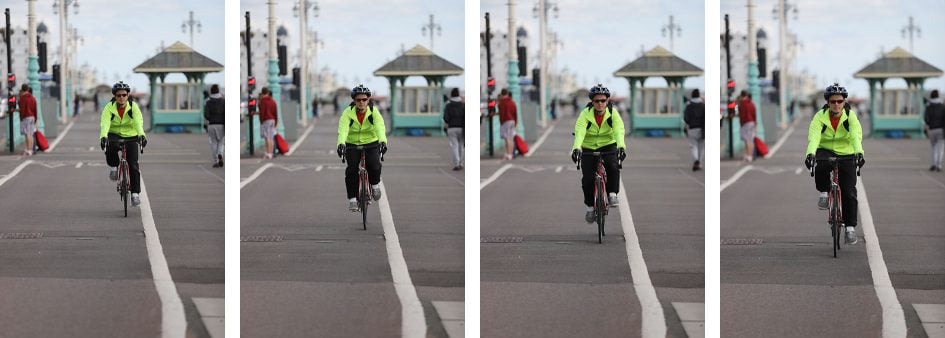
After testing the viewfinder AF system I moved onto Live View. Thanks to Dual Pixel CMOS AF, I could position the AF area almost anywhere on the frame, allowing me to shift Ben higher on the image for a more balanced-looking composition. What follows is another burst of 16 frames with the full images and 100% cropped areas, although note the slower burst speed of around 4fps in Live View when using Servo AF means the sequence of 16 frames represents a slightly longer period of time – so Ben starts further away at the start of the sequence. Judging from the crops below, I’d say the Live View AF system is delivering a much higher hit-rate than the viewfinder AF system with all 16 frames looking acceptable and only a couple being a tad-off.
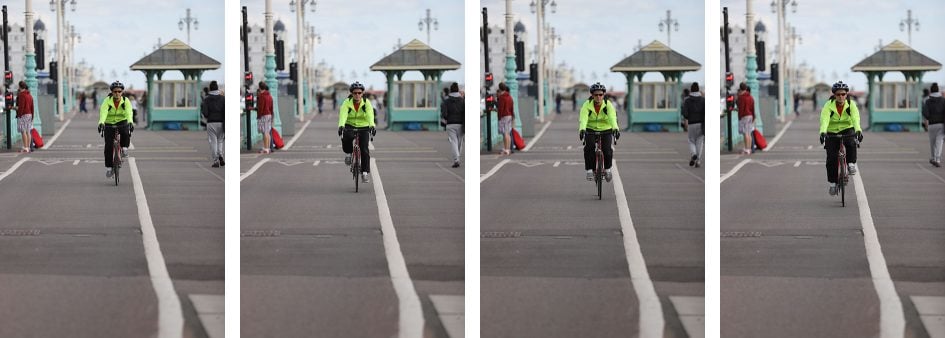
Above: Canon EOS 6D II Servo AF in Live View with EF 70-200mm f2.8 at 200mm f2.8. Below: 100% crops

Above: Canon EOS 6D II Servo AF in Live View with EF 70-200mm f2.8 at 200mm f2.8. Below: 100% crops

Above: Canon EOS 6D II Servo AF in Live View with EF 70-200mm f2.8 at 200mm f2.8. Below: 100% crops
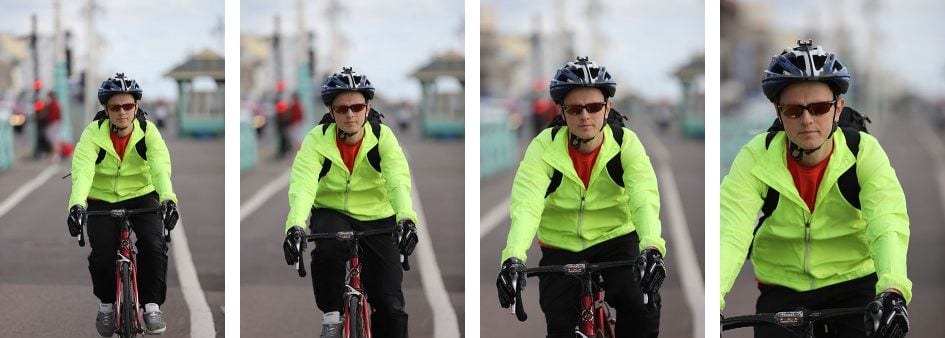
Above: Canon EOS 6D II Servo AF in Live View with EF 70-200mm f2.8 at 200mm f2.8. Below: 100% crops
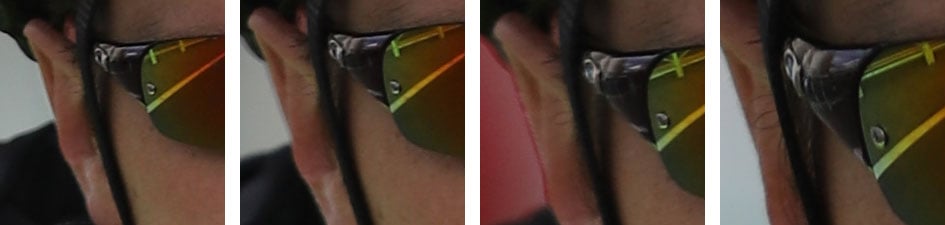
I’ve always been a big fan of Canon’s Dual Pixel CMOS AF system, but to see it out-performing the viewfinder AF system on the 6D Mark II remained a bit of a surprise. Maybe it was my technique, the subject or the conditions of the day, but the bottom line is I enjoyed a greater hit-rate in Live View, albeit at a slightly slower burst speed;
Shooting in Live View also let me position the AF area almost anywhere on the frame or deploy face detection and let the camera track the subject; indeed I repeated the Live View test with face detection and found it delivered pretty much the same hit rate. The only problem with shooting in Live View on the 6D Mark II -beyond the reduced burst speed – is the fact you can only compose with the screen and not the viewfinder. Not only is this hard in bright conditions, but it’s tough to aim and recompose with a DSLR held out in front of you and a large lens on the front. If only it was possible to frame with the viewfinder in Live View… oh hang on, that would be a mirrorless camera.
I know the whole point of buying a DSLR is having access to an optical viewfinder, but the simple fact is the Live View AF experience on the 6D Mark II is superior to its viewfinder AF system. Indeed over time I found myself increasingly shooting with the screen in Live View on the 6D Mark II over the viewfinder, and only using the latter when the conditions were very bright or it was too hard to aim.
Moving onto the burst speed performance, Canon quotes a top speed of 6.5fps with a buffer of 150 JPEGs or 21 RAW files; the speed represents an increase over the 4.5fps of the 6D Mark I although only matches what’s offered by the Nikon D750 while actually coming-in half an fps slower than the 80D’s top speed of 7fps. To put the 6D II to the test I used a freshly-formatted Lexar 32GB SDHC UHS-II 2000x SD card, set the shutter to 1/500, the sensitivity to 400 ISO and shot a variety of bursts.
With the 6D II set to Large JPEG, and using the viewfinder, I fired-off 130 JPEGs in 20 seconds for a rate of 6.49fps, confirming the quoted speed and the camera seemed happy to keep shooting. In RAW, I fired-off 19 frames in 2.86 seconds before the camera stuttered, resulting in a rate of 6.64fps – so roughly as quoted. The 6D II also performed similarly in speed when set to single or continuous AF, when using the viewfinder.
Switching the camera to Live View with single AF, I shot 136 Large JPEGs in 21.35 seconds for a rate of 6.37 seconds and the camera seemed happy to keep shooting. Set to Servo AF though for continuous autofocus, I fired-off 91 Large JPEGs in 22.97 seconds for a reduced speed of 3.96fps. As noted earlier, I was aware of this reduced speed when shooting bursts with continuous autofocus in live view. So if you want the 6D II’s top speed when shooting with continuous AF, you’ll need to use the viewfinder and keep the subject close to the centre. If you want the broader AF coverage of Live View, you’ll need to accept a reduced speed of around 4fps with continuous autofocus.
Still by delivering 6.5fps with single or continuous AF through the viewfinder (or in single AF in Live View), the 6D Mark II represents a boost in speed over the Mark I which only shot at a top speed of 4.5fps. That said, Canon had to play catch-up with the Nikon D750 which offered 6.5fps at launch several years ago. Plus again if you’re coming from the 80D, you’ll only lose half an fps.
Canon EOS 6D Mark II shooting modes
The EOS 6D Mark II’s lockable mode dial offers the traditional PASM options, along with B for Bulb, two Custom positions, SCN, Creative Auto and green Auto+. In this respect it’s identical to the EOS 5D Mark IV and 7D Mark II, apart from swapping their third Custom position for the SCN and Creative Auto modes. As a ‘semi-pro’ Canon body, the 6D Mark II also lacks the digital Creative Filters, although Auto+ can deploy scene detection during Live View composition with the current preset indicated in the corner of the screen. Note the EOS 80D, from which many 6D II buyers may be upgrading from, does have a Creative Filter position on the dial, as well as a Flash-off mode too.
Shutter speeds between 1/4000 and 30 seconds are available, along a 1/180 flash sync and a Bulb mode for longer exposures. If you want a faster 1/8000 shutter and 1/250 flash sync from a full-frame Canon, you’ll need the EOS 5D Mark IV, although it’s worth mentioning the APS-C / cropped-frame EOS 80D also offers 1/8000 and 1/250 flash sync so beware if you’re upgrading. Note Nikon’s D750 has a top shutter of 1/4000.
Like the 5D IV, the 6D II shutter makes a motorized but sharp CLACK sound that comes across as eager to shoot again, but isn’t exactly the quietest around especially when firing continuously. Like most Canon DSLRs, the 6D Mark II offers an alternative ‘silent’ drive mode. This certainly dulls the sharp sound of the mechanical shutter, but remains far from completely silent, instead turning a single CLACK into a slower KER-CHICK.
When shooting in Live View you have the choice of two further ‘silent’ options, but these again simply draw a single sound out into two discernable steps with a delay inbetween; the first mode inserts a small delay while the second mode delays the resetting of the mechanism until your finger lifts from the shutter release. Again both are noticeably quieter than the normal shutter, but they’re not silent.
This may seem reasonable if you only use DSLRs, but there are truly silent alternatives available. For example, most mirrorless cameras offer optional electronic shutters which can operate in genuine silence. Yes, there can be rolling shutter artefacts to beware of when shooting movement with an electronic shutter, but they’re steadily getting better at minimizing the effect and it’s certainly nice to have the option to not only shoot silently, but also often with the added bonus of accessing super-fast shutter speeds, typically up to 1/32000. So while the silent shutter options of the 6D Mark II certainly quieten it down, sensitive event or street shooters may prefer something that can become genuinely silent. It does make you wonder why Canon doesn’t offer a truly silent electronic shutter option in Live View – presumably the sensors suffer too much from rolling shutter.
In a welcome update, the 6D Mark II now offers a Bulb timer option which lets you preset the desired exposure length, eliminating the need for a cable release or remote control accessory; the camera offers a range of one second to 99 hours, 59 minutes and 59 seconds, although obviously power will be a consideration for longer exposures. Here’s a shot I took using the Bulb timer to capture a one minute exposure; during the exposure the time so far is indicated on the upper LCD screen.
Above: Canon EOS 6D Mark II Bulb Timer: 120 seconds
Auto exposure bracketing is available in 2, 3, 5 or 7 frames up to 3EV apart, even for seven frames. You can change the order of the bracket, and also have the camera capture the entire sequence with a single press or a timer release. So if you’re into HDR you could use the self-timer to capture a complete seven-frame sequence hands-free without the need for additional accessories. Note if you want to access 2, 5 or 7 frame bracketing, you’ll need to select them in one of the Custom Exposure menus.
The 6D Mark II also supports HDR capture and assembly in-camera. The HDR mode captures three frames at +/- 1, 2 or 3 EV increments (or Auto), before automatically combining them into one using a choice of five effects. You can also choose to have the camera auto-align the images, capture them in a continuous burst and or also record the individual source images.
Above: Canon EOS 6D Mark II HDR modes (four of the five effects)
Like other recent Canon DSLRs, the 6D Mark II also offers Highlight Tone Priority (preserving detail in highlights) and Auto Lighting Optimiser (adjusting the levels); the former is disabled and the latter set to Standard by default, so unless otherwise stated, these are the settings I’ve used for my tests and sample images. Note I disabled Auto Lighting Optimiser for my noise comparison test as it can introduce artefacts.
The 6D Mark II also features a built-in Interval Timer which lets you capture one to 99 (or an unlimited number) of images at intervals between one second and 99 hours, 59 minutes and 59 seconds. This may now be a fairly standard feature on Canon’s latest DSLRs, but it’s important to remember it wasn’t present on earlier models, so it’s a useful feature here. Some cameras struggle with recording shots at truly regular one second intervals, but I timed the 6D Mark II capturing full-size images in RAW+JPEG mode at one second intervals for 99 frames and it did so in exactly 99 seconds without stuttering or any buffering issues; obviously the shutter speed was sufficiently quick to maintain this speed.
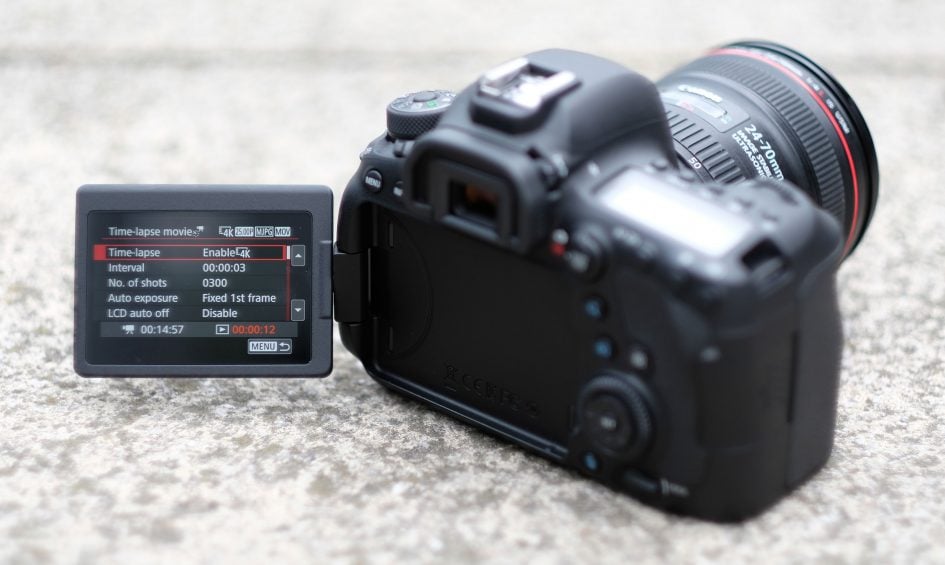
I’m also pleased to report the 6D Mark II can generate timelapse movies in-camera, and it becomes the first Canon camera to offer you the choice of rendering them at 1080p or 4k resolution. The Timelapse movie mode is accessed with the camera set to video and offers the same choice of intervals as the Interval Timer (one second to a second shy of 100 hours), although only for a maximum of 3600 shots, a slowest shutter of 1/25, and without saving the original images. These are then assembled automatically into a 1080p or 4k (MOV format) video at 30p (if set to NTSC) or 25p (if set to PAL), so the longest videos you’ll be able to generate will last about two minutes or 2:20 respectively. If you prefer to have more control over the final rendering, you can of course just shoot a normal interval timer sequence and assemble it in third party software later. Here’s an example of the in-camera Timelapse Movie mode using the 4k option.
Above: Download the original file (Registered members of Vimeo only).
A Multiple Exposure mode is also available, allowing you to combine 2 to 9 frames into one, and like the HDR mode there’s the option to save the individual source images.
In a neat upgrade inherited from the sports models, the 6D Mark II can also now recognize the presence of flickering fluorescent lamps and deliberately delay the shutter to avoid the times when the light is effectively off or at its dimmest. This can particularly affect anyone who shoots fast continuous bursts of action under artificial light, where some of the frames will be darker due to the pulsating frequency of the bulb. By default the flicker reduction is disabled, but if you enable it in the menus, the camera detects the light’s frequency and avoids the dimmest part of the sequence; it may result in fractionally longer shutter lag depending on the cycle, but it remains a useful tool for those shooting bursts under artificial light alone.
The camera’s viewfinder metering system employs a 7560-pixel RGB+IR sensor, divided into 63 segments, I believe the same (or a full-frame version) of the EOS 80D’s metering and a step below the 150,000 pixel / 252 zone system on the 5D Mark IV. The 6D II lets you choose between Spot metering (3.2% of viewfinder), Partial metering (6.5% of viewfinder), Centre-weighted and Evaluative (linked to all AF points). In Live View, evaluative metering employs a finer 315-zone system and as noted earlier, can also deploy scene and face detection to a more sophisticated degree.
While the metering system on the 6D II is less sophisticated than that on the 5D Mark IV, I rarely if ever found it making the wrong decision. All the images in my samples gallery were taken with Evaluative metering, either in Live View or through the viewfinder, and the majority did not need any exposure compensation. Only when shooting under very dim situations, or products under artificial light did I feel the need to make some minor adjustments.
Note Spot metering still remains linked to the central AF point, rather than the active AF point, so if you’re using the AF system to track a subject moving across the frame, the spot metering won’t ‘travel’ with it. This annoys many wildlife and sports photographers who often prefer to spot-meter their subjects against a tricky background. That said, evaluative metering does take the active AF area into account, so it could be worth giving it a try in conditions where it previously struggled. As it stands though, if you want spot metering that’s linked to the active AF area on a Canon body, you’ll need to splurge on the 1Dx series.
Less critical but worth noting is the continued absence of any digital effects or panorama options. Canon doesn’t think the former are relevant on a semi-pro body, and doesn’t seem interested in auto panoramas on any model. Some may think this is reasonable, but I believe both can be fun and useful even in a high-end body. There are the usual Picture Styles which include monochrome options, but nothing like the ART filters or Film Simulations of Olympus and Fujifilm models. So while Canon’s out-of-camera JPEGs are fine, I still personally prefer the JPEG output from Fujifilm. Once again note if you’re upgrading from the EOS 80D, you’ll be losing the Creative Filter options from that model.
A final note on in-camera RAW processing. From the playback menu you can choose to process a RAW file into a new JPEG, with options to adjust the brightness, white balance, picture style, auto lighting optimiser, high ISO noise reduction, image quality and colour space, along with choosing whether to apply lens corrections or not. Once you’re done, a new JPEG file is generated. It’s a useful way to tweak things like the white balance or explore different picture styles after the event, but without needing to open RAW files on your computer.
Canon EOS 6D Mark II movie mode
The EOS 6D Mark II represents a big upgrade over the Mark I in terms of movie capabilities, doubling the maximum frame rate for 1080 to 60p, offering a fully-articulated screen with touch control over exposure and focus, and supporting full-time continuous autofocusing thanks to the Dual Pixel CMOS sensor. I’ll break the bad news right now and say the 6D II still doesn’t have 4k video (unless you count the timelapse mode), nor focus peaking, nor even higher than 60p frame rates for proper slow motion, but if you’re happy with 1080p and can exploit the autofocusing in your work, it’s a delight.
You can film in 1080p at 23.976, 25, 29.97, 50 or 59.94fps in IPB Standard or Light compression, or 720p at 25, 29.97, 50 or 59.94fps. The longest recording time per clip is the usual second-short of half an hour and a full battery charge should be good for around five of them in a row; the combination of a largeish DSLR body, flip-out screen and 1080p maximum quality also means over-heating is unlikely to ever be an issue.
Filming 1080p or 720p takes the full sensor width and scales it down to the desired resolution without any cropping or field-reduction. The camera doesn’t however offer the digital zoom feature of the 80D which starts with a crop for a roughly 3x field reduction, before allowing you to magnify up to 10x (with a steady loss of quality). It’s a shame neither the 6D II or 5D IV offer the digital zoom facility as it’s a neat way of extending the reach in 1080p without a loss of quality.
As before there’s a 3.5mm input for connecting an external microphone, although sadly still no headphone jack; in the full-frame EOS series, Canon clearly sees this as treading on the toes of the 5D Mark IV, yet you’ll find a headphone jack on the EOS 80D from which many will be ‘upgrading’ to the 6D II and thereby losing the capability to monitor audio. It’s also worth mentioning Nikon hasn’t held back on fitting headphone jacks to its comparable DSLRs like the D750.
Like other Canon DSLRs you can film with full manual control over exposure, adjusting aperture, shutter and ISO as desired, or opting for fully automatic. In Manual it’s also possible to lock the aperture and shutter and deploy Auto ISO to balance varying light conditions. In Green Square Auto and Creative Auto modes, the 6D II deploys scene detection, automatically adjusting for human and or backlit subjects.
The touchscreen allows you to make quiet and fairly discreet exposure adjustments while you’re filming, changing the aperture, shutter, ISO and compensation (depending on the shooting mode) in one-third increments.
While the lack of features like 4k, focus peaking and a headphone jack are frustrating, Canon has one important card to play: the 6D Mark II now features a Dual Pixel CMOS AF sensor, allowing 80% of the pixels to double-up as phase-detect AF points, allowing the camera to confidently refocus without hunting. The touchscreen interface also lets you tap just about anywhere and have the camera refocus on that point, or track a moving subject, such as an approaching face, and it’s also possible to adjust the speed and response of the refocusing. This is ultimately what consumers expect a movie mode to be able to do, but sadly it’s something that continues to elude many cameras, most notably Nikon’s DSLRs. It’s even possible to remotely pull-focus on the 6D II by tapping the screen of a Wifi-connected smartphone running the Canon app. Here’s an example of using the 6D II’s touchscreen to pull-focus.
Above: Download the original file (Registered members of Vimeo only).
Dual Pixel CMOS AF works with in all the movie modes including 1080p up to 60fps and works with all EF lenses too, although for the smoothest and quietest refocusing, it’s best to use Canon’s STM lenses. While there’s a fairly broad choice of STM lenses for APS-C / cropped-frame bodies like the EOS 80D though, the options are more limited for the full-frame 6D II which can’t use EF-S lenses. Indeed at the time of writing there were only three full-frame compatible EF lenses with STM focusing: the EF 40mm f2.8 STM, EF 50mm f1.8 STM and EF 24-105mm f3.5-5.6 IS STM. So there’s only one STM lens with optical image stabilisation and or wide coverage. There may be digital movie stabilisation available on the 6D II which makes filming with unstabilised lenses more acceptable (albeit with a mild crop), but the fact remains there are a lot more movie-oriented STM IS lenses available for the cropped-bodies. Once again something you’ll need to consider if you’re upgrading from models like the EOS 80D.
If you’re into grading footage, you’ll be disappointed to discover there’s no Log profile on the 6D Mark II, so you’re next best bet is to use a Neutral profile with all the parameters turned down and hope it’s sufficiently flat; to be fair the situation is no better on the 5D IV, but I should note Log profiles are available on many Sony bodies from the A6300 upwards. There’s also no zebra patterns for gauging exposure, so if you want zebras and peaking (for focus assistance), you’ll need to connect an external monitor.
Now for some more clips to show you what the EOS 6D Mark II’s movie quality looks like in a variety of conditions.
Above: Download the original file (Registered members of Vimeo only).
Above: Download the original file (Registered members of Vimeo only).
Above: Download the original file (Registered members of Vimeo only).
Canon EOS 6D Mark II Wifi, GPS and Bluetooth
The Canon EOS 6D Mark II is well-equipped with wireless capabilities, featuring Wifi and a built-in GPS receiver, as well as Bluetooth and NFC. The earlier 6D Mark I also featured Wifi and GPS, but the addition of NFC and Bluetooth on the Mark II greatly eases the initial negotiation and connection between the camera and your phone, making it more of a seamless process.
The Wifi capabilities are similar to recent Canon DSLRs. You can wirelessly remote control the camera with a Mac or Windows computer (using the supplied EOS Utility) or with an iOS or Android smartphone using the Camera Connect app). You can wirelessly transfer images to a variety of devices including smartphones, computers, printers and compatible cameras, or view them on DLNA devices like a Wifi-equipped TV. Alternatively you can connect the camera directly to the internet and share images on various networks via Canon’s Image Gateway.
I’ll concentrate on the smartphone and computer remote control here, starting with the former and the Camera Connect app which must first be installed on your handset. I tested the latest Android version on my Samsung Galaxy S7.
Like all Wifi-equipped cameras, the 6D Mark II sets itself up as a Wifi access point for your phone to connect to, but the presence of NFC and especially Bluetooth makes the connection process much easier. Since most phones have Bluetooth, the app suggests pairing as soon a sit first starts, but if you prefer you can connect by briefly holding an NFC-equipped phone to the side of the camera, or of course simply browsing for the camera’s Wifi network manually and entering the required password.
Bluetooth is easiest of all though so I’d recommend pairing your phone with the camera when prompted – you’ll only need to do this once. From this point on, the Canon app can connect you to the 6D Mark II’s Wifi with a single tap, allowing you to remote-control the camera or wirelessly transfer images with no further effort or configuration. Indeed the camera doesn’t even need to be next to you, only within Bluetooth range and with the body switched on; the app indicates this is possible when the Bluetooth icon is shown near the top.
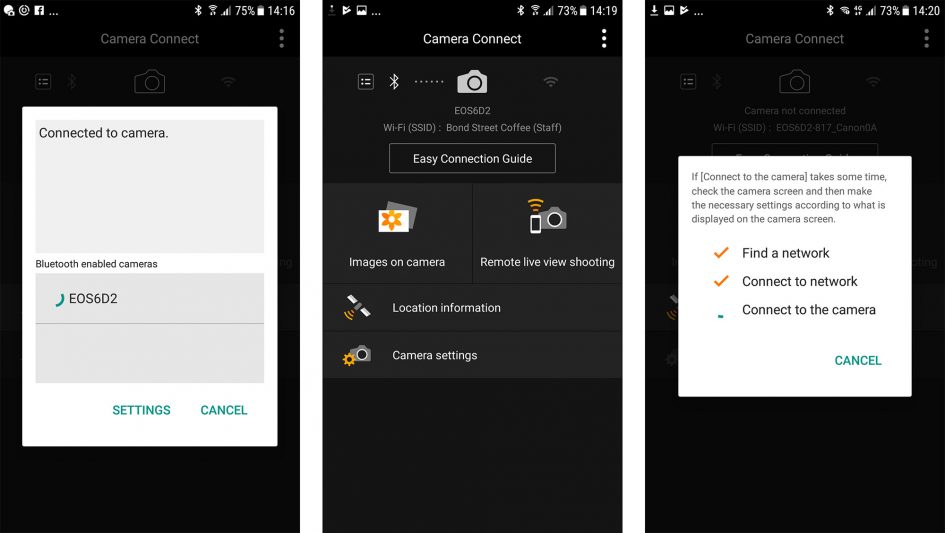
Once the camera and phone are connected, the app shows four options: Images on Camera, Remote Live View Shooting, Location Information and Camera Settings; note Location Information performs logging which is redundant here due to the 6D II’s built-in GPS receiver which I’ll cover in a moment.
Selecting Images on Camera fires-up a thumbnail view of the images on the camera’s card, including JPEGs and movies but not RAW files. You can then tap a thumbnail to view a full-screen version with basic shooting information, then save it to your phone if desired. You have the choice of saving the original JPEG image without resizing if desired, or go for a resized version which, on my phone, measured 1920×1280 pixels. You can set a preference going forward or go for an option which prompts you to choose a resized or original version each time you transfer an image.

It’s also possible to access movie files which were recorded in the MP4 format, and copy them across too in their original format. I tried this with a number of 1080p movies which played-back fine on my Galaxy S7 and were also happy to be imported directly into Instagram for sharing.
Select Remote Shooting from the main app menu and you’ll see a live image from the camera on your phone, with the chance to tap anywhere on the frame to refocus if desired (a double-tap presents a magnified view for further confirmation). The Camera Connect app also offers full exposure control depending on the mode set on the camera’s dial. If the mode dial is set to Manual, you’ll be able to remote control the shutter, aperture and ISO all from your phone, then tap the remote shutter release to take a shot.
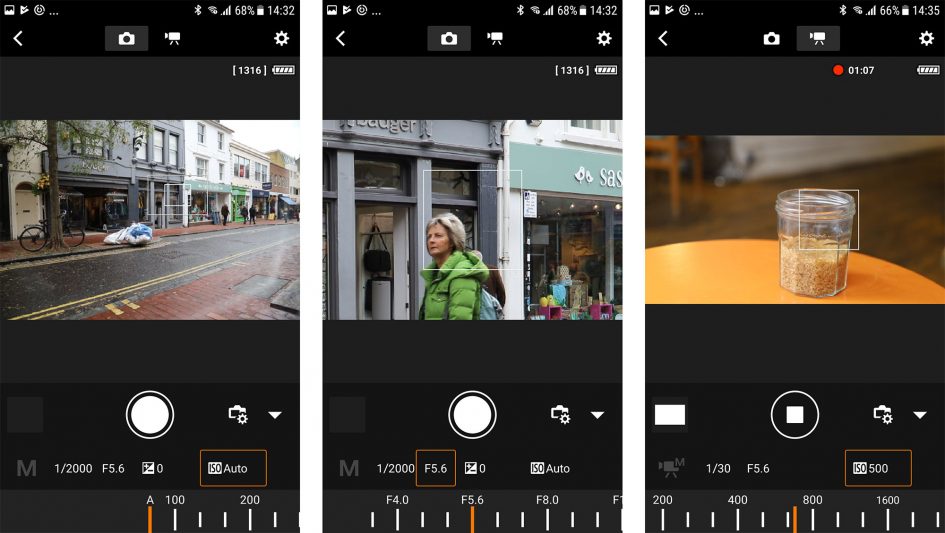
A slider at the bottom of the app lets you switch the camera into movie mode. Doing so reframes the live image in 16:9 and lets you remotely control the exposure and keeps the touch-AF active. This allows you to remotely pull-focus by tapping the phone’s screen as you film a video.
The final option on the Camera Connect app accesses camera settings, but these are simply related to the clock and area, allowing you to adjust them remotely or sync them with the phone.
As mentioned earlier, you can also use Wifi to wirelessly remote control the EOS 6D Mark II using the free EOS Utility application for Windows and MacOS computers. The EOS Utility is one of the lesser-known highlights of owning a Canon DSLR. With the camera connected to your computer, whether wirelessly or over USB, the EOS Utility lets you remote control pretty much any function or setting of the camera that doesn’t involve turning a physical switch or dial.
As before you can fire-up a large Live View window with a high resolution live image, remote focus (manually nudging it back or forth of going for auto and clicking the desired region with the computer’s mouse), take photos and have them recorded to the computer, camera or both, or trigger movie recording, although videos are still only recorded to the internal memory card. You can also set up an interval timer, although the 6D Mark II also offers the facility in-camera. In Live View Shooting you can overlay a wealth of guides, grids, lines and there’s also a leveling gauge.

Like other recent Canon DSLRs, you can connect your computer to the camera over Wifi using either a shared network or a direct peer-to-peer link. This means you can wirelessly remote control the 6D Mark II directly with a laptop alone, literally in the field. I tried it in my house, remote controlling the camera from different rooms or even floors with my MacBook Pro, although understandably as the range increased, the live view refresh and speed of transferring images (if enabled) reduced. So while wireless control is cool, you should still use a USB cable for the best and most responsive experience. I’d also love to see an option to program a series of shots, not just at preset intervals but also with preset exposure values that could be different for each shot if desired.
As mentioned earlier, the EOS 6D Mark II is not only equipped with Wifi and NFC, it also features a built-in GPS receiver in the viewfinder head. This allows the camera to embed your location details onto images if desired, with no effort other than enabling the feature in a menu – so much easier than recording a log with your smartphone and syncing it later.
There’s three options: Disable which completely turns off the GPS, Mode 1 which keeps the GPS active even when the camera’s switched off (for the quickest positioning, but at the cost of increased battery life), and Mode 2 which turns the GPS off when the camera’s off (resulting in slower acquisitions from cold, but without the increased battery hit of Mode 1); note Mode 2 will still receive GPS signals if the camera powers-down to sleep as oppose to being physically turned off.
If enabled, you can set the GPS to update the camera’s clock automatically, which is very handy when you’re travelling between different time zones, although strangely didn’t work for me when I took the 6D II on a trip from the UK to the USA. You can also set the interval between position updates from every second, every five seconds, ten seconds, 15 seconds, 30 seconds, every minute, every two minutes or every five minutes. It’s also possible to record a GPS log for use externally. A GPS icon flashes while the camera finds its position and stays on once the location is determined.
There’s little more to say really other than it all works as you’d expect, and the process is seamless unlike syncing logs made with smartphones. Mode 1 is of course the most responsive, generally indicating the position is known (with the fixed GPS icon) at all times; you certainly don’t have to wait more than a few seconds if it’s flashing unless you’ve significantly changed location, such as after a flight.
While shooting with the 6D Mark II, I generally left it in GPS Mode 1 for the most responsive and accurate experience. It may consume more battery power, but I didn’t notice it depleting particularly quickly in use, so kept it on. Most of my sample images are tagged with GPS positions; here’s one with the location loaded into Google Maps.
PS: a quick word of warning – if enabled, the GPS will also embed a location on video files (based on the position at the start of recording) as well as stills, so if you’re concerned about privacy, remember to disable it before shooting.
Canon EOS 6D Mark II sensor
The EOS 6D Mark II is equipped with a new full-frame CMOS sensor with 26.2 Megapixels, delivering images with a maximum resolution of 6240×4160 pixels. This represents a comfortable six Megapixel boost over the original 6D Mark I who’s 20.2 Megapixel sensor delivered images with 5472×3648 pixels. This allows you to output two or three inches larger at 300dpi.
If you’re upgrading from the 80D, you won’t notice much difference in resolution over its 24.2 Megapixel / 6000×4000 pixel sensor, but you will enjoy the benefits of the larger full-frame sensor with the 6D Mark II delivering lower noise at higher sensitivities (as seen in my quality page) as well as higher maximum ISOs.
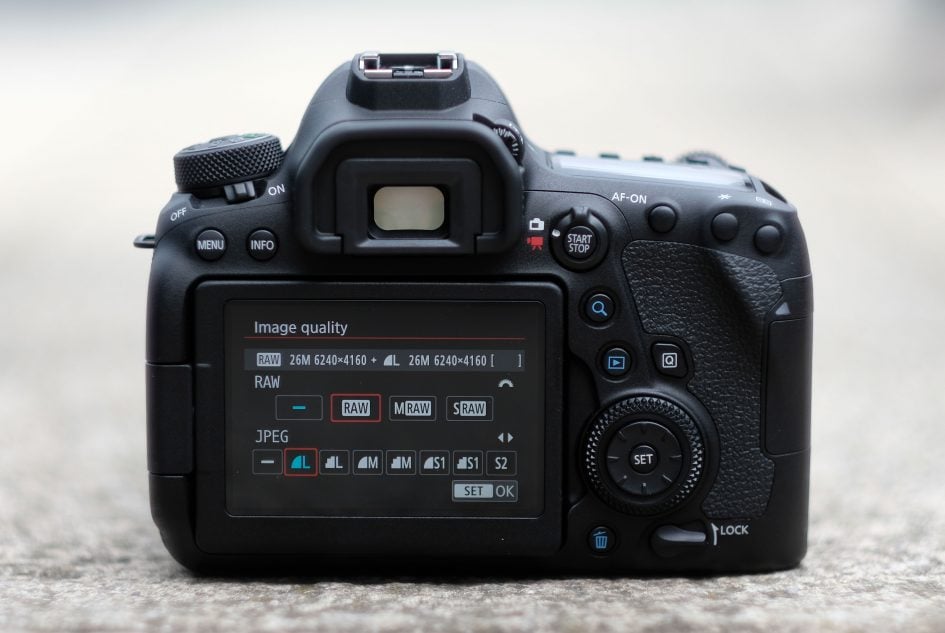
The 6D Mark II lets you record JPEGs in four different resolutions and in a choice of 3:2 (native), 4:3, 16:9 or 1:1 aspect ratios. 14-bit RAW files are available in three resolutions and you can set the camera to record any combination of JPEGs and RAW files. Full-size JPEGs varied considerably in file size depending on the complexity of the subject, generally measuring between 5 and 12MB in my tests, while RAW files typically measured 30-34MB each.
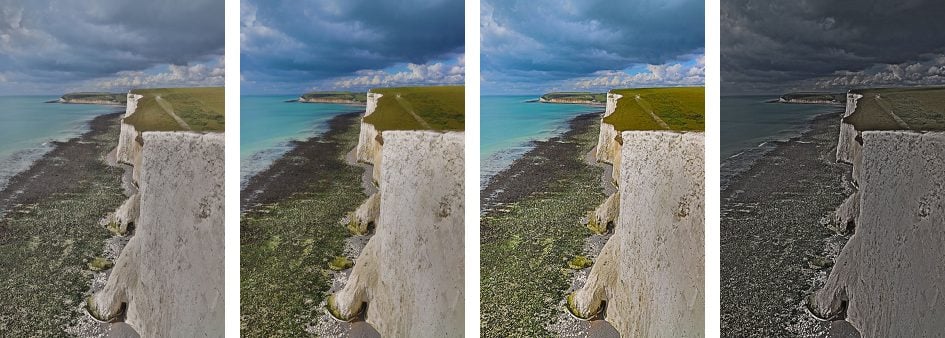
On my quality page I’ve compared the output of both JPEGs and RAW files from the EOS 6D Mark II alongside the 80D for anyone thinking of upgrading. But just before that, a quick look at the dynamic range of the 6D Mark II. As regular readers of Cameralabs know, I don’t formally benchmark dynamic range, so I can’t tell you if it’s decisively better or worse than another camera in this regard, but I can show you some examples of highlight retrieval in practice.
In the examples below you can see an out-of-camera JPEG on the left with a RAW file on the right processed in Adobe Camera RAW to retrieve the maximum highlight detail. In both cases, the processed RAW file has retrieved a lot of highlight detail that had become saturated on the JPEG; you can see it in the sky in the train yard and in the cliffs on the landscape. Maybe you personally want even more, but for my purposes, there was sufficient dynamic range to achieve the results I wanted. Personally I was far more interested in the noise and detail at high ISOs, so that’s what I’ve concentrated on in my quality page.
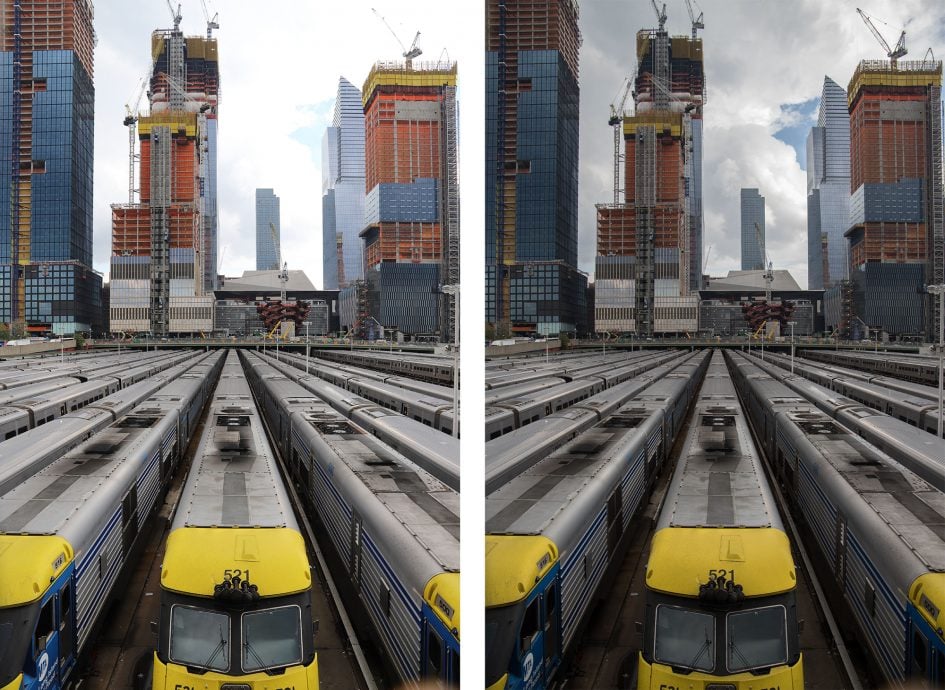
Above left: OOC JPEG. Above right: RAW file processed to retrieve highlight tonal detail
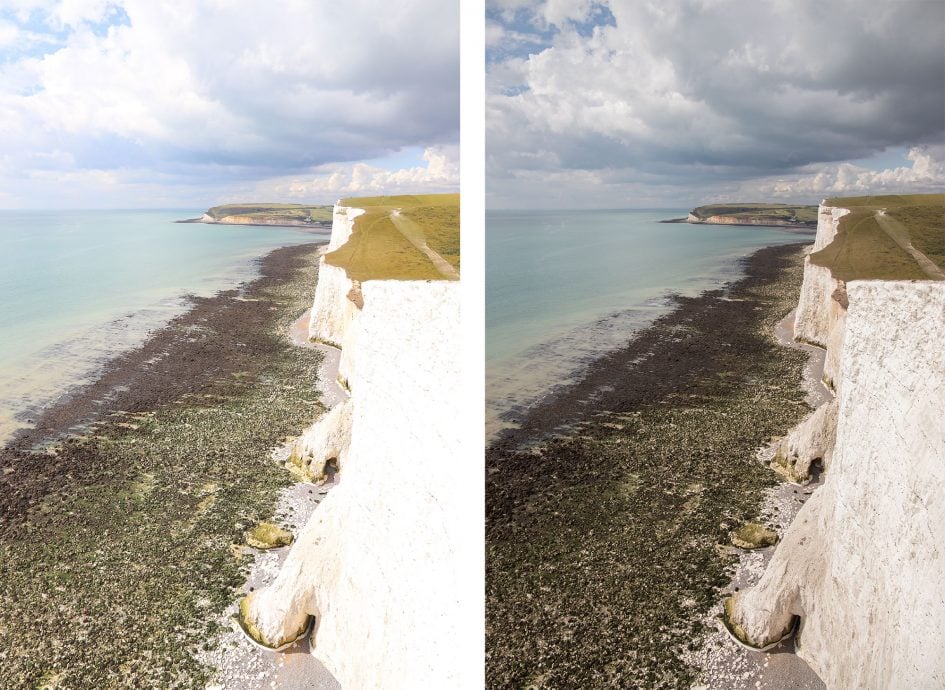
Above left: OOC JPEG. Above right: RAW file processed to retrieve highlight tonal detail
Check prices on the Canon EOS 6D Mark II at Amazon, B&H, Adorama, or Wex. Alternatively get yourself a copy of my In Camera book or treat me to a coffee! Thanks!