- Handcrafted
- Season 1
- Episode 1
How To Butcher An Entire Cow - Every Cut Of Meat Explained
Released on 05/17/2017
(Dramatic drum music)
My name is Jason Yang and I'm a butcher
at Fleisher's Craft Butchery.
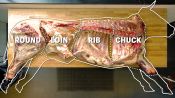
Today, I'm gonna break down half a steer
into all the cuts you would see in your local butcher shop.
(upbeat music)
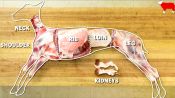
Alright, so we're starting off with the round,
which is the rear leg on the steer,
so you're gonna get a lot of nice, big roasts out of here.
Right now, I'm actually removing the oyster steak,
which is a little steak that sits on top of the aitch bone,
which is a very tender, juicy, tasty little cut,
which is actually a nice butcher's cut
that we usually take home,
so you're rarely gonna see it
outside of a craft butcher shop.
So, from here I'm removing the aitch bone.
There's some strong tendons that you have to sever
that hold the femur in place,
so you wanna make sure that you sever those tendons
as you remove this,
so that you can get the shank off easier.
You can start getting access to the other muscles
and start unbundling them.
Now, the aitch bone is great for stock,
so we'll cut that up later.
Right now, I'm actually gonna take the shank off.
And, I'm using the leverage of the table,
so I can get through these tough tendons.
If you hear about an athlete tearing their ACL,
or MCL, or PCL, or LCL,
I'm tearing through all of it right now.
So, removing the shank,
which is gonna be a tough bundle of muscles,
but it's great for braising.
So, if you cook it properly, braised beef from the shank
can make some of the most umptious, delicious meals.
So, now, we can start unbundling
the four muscles that we're looking at.
We're looking at our top round.
We have our knuckle.
We have our eye round and the bottom round.
And you're gonna see that this is interesting
because it's all seams.
We can actually seam the muscles apart.
Right now, I'm kind of pulling the cap,
which is a muscle that sits on top of the top round.
So, I'm just peeling that away, starting to open this up
and you're gonna see some nice seams open.
It's really satisfying to do this.
I'm literally just flicking my knife
with the first quarter inch and now,
as I pull away, you're gonna see the top round
just slowly peels away. My eye round's revealed.
You see some of that fat and fascia
and it comes right off on these seams.
So, now, we're left with our femur bone,
which is gonna be what we're gonna attack next,
so we can get access to the other muscles.
The femur bone is gonna be our
longest marrow bone in the steer,
so this is great for bone marrow; a great winter meal.
So, we have our nice marrow bone here.
This is great. We can cut the knuckles off.
Those will make excellent stock and then,
the marrow bone itself we can cut into rounds or canoe it.
So, cut it right down the middle so it comes open.
You can roast it off. It's a really tasty dish.
Now, I'm separating our last few muscles.
We have our knuckle here, our sirloin tip,
which sits right next to our bottom round.
So, there's my knuckle.
Let's put that aside for now.
And we're left with the gooseneck,
so this is gonna be a combination of three muscles:
our eye round, the bottom round is sort of
like the outside of our leg, and then the heel,
which is the tough muscle behind the knee.
So, here we're just removing the eye round.
Putting that aside, that can make a nice roast later.
And then, we have the heel, which can be used for braising.
There's a nice cut of steak out of there called the Merlot
with a pretty tight grain structure,
but if you cook it to like a medium-rare
and slice it thin it can be pretty nice.
So, now we have our bottom round,
which is gonna be a little more tender,
but the whole shape is really nice for roast beef.
So, when you're cleaning these parts
and we're cleaning some round parts.
Right now I'm cleaning the top round.
I'm really cleaning this off so we're getting to
what we're going to be selling as steaks.
Sometimes there's fascia, sometimes connective tissue,
sometimes there can be some blood or spotting,
so I'll shave that off just to make it more presentable,
but also to cut it in such a manner
that's going to allow it to either cook properly
or give you the best texture.
So, from here, I've cleaned up the top round,
which we'll take a look at later.
And now, we're gonna look at the eye round.
So, right here, you can see the shape.
I'm gonna leave all the fat on it
because that's gonna be really nice when I do the roast beef
but we're gonna take off a lot of the fascia.
Sometimes you're gonna have some fat
that's not gonna be good, but the fascia
will be like the sheaths that cover the muscles.
And then here, we're taking a look at
the knuckle or the sirloin tips.
Just taking out the kneecap here.
There's two supporting muscles that we pull out
that we don't generally use,
but those can be cut into little steaks as well.
But what I'm really revealing is the sirloin tip is soft,
which is made up of the sirloin tip side
and the sirloin tip center.
A lot of these round cuts are leaner.
You can see there's some fat cover on the bottom round,
but these are gonna generally be leaner cuts.
You're gonna have to cook them a certain way.
So, here's the breakdown of the round.
Now, I'm going to cut these down even further
into the cuts you'd see at the butcher shop.
Here we have our sirloin tip,
so I'm just gonna cut some nice sirloin tip steaks here.
This is also called the knuckle.
This is a nice flavorful steak.
A little bit more texture, a little bit chewier,
but definitely a very tasty steak.
We also have our eye round,
which I think make an excellent little small roast beef.
Muscles aren't shaped the way
we necessarily want them to be,
but when you tie them up into a uniform shape
they're gonna cook more evenly.
(quiet drum music)
The bottom round's also a great roast beef as well,
so I'm gonna tie that up as well
for a much bigger roast beef.
You can see that it's gonna be a nice,
big, solid roast beef and give us great slices.
For the top round, we mentioned tartare earlier,
it's great for tartare, also excellent for jerky.
It can be done as a roast, but we cut it
for our top round London broil steaks.
Here are the final cuts from the round.
Later, I'll come back to the skank
and cut it down using the band saw.
(low drum music)
Next, I'm going to break down the loin.
So, we're taking a look at the loin,
which consists of basic two sections here.
We have our drop and then we have our short loin.
So, here I'm going to take off the flank.
First, this is a nice lean piece of meat.
Takes to marinade really well.
Throw it right on the grill.
I'm just peeling this away.
All these thing just sit on top of membranes.
These are actually really easy to take out
because I'm peeling them away
and, essentially, I'm cleaning them.
You're gonna see there's not much
I have to do to this afterwards
because it just comes right out.
And we have our flank and it's all set to go
and we can throw it right into the case if we needed to.
So, next, I'm just gonna cut off
a little bit of the drop here just to make it
a little but easier to see my sirloin flap
and I remove some of the fat, too.
So, the sirloin flap is a great cut,
called the bavette in France, it means bib
and it's gonna look like a bib when we pull it out.
This is actually a great cut
that has a really nice grain structure,
full of flavor, often has great marbling,
and easy just to throw right on the grill.
So, I'm just gonna peel that out.
Cut off a little bit of the trim there
and we're left with our short loin now.
So now, I'm gonna pull out the rest of the suet.
This is the internal fat that coats the kidney,
protects some of these organs here,
and this is great to render down to make tallow.
You can use it for candles, skin care products.
We have a variety of people that buy them from us,
but I think it's a great frying fat.
Now, we're going to pull the tenderloin.
So, the tenderloin is going to have a big head
with two arrow barbs that's gonna run through
and that's gonna taper all the way down to a thin tail.
So, here you're gonna see me working both sides of it
because it's so big that you're not gonna be able
to take off one side and then peel off the rest.
So, with this deboning process,
I'm going to actually work one side first,
work the other, and then meet somewhere in the middle.
And then, I'm pulling off a side muscle here,
the psoas minor, so the tendon was the psoas major.
This is the psoas minor.
It's the Chaînette in French cooking.
A little bit of tendons in there,
but it's one of my favorite cuts.
So, now, we have a strip loin.
And now, I'm gonna separate the loin section,
which is where we're gonna get our
New York strip steaks or shell steaks
because of the bone structure that goes around it.
And we're going to have our sirloin bone-In
and then we'll have our loin.
Now, I'm just pushing down using leverage,
using the gravity, having a nice fulcrum point,
so I can dislocate the loin from the sirloin.
So, now, we're gonna take a look at the sirloin,
which is actually one of my favorite cuts.
I'm gonna start deboning this,
so this is an interesting bone because it's concave,
so it really curves in, so you have to keep your knife
ever turning towards the bone.
So, now, I'm gonna take out the ball tip here,
so that's gonna go to trim.
That's a little bit of the sirloin tip that's left behind.
And now, we're gonna take off the tri-tip,
which is a really nice cut,
very popularized in California.
You'll hear it as the Newport steak.
This is about a pound, pound and a half.
It's excellent for grilling, throw around on the grill.
In Texas, they smoke them.
And then, now, we have our top sirloin.
So, here's the breakdown of the loin.
Now, I'm going to cut these down even further
into butcher shop ready cuts.
So, here we're gonna hand cut some New York strip steaks.
I'm going to go through the feather bones
and then finish with my saw.
I think that, here, there's really an obsession
with tenderness and often times people will be like,
I want tenderloins specifically or,
What's your most tender cut?
and I think it's okay to chew
and have interesting textures.
There is nothing as tender as tenderloin.
I've definitely cooked steaks that
I thought were as tender as tenderloin,
but I think that, these days,
I'm really looking for more complex flavors,
good textures, and you can find that anywhere on the animal.
Here are the final cuts from the loin.
This is what you'd see in the case at the butcher shop.
Next, I'm going to break down the rib.
Alright, so we're taking a look at the rib.
This is going to be familiar to everyone.
I mean, if anyone's ever seen the Flintstones
they're gonna think of this giant rack of ribs.
There's a couple of nice cuts
I'm going to harvest out of here.
We're taking a look at the skirts right now.
So, we have our outside skirt and we have our inside skirt.
So, right now, I'm just pulling off some of the membranes.
There's gonna be a lot of membranes
that cover bones or that cover muscles.
These are tough membranes that I'm just gonna pull off.
And once I pull them off, I can start
getting access to my skirts here.
Here, I'm removing the outside skirt.
It's gonna be the darker, richer one.
It has a more minerally taste.
It's very similar to a hanger steak,
a little bit more tender.
This is what you're gonna see
for Carne Asada often and in Brazilian barbecue.
With the inside skirt, we can leave it whole,
we can cut it into portions, but,
in general, we'll cut it across the grain
just to make it more tender;
Like a mechanical form of tenderization.
Every time you cut across the grain,
you shorten the muscle fibers to increase tenderness.
So, next I'm gonna take off the navel.
There's some cartilage that holds all this in place.
They go along the rib bones.
So, here, we're just using a basic hand saw
and it's great because you can do a lot of this
with just a hand saw, a boning knife, and a table.
It's really all, again, using the leverage,
the side of the table, gravity helping as well.
So we have our plate here, our short rib plate
and then, now, we have our rib.
So, here's the breakdown of the rib.
Now, I'm going to clean these up and break them down further
into the cuts you'd see at the butcher shop.
The navel, which you could smoke for beef bacon,
for example, it's a pretty tough cut,
so it can be braised down.
Ropa Vieja is a very popular dish.
So just remove some of the cartilage here
and then we'll have our navel.
Right now, I'm just cleaning some of the
membranes off of the skirt steaks.
You know, inside skirt and outside skirt,
I wanna get rid of some of the tough fascia,
but I wanna leave some of the fat on too
because I think some of the fat on there is nice.
It doesn't have to be completely barren of fat.
And then, for the rib, I'm going to actually
hand shine the rib here.
I'm basically lining up my saw
so I can get through the spine there
and I'm cutting through so I can eventually
cut through the steaks by hand.
(quiet guitar music)
In this case, I'm gonna take the chine
and the feather bones all off at once.
So, there's gonna be some lifter meat
that's gonna sit on the outside of the steer,
so it's gonna be tough.
So, I'm gonna pull this off.
And then, I'm gonna hand cut steaks now,
Now that the chine's gone and the feather bones are gone
we're gonna hand cut some nice ribeyes.
These are the final cuts from the rib.
Later, I'll come back to the short rib plate
and cut it down using the band saw.
Next, I'm gonna breakdown the chuck.
Alright, so, this is, to me, the most interesting cut
just because there's so much you can pull out of here;
so many flavors, so many textures.
I'm taking off a little bit of the sweet breads here
that were left behind by the slaughterhouse.
Really tasty, the best chicken nuggets you'll ever have.
I'm essentially gonna saw off
the upper shoulder and neck all in one piece.
I like doing it this way so I can decide
what I want to do with that big bone-in piece later
and it gives me access to a lot of the other items.
So, I'm gonna start peeling this away
and you can see I'm using the edge of the table.
I'm gonna hang this of the edge of the table
so I can get tight on the bone
and the chuck's gonna counter-balance
the entire shoulder so I can start pulling away
this little cap that sits on top.
And then, we have our entire
chuck and neck together, bone-in.
Now, there's gonna be another
short rib plate I'm going to remove.
These are the first five ribs
and these are actually gonna be meatier.
So, from here I'm just gonna cut across the top rib
and start to peel this away.
When I take that off, I can saw off the breast bone.
It's gonna be great for stock.
So, this is gonna be our chuck rib plate.
This is gonna be meatier and have
a better ratio of meat to bone.
So, now that I've taken off the short rib plate,
I have access to the brisket.
I can peel the brisket away here.
I'm gonna remove some of this fat around the neck,
just so I can see the seams in the brisket.
So, here I'm gonna find a seam
almost kind of like at the arm pit.
The brisket's gonna wrap right here
on the shoulder clod of the triceps
and I'm just gonna find that little arm pit seam
and just seam this guy off.
And, now, I can pull away.
There's a very satisfying seam just to roll
this pectoral muscle off,
so the brisket's coming right off.
And then, we have our complete brisket.
Alright, so we're left with arm steaks,
our chuck arm steaks. I have the entire arm here.
What I'm gonna do is, I'm actually going to
dislocate the shoulder blade, keeping the triceps intact.
This is gonna give me a more manageable piece to work with.
I'm goin to take off the arm, so that we're left with
the triceps muscle, the clod, and then, the scapula,
which is gonna also gonna have some different steaks there.
So, you can see, I'm pointing to the teres major here.
So, this is a nice little steak; about a pound,
pound and a quarter that they found
was quite a little tender steak.
So, I'm basically just removing some of the fat,
connective tissue, just so I can see the lip better.
Now, I'm just starting at the tip
and then I'm starting to pull away.
And then, once I see that silver skin,
it's gonna be quite easy because
I'm basically just peeling two muscles apart.
So, I have it off here.
Now, I'm pulling the underblade,
which is the muscle that's on the
underside of the shoulder blade.
So, this is another cut that has great texture,
pretty tender, good flavor.
This is an excellent every day steak.
Excellent for chicken-fried steak,
which we'll see with the flat iron as well.
Now, we're looking at our shoulder clod,
so this is going to actually seam onto the flat iron.
So. I have to be careful when I cut this.
So, we have our shoulder clod set aside.
I pulled off a little side muscle
that can be made into a roast as well,
but we've revealed here's our clod heart,
which is what we're gonna use
for either a roast or ranch steaks.
So, I'm just pulling off this layer
on top of the flat iron here,
so I can see a little bit better.
There's a ridge that runs along the scapula.
So, once I've identified that ridge,
I'm gonna score the bone skin.
Get really tight so I can try to
pull this guy off all in one piece.
So, this one, I think, is regarded
as the second most tender muscle in the steer.
It's interesting because it actually
has a long tendon that goes through it,
so you have to separate that out when you clean it.
Here I'm removing the mock tender or the chuck tender.
This sits on the scapula,
but it's not as difficult to remove just because
there's less of a ridge that it's sitting on,
so I just pull that guy out.
And usually you'll put this to trim,
but it could be tied as a roast
or if you wanted to have lean stew.
Here's the breakdown of the chuck.
And now, I'm gonna cut these down further
into cuts you'd see in the case at your butcher shop.
With cutting meat, there's always
different ways to present it.
You're rarely gonna do something so bad
that you can never use the meat again.
Whether you chop it up in half, present it as two pieces.
Whether you've messed it up in such a manner
that we can't really case it or sell it properly,
we can use it as our trim.
You know, it's gonna be delicious
for our ground beef, for our burgers, for paired foods.
So, I tell people all the time,
I want you to be able to cut confidently.
So, now, we're taking a look at the chuck.
So, we have a bone-in chuck here,
so I'm gonna debone this by, first,
taking some of the meat away from the vertebrae
and I'm gonna pull it off all in one piece.
So, here we have our neck roast and I'm separating that
from my shoulder; just squaring that off
so I can have a nice roast or a braise.
And then, I'm gonna start breaking down my chuck.
Let's take out this tough tendon.
Flip it over, there's gonna be a
little bit of a cap that I'm gonna take off.
And then, we can start breaking down our chuck.
So, from here, I'm gonna seam the chuck eye off the Denver.
I'm gonna face this a little bit
because that part was exposed;
because that's where it was split.
And here, we have some chuck ribeyes;
lot of flavor, a good tenderness as well,
so this is some of my favorite steaks,
right here, from the shoulder.
(low drum music)
So, I peeled off the chuck eye,
so that can be a nice roast, as well; chuck eye roast.
So, now, we're gonna cut these beautiful,
beautiful Denver steaks.
You can see they're nicely marbled.
These are excellent steaks.
This is like my perfect butcher's cut right now.
Here are the final cuts from the chuck.
I'll come back to the chuck rib plate
and cut it down using the band saw.
(drums playing)
Next, I'm gonna hop over to the band saw
and cut some Osso Buco from the shank.
The band saw's a great tool in the butcher shop.
It's something that can allow you to make precise cuts,
as well as, save you a lot of time and effort
when you're cutting through bone.
Cutting down these Osso Buco
to about an inch and a quarter.
This is a really nice size for a pot
and it exposes the marrow.
We want all that marrow dripping out
all over our beef as we braise it.
So, I'm gonna be scraping every time I'm using the band saw
just because every time you're cutting bone,
there's gonna be some dust;
some debris that comes off and when it sits on the meat,
it can change the color, it can oxidize the meat
a lot faster, so you don't want that on there.
I wanna remove that from my surface immediately.
Next, I'm gonna cut down the chuck rib plate from the chuck.
The band saw's gonna allow me to make nice,
thin cuts on the rib plate that would be
very difficult to do by hand.
This is going to be an excellent grilling cut.
(light drum tapping)
And now, I'm gonna cut down
the short rib plate from the rib.
So, here, I'm cutting the English cut short ribs.
I can either do blocks of two inches or four inches.
These will be excellent for a braise.
(soft drum sounds)
And here are the final cuts from the band saw.
And finally, these are all the cuts
you get from a side of beef.
(low drum music)
Director: Joseph Pickard
Special thanks to Fleishers Craft Butchery.
How To Butcher An Entire Cow - Every Cut Of Meat Explained

How to Butcher an Entire Pig - Every Cut of Pork Explained
How to Butcher an Entire Lamb - Every Cut of Meat Explained
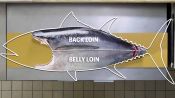
How To Butcher a Whole Tuna: Every Cut of Fish Explained

How to Make Handmade Soba Noodles
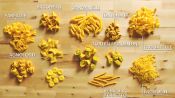
How to Make 29 Handmade Pasta Shapes With 4 Types of Dough
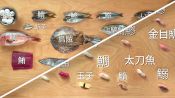
How to Make 12 Types of Sushi with 11 Different Fish
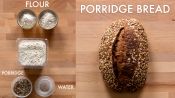
How to Make 3 Kinds of Bread from 1 Sourdough Starter
How To Make 8 Types Of Dim Sum
How a Sugar Artist Crafts a 5-Tier Wedding Cake
How To Make 13 Artisanal Italian Cheeses | Handcrafted

How To Make Japanese Candy (8 Types Of Wagashi)

How an Indian Master Chef Makes Dosas, Idli & More

How A Master Chocolatier Makes 5 Gourmet Chocolates
How Traditional Korean Tofu is Made
How A Master Carver Makes Peking Duck (40 Hours)

How To Make 3 Kinds Of Boba Milk
How a Japanese Chef Turns a Whole Fish Into 6 Dishes