Left 4 Dead 2

Left 4 Dead 2

190 betyg
Jacob's Left 4 Dead 2 Solo Achievement Guide
Av Jacob
Detailed achievement guide featuring custom artwork, add-ons, and in-depth explanations.
2
5
   
Utmärkelse
Favorit
Favoritmarkerad
Avfavoritmarkerad
0a. Main Introduction


This guide has been colour-coded as follows:

Guide Info


Easy Achievements


Medium Achievements


Hard Achievements


Superseded Achievements (can be unlocked through another achievement)


PC-Exclusive Achievements


Custom Content


Console


You will need to enable your Console in order to input text commands. From the main menu, go to Options -> Allow Developer Console -> Enabled.


**NOTE** YOU WILL NEED TO PLAY ON A - LOCAL SERVER - FOR MODS AND KICK COMMANDS TO WORK! (Single player and starting offline matches via Console count.)

Kick Commands

bind "v" "kick smoker; kick charger; kick jockey; kick tank; kick hunter; kick spitter; kick boomer; kick (1)smoker; kick (1)charger; kick (1)jockey; kick (1)tank; kick (1)hunter; kick (1)spitter; kick (1)boomer; kick (2)smoker; kick (2)charger; kick (2)jockey; kick (2)tank; kick (2)hunter; kick (2)spitter; kick (2)boomer; kick (3)smoker; kick (3)charger; kick (3)jockey; kick (3)tank; kick (3)hunter; kick (3)spitter; kick (3)boomer; kick (4)smoker; kick (4)charger; kick (4)jockey; kick (4)tank; kick (4)hunter; kick (4)spitter; kick (4)boomer; kick (5)smoker; kick (5)charger; kick (5)jockey; kick (5)tank; kick (5)hunter; kick (5)spitter; kick (5)boomer"

Enter this command string into your Console and expect part of it to be cut off. Will not work for Witches and may leave some Special Infected spawned if there are many of a kind at once. I chose to bind the v key for kicking. You can change it to anything you please, but make sure you aren't replacing something important. To remove the key binding, enter the command string again and replace bind with unbind.


Another, more permanent kick solution:

bind "z" "kick_inf_sp_all"

Using this command string, you will notice Common Infected have become more sparse and Special Infected spawn far less often (Witches excepted). You should only have to use this once per campaign and can use it in conjunction with the "v" string to keep everything Non-Witch away from you. To remove the effects of this one, exit Left 4 Dead 2 and restart the game, not touching the "z" key unless you unbind it. This bind is meant for use in Campaign (Single Player) mode.

Essential Add-ons

Don't kick too early in finales or you might never get a rescue without something like Admin Menu. This brings me to my next topic, essential mods - the few you will need or want very much in order to complete this game solo.

There are four to be installed:

1. Admin System

2. Admin Menu

3. Improved Bots (Simple)

4. Melee Weapon Unlock Mod

The Admin mods have different versions, but I tend to stick with the originals (by Rayman1103 and Egregoros a.k.a. SidNamo respectively) because they run the lowest risk of having compatibility issues with other add-ons, and function best overall.
Artwork provided by csgs.
Sourcemod Plugins

A further option is the use of Sourcemod plugins. More advanced, computer-literate players might explore this[www.sourcemod.net], but it is beyond the scope of what I want to do here.
0b. Map Codes
There are 14 campaigns in this game. In order of appearance via menu:

1. Dead Center

A) Hotel:
map c1m1_hotel

B) Streets:
map c1m2_streets

C) Mall:
map c1m3_mall

D) Atrium:
map c1m4_atrium


2. The Passing

A) Riverbank:
map c6m1_riverbank

B) Underground:
map c6m2_bedlam

C) Port:
map c6m3_port


3. Dark Carnival

A) Highway:
map c2m1_highway

B) Fairground:
map c2m2_fairgrounds

C) Coaster:
map c2m3_coaster

D) Barns:
map c2m4_barns

E) Concert:
map c2m5_concert


4. Swamp Fever

A) Plank Country:
map c3m1_plankcountry

B) Swamp:
map c3m2_swamp

C) Shanty Town:
map c3m3_shantytown

D) Plantation:
map c3m4_plantation


5. Hard Rain

A) Milltown:
map c4m1_milltown_a

B) Sugar Mill:
map c4m2_sugarmill_a

C) Mill Escape:
map c4m3_sugarmill_b

D) Return To Town:
map c4m4_milltown_b

E) Town Escape:
map c4m5_milltown_escape


6. The Parish

A) Waterfront:
map c5m1_waterfront

B) Park:
map c5m2_park

C) Cemetery:
map c5m3_cemetery

D) Quarter:
map c5m4_quarter

E) Bridge:
map c5m5_bridge


7. The Sacrifice

A) Docks:
map c7m1_docks

B) Barge:
map c7m2_barge

C) Port:
map c7m3_port


8. No Mercy

A) The Apartments:
map c8m1_apartment

B) The Subway:
map c8m2_subway

C) The Sewer:
map c8m3_sewers

D) The Hospital:
map c8m4_interior

E) Rooftop Finale:
map c8m5_rooftop


9. Crash Course

A) The Alleys:
map c9m1_alleys

B) The Truck Depot:
map c9m2_lots


10. Death Toll

A) The Turnpike:
map c10m1_caves

B) The Drains:
map c10m2_drainage

C) The Church:
map c10m3_ranchhouse

D) The Town:
map c10m4_mainstreet

E) Boathouse Finale:
map c10m5_houseboat


11. Dead Air

A) The Greenhouse:
map c11m1_greenhouse

B) The Crane:
map c11m2_offices

C) The Construction Site:
map c11m3_garage

D) The Terminal:
map c11m4_terminal

E) Runway Finale:
map c11m5_runway


12. Blood Harvest

A) The Woods:
map c12m1_hilltop

B) The Tunnel:
map c12m2_traintunnel

C) The Bridge:
map c12m3_bridge

D) The Train Station:
map c12m4_barn

E) Farmhouse Finale:
map c12m5_cornfield


13. Cold Stream

A) Alpine Creek:
map c13m1_alpinecreek

B) South Pine Stream:
map c13m2_southpinestream

C) Memorial Bridge:
map c13m3_memorialbridge

D) Cut-throat Creek:
map c13m4_cutthroatcreek


14. The Last Stand

A) The Junkyard:
map c14m1_junkyard

B) Lighthouse Finale:
map c14m2_lighthouse

0c. Badges & Trading Cards


There are a total of 8 cards in Foil and Standard.

1a. Introduction I - Basics & Survivors

ORIGINAL SURVIVORS (ง'̀-'́)⌐╦╦═─


(Top-left) Bill. War veteran and leader of the original Left 4 Dead Survivors. Determined, weatherbeaten, and sturdy.

(Bottom-left) Zoey. Young, high-spirited and energetic. Having spent more time watching old horror movies than attending class, it looks like she was studying the right subject after all.

(Top-right) Louis. A slim, trim IT professional, Louis was actually planning to quit his job before the world suddenly downsized. His lunch break practice at the gun range and video game sessions have proven invaluable.

(Bottom-right) Francis. Rough, tough, and tattooed. When the apocalypse came, everyone else stockpiled food and water, looking for a place to hide. Francis found a gun, turned up the music, and looked for some fun.


NEW SURVIVORS ̿̿ ̿̿ ̿̿ ̿'̿'\̵͇̿̿\з=(¬_¬)=ε/̵͇̿̿/’̿’̿ ̿ ̿̿ ̿̿ ̿̿


(Top-left) Nick. Conman with an attitude and possible gang member with a dubious background. The reluctant and de facto leader of his group, he is tough, courageous, and egotistic.

(Top-right) Ellis. Affable young mechanic, nearly fearless, and definitely of a sanguine character. He is very inclusive, easily fascinated, and loyal.

(Bottom-left) Rochelle. Was employed as an associate producer on a television news station, sent on assignment to Savannah, Georgia to cover the breaking story of widespread Zombie infection. Strong-willed, brave, and stubborn. She finds Ellis adorable and Coach amicable. Nick is an acquired taste.

(Bottom-right) Coach. Was a high-school health teacher and coordinator for the freshman football team before the Infection hit his hometown. The oldest of the group, he is very strong, motivated, and prudent. Actively encourages his friends and stays goal-oriented.

1b. Introduction II - Special & Uncommon Infected

SPECIAL INFECTED ┻━┻ ︵ヽ(`Д´)ノ︵ ┻━┻


Boomer and Boomette. Large and slow-moving, they puke on hapless Survivors, attracting hordes of Infected. Lowest HP of all Special Infected and weakest attack. Either one exploding will cover their immediate surroundings in bile, attracting zombies if making human contact. Vulnerable to fire damage and being shoved.


Tank. Strongest and toughest of all Infected. Starts with 5,000 HP and deals 25-35% damage per hit. Can climb walls and other objects to pursue you and throw huge chunks of earth to connect. Most vulnerable to fire damage, headshots, and explosions. Will outrun you if your Health sinks too low (below 45%).


Spitter. Tall, lanky, and hard to miss out in the open. Will spit acid patches that will damage Survivors on contact. Will often hide and wait for an opportunity to spit when you are cornered or surrounded. Spitters come in both male and female forms, but can be hard to tell apart without being close-up - so enjoy this female's pretty features within spitting distance.


Hunter. Crouches down and growls before leaping to pin its prey. Can pounce from long distances and great heights. Average attack power, highest speed of any Special Infected.


Witch. Tends to wander or kneel and weep until provoked. Arguably most dangerous of all Infected, capable of incapacitating or killing a Survivor in one hit. When moving to attack, becomes one of the fastest Special Infected. Vulnerable to close-range headshots and fire damage.


Smoker. Uses long tongue to pull and constrict its victims, excreting streams of smoke in the process. Average attack power and speed, with by far the longest reach of any Infected.


Charger. Strongest Infected after the Tank, with enough power to send Survivors flying with a charge and slam one at a time into the ground until death, unless killed first. While it has only one functional arm and does not walk very quickly, a charge will increase its speed considerably.

Once it has grabbed you, the only escape is from environmental damage or rescue by a teammate. Vulnerable to melee weapons (2-3 hits at most for a kill) and fire damage.


Screamer. Concept character from the original Left 4 Dead, replaced by the Boomer (and Boomette, in this second game). It screams to daze you instead of puking, biting and chomping at you to attack as its arms are restrained.

Obtainable through an add-on in the Workshop - see the Custom Content section at the bottom of this guide for details.


Jockey. Smallest and most irritating of all Infected. Jumps on the backs of Survivors and strangles them, also preventing a Survivor's ability to defend themselves. Will tend to veer its victims away from support and into Boomer bile, Spitter acid patches, and hordes. Once jumped, a teammate will need to free you by killing the Jockey or shoving them off of you.


UNCOMMON INFECTED ¯\(°_o)/¯


Jimmy Gibbs Junior. Has a 5% chance of spawning in The Atrium and nowhere else. Can blind Survivors with motor oil. His jumpsuit makes him fireproof; with 1000 HP and no detachable limbs, he is one of the most resilient of all Uncommon Infected. Vulnerable to headshots and melee attacks.


Clown. Will be found in the Dark Carnival campaign. When provoked, they will often lead groups of Common Infected toward Survivors for an attack. Shoving them in the face with a melee weapon before they die will count toward #35: Cl0wnd, and lighting one on fire while they lead at least ten other zombies will unlock #45: Fried Piper.


CEDA Agent. Are seen in hazmat suits across different campaigns. They are resistant to fire; incendiary fire will ricochet off of them, and short-term exposure to fire will not affect them. Heat from standing in fire for extended periods will kill them, and shooting them to death will sometimes produce a hissing sound, implying their suit still had some measure of independent air supply. Will sometimes drop bile bombs; picking them up will count toward #25: Robbed Zombie.


Mudman. Will only appear in the Swamp Fever campaign. They walk and sprint on all fours, but stumble back on two feet when shoved and stand when idle. Always use mud for camouflage and, unlike Common Infected, are not slowed by water. Killing them while they are in water will count toward #13: Dead In The Water.


Demolition Worker. Will not hear pipe bombs, but are provoked by the sounds of a chainsaw. Bile attracts them, but they will attack Survivors directly when thrown bile bombs do not hit any zombies. Higher tolerance against melee attacks than most other Uncommon Infected.


CEDA Riot Security Officer. Will only spawn in The Parish campaign. Their armour will grant them immunity to bullets and melee attacks except at their rear. Vulnerable to chainsaw attacks and still harmed by fire and explosions. The Grenade Launcher is arguably the most effective weapon against them, though chainsaws will literally rip through their armour and make them continually stumble until they die.


Fallen Survivors. Well-equipped Survivors that have succumbed to zombie infection. Will only spawn in The Passing campaign and can be difficult to kill, as they tend to run away from you and take multiple shots before being downed. Pipe and bile bombs will attract them, but they are immune to fire damage.

Vulnerable to melee weapons, explosive rounds, and sniper rifles. Will drop one to four items when killed which will need to be picked up in order to obtain #19: Grave Robber.

Fallen Survivors are the most rare Uncommon Infected after Jimmy Gibbs Junior. Only males spawn by default, but there is a Workshop mod that will add females.

2a. Items
ITEMS AND WEAPONS ︻╦╤─ ︻╦̵̵͇̿̿̿̿╤─── /̵͇̿̿/'̿̿ ̿̿ ̿̿


Medkit. Heals up to 79 points of damage for any one Survivor. Can be used to shove zombies, and prevent teammates from healing you, if you hold it in your hands.


Pain pills. Gives a temporary health boost when consumed, and can be transferred between Survivors. Holding it out will prevent you being healed.


Adrenaline shot. Gives a temporary health boost and faster, stronger reflexes for a short time. Required for #17. Gong Show and #70. The Quick And The Dead.


Molotov. Burns for an extended period with a large damage radius. Useful for crowd control and weakening tough or agile Special Infected. Once an enemy starts burning, it won't stop until they are dead (...again).


Gas Can. Needed on Port Finale in The Sacrifice campaign to fill up the finale generator. Also used in Scavenge to fill generators and increase your team's score. Otherwise, can be thrown and shot to burst into temporary flames.


Explosive Barrel. Found only on the first two maps of The Sacrifice campaign (Docks, Barge), and needed for #32: Barrel Rolled.


Oxygen tank. Highly explosive and easy to miss, fire damage or a single fired round will detonate it. Similar to a Propane tank in that its explosion can make a Tank stumble and kill multiple Infected at once.


Propane tank. Explosive item easily triggered by fire damage or bullets. Shorter and wider than Oxygen tanks, these are more common and more ergonomic to carry.


Pipe bomb. Beeping time bomb that flashes a red light before detonation, attracting hordes to it. Very useful for crowd control and heavy explosive damage. Recommended for #24. Kill Bill.


Ammo stash. Littered throughout the game, and often needed to replenish your ammunition. Will not supply you with grenades for a Launcher, bullets for an M60, melee weapons or throwable items.


Radio. Good old-fashioned HAM radio, used to call for a rescue and communicate with other non-Infected outside of your group. Also used to start Survival rounds.


Cola. Only found on one map of the Dead Center campaign. Required to gain passage through a wall of obstructions toward a Safe room after reaching a gun shop.


Bile bomb. Containers full of Boomer puke. Throwing them will release bile and attract a horde of zombies. Useful for clearing areas and making average zombies attack covered Special Infected. Found occasionally on CEDA Agents. Required for #36. Robbed Zombie (from killed Agents) and #38. Septic Tank.


Bruton Fedora. My, my, my, how beautiful you are. But where is your owner to adorn that Crown?


Safe room door. Found at the start and end of most maps in a campaign except finales, where you are rescued (if you survive long enough). Depending on the game mode, these doors will unbar and open themselves after a time.


Jukebox. Now that's the good stuff. There are plenty of add-ons in the Workshop to change what songs are played. Required for #25. Killing Them Swiftly To This Song.


Generator. Found on different maps, they are sometimes used to help end campaign finales and progress through a level. The most important ones are in Port, Junkyard, and Truck Depot. Required to complete the Crash Course and Sacrifice campaigns. Also needed for #8. Chaos Generator and #39. Supreme Sacrifice.


Fireworks. Found most often in the Dark Carnival campaign. Shooting them will make them ignite, and create a small but very real damage radius until they die down. Not as effective against zombies as Molotovs or gas cans, but worthwhile in larger quantities.


2b. Weapons I


SIG-Sauer P220 SAO. This version features a shortened barrel and no beavertail. Also features custom finish and sights plus an under-barrel LT-TLP08 tactical flashlight.


Glock 26. Used as the second handgun when dual-wielding. While the short grip and slide shape are intact, the frame and slide itself have changed to resemble one of its full-sized counterparts.


IMI Desert Eagle Mark VII (.50 AE?). Cannot be dual-wielded. Holds 8 rounds like the .44 Magnum version, and looks a lot like the Mark 7, though Whitaker's gun shop advertises it as the .50 AE. Its flashlight is attached with a ring mount and rail. Much more powerful than other pistols, and often kills simple Infected with a single round outside of Realism.


Remington 870 Police Magnum Riot. Sports an Ithica-style mag tube, otherwise looking true-to-form. 12-gauge pump shotgun, holding up to 8 shells. High damage, high recoil, slow reload, short to medium range, moderately effective for crowd control.


Remington 870 Marine Magnum. 12-gauge pump shotgun. Holds up to 8 shells. Somewhat less spread and less damage than the Magnum Riot. This version has a vented rib and ghost ring sights with an NP3 finish. Like the Riot, high damage, high recoil, slow reload, short to medium range, moderately effective for crowd control.


Benelli M4 Super 90. Semi-auto 12-gauge shotgun. Looks like a civvie 4-shot model, but holds up to 10 shells. (The military should totally pick these up, don't even need a tube extension). Flashlight is attached to the magazine tube, right in front of the handguard. Very high damage, high recoil, slow reload, medium effective range, effective for crowd control.


Franchi SPAS-12. Semi-auto 12-gauge shotgun. Holds up to 10 shells in-game instead of the original's 8+1. It has a tighter shot spread than the Super 90 and does more damage per shell fired, but fires less shot per shell. Very high damage, high recoil, slow reload, medium effective range, good for crowd control.


Ingram MAC-10. Silenced submachinegun. Fitted with a Mitchell Werbell suppressor, a strap on the barrel to serve as a makeshift foregrip (like in Counter-Strike: Source), and a flashlight attached to the suppressor with zip ties. The magic of Valve provides 50 rounds in a 30-round magazine. Very high rate of fire, short to medium effective range, very fast reload, excellent tool against hordes (especially with headshots). More potent than the IMI Uzi, it likely chambers .45 ACP.


IMI Uzi. Submachinegun from the original Left 4 Dead. 50-round capacity in a 32-round mag (ノ◕ヮ◕)ノ*:・゚✧ ✧゚・: *ヽ(◕ヮ◕ヽ), and a flashlight taped on its handguard. Very high rate of fire, short to medium effective range, very fast reload, and decent against waves of Infected.


Ruger Mini-14. Semi-automatic scoped rifle. Most accurate weapon in the game, sporting a 15-round (not 10) capacity. Low rate of fire, very long range, fast reload. High stopping power short to mid range, but runs out of ammo quickly.


M16A2. High-powered automatic assault rifle. Despite being labeled an A2, fires in full-auto like the A1 or A3. Highest rate of fire for any assault rifle in the game, holding 50-rounds per clip in 30-round STANAG magazines. Long range, very fast reload, very high recoil, and high stopping power. Loud. Desirable for mowing down high volume opposition.

2c. Weapons II


AKM. Fully automatic assault rifle. Lowest rate of fire in its class, but highest damage. Holds 40 rounds in 30-round AK mags. Medium to long effective range, mid to fast reload, very high recoil, and a worthy option to maintain order. Like the Ingram MAC-10, it has a flashlight secured via zip ties to the weapon's handguard.


FN SCAR-L. Burst-fire assault rifle (hinted at as part of a future variant with a "Mod 3" marking on its side). Holds 60-rounds in 30-round STANAG magazines. Most accurate weapon in its class, with more damage than the M16 and less recoil than that or the AKM. High damage, long to very long effective range, mid to fast reload, low recoil, high capacity. Fantastic weapon to kill with headshots, but with a paced rate of fire.

Heckler & Koch G3SG/1. Scoped, semi-automatic sniper rifle. This is an interesting franken-piece. No paddle-mag release makes one think of a scoped HK91. The barrel, trigger setup and stock say "H&K MSG90A1", and then there's an AK-74 muzzle brake. Holds 30-rounds in a 20-round mag. Very long effective range, high stopping power, mid to high recoil, and clunky but devastating in close quarters.

(Art) AK-74M. 5.45x39mm assault rifle, appearing in concept art and in-game campaign posters. Developer commentary suggests the AKM may have replaced this weapon during development.

(Art) CQB-R / Mk. 18 Mod 0. 5.56x45mm assault rifle. Equipped with LMT rear sight, Crane stock, and RIS foregrip. Appears in concept art and in-game campaign posters. Also appeared in the original Left 4 Dead's art, wielded by Francis. Might be the M4A4 used in CS:GO.


Browning M2 Heavy Machine Gun .50 BMG. Heavy machine gun used in both Left 4 Dead games. Always mounted, this features unlimited, high-caliber ammunition. The drawbacks are a lack of maneuvering space and cooldown period. Very high damage, long to very long effective range, high rate of fire, lots of stopping power.


GE M134 Minigun. High caliber heavy machine gun, also found in both Left 4 Dead games. Like the Browning it is always mounted with the same strengths and drawbacks. Very high damage, long to very long effective range, high rate of fire, strong stopping power. Found most often in original Left 4 Dead campaigns.


M60 machine gun. Heavy machine gun firing 7.62×51mm NATO cartridges. Carries 150 rounds of ammo that cannot be reloaded or resupplied. Once all ammunition is depleted, the weapon will be immediately dropped (like with the M79 Grenade Launcher). Very high damage (killing Infected with a single shot), high rate of fire, heavy to carry, high capacity, short to mid effective range. Required for #72. Til It Goes Click.

M79 Grenade Launcher. Among the least common weapons to spawn in the game, it is single shot, powerful, and highly explosive. Friendly fire can happen easily. For reference, 3 - 5 grenades can down a Tank on Normal difficulty. Once ammo is gone (30 grenades max), the wielder drops their Launcher immediately. Can use Laser Sights, Explosive and Incendiary ammunition from deployed boxes (one round per box at a time).


Howitzer Cannon. Short-barreled artillery piece needed to destroy obstructions blocking your path in the Crash Course campaign.


2d. CS: Source & Melee Weapons

CS: SOURCE & MELEE WEAPONS
)xxxxx[;;;;;;;;;> ס₪₪₪₪§|(Ξ≥≤≥≤≥≤ΞΞΞΞΞΞΞΞΞΞ> ╾━╤デ╦︻ {>==╦╦=ʖ> ¯¯̿̿¯̿̿'̿̿̿̿̿̿̿'̿̿'̿̿̿̿̿'̿̿̿)͇̿̿)̿̿̿̿ '̿̿̿̿̿̿\̵͇̿̿\=(•̪̀●́)=o/̵͇̿̿/'̿̿ ̿ ̿̿


German/International versions

Because of censorship in Germany and other nations, Valve added four Counter-Strike: Source weapons to those versions of the game as compensation. Players were able to use them in non-censored versions of the game if they played with someone using the German version or in custom campaigns set to spawn them.

Players could also enable them with Console commands, but without them dealing any damage unless the map were to be restarted or they were carried through to another map via Safe room.

https://steamcommunity.com/sharedfiles/filedetails/?id=924194917
This add-on by Rectus was very useful until the recent Last Stand update. Though it didn't unlock the Hunting Knife, it made possible the use of every other Source weapon for people outside of Europe. At this point, -all- CS:Source weapons are available to everyone on PC, making this mod obsolete but still worth mentioning.


Heckler & Koch MP5N. It has a lower rate of fire than both other submachineguns, but a slightly higher accuracy than the IMI Uzi. While its damage per shot is almost the same as the Ingram MAC-10, it retains the Uzi's damage-per-second stat. Like all SMGs in the game, it has a 50-round capacity (in 30-round mags for this weapon). Highest overall ammo capacity of any weapon.


Steyr Scout. Bolt-action sniper rifle sporting an extended mag adapter. Lowest rate of fire for any sniper rifle, but boasts high accuracy and one of the longest effective ranges of any weapon in the game. Very high damage, very long range, very slow reload. Holds 15 rounds per 10-round mag.


Accuracy International AWSM. Bolt-action sniper rifle firing .338 Lapua Magnum rounds. It has the slowest rate of fire (except the Grenade Launcher) but inflicts a high amount of damage per shot. Holds 20-rounds in 5-round mags. Very high damage, very long effective range, low rate of fire, slow reload, very high overall ammo capacity.


SIG SG 552. Assault rifle with variable firing modes. It has a 2x scope and two rates of fire, determined by whether the scope is in use. Without looking down the scope, it has the highest automatic rate of fire out of all assault rifles. Holds 50 rounds in 20-round mags. High damage, very high rate of fire, long effective range, very high overall ammo capacity, very accurate.


Melee weapons

Melee weapons are an exclusive feature of Left 4 Dead 2; in the first game, they were absent entirely, with shoving would be the only melee-type attack one could employ.


Baseball bat. Reasonably fast swings and a good decapitator, but with short range.


Chainsaw. Only melee weapon in the game with finite use. Will run out of gas with use or idling while equipped. Once the gas meter is at 0, you'll drop the saw and won't be able to pick the same one back up. Tears nicely into zombies, most notably Riot Infected, whose armour will only afford them brief protection as you shred through it. (This is -not- a "sharp" melee weapon.)


Crowbar. It's the crowbar from Half-Li- oh, wait, that was a jimmy bar >.>


Fireaxe. Arguably the "strongest" of all melee weapons, it can push back many Infected with every shove and sweeps widely, able to sever multiple heads with each swing. Also, it will not run out of gas like the Chainsaw and has one of the longest reaches. This is my choice tool for #44: Stache Whacker. P.S: My top choice for severing heads, but it takes time to master. (This is a "sharp" melee weapon.)


Golf club. Found mostly in The Passing campaign, and needed for #37: Fore! This is excellent for removing heads, but does not appear nearly as often as other suitable weapons.


Katana. Sharp blade with a decent reach. If you're into Samurai swords, this one's for you. Very good for decapitations, lagging a bit behind the Baseball Bat at very close range but much better at more of a distance. (This is a "sharp" melee weapon.)


Cricket bat. Lovely bit of wooden craftsmanship, sure to impress your neighbours and crack skulls with flair. Good for decapitations, though the Baseball Bat and Katana would be preferable. The Fire Axe too, if you can learn how to swing it.


Tonfa (Knightstick). Found mostly in The Parish campaign, often dropped from Riot Infected.


Frying pan. Looks like cast-iron. Someone's-in-the-kit-chen with Diiiinah...


Machete. Fastest attack of all melee weapons, possibly excluding the Hunting Knife. My weapon of choice for #88: Level A Charge. (This is a "sharp" melee weapon.)


Riot shield. Outside of mods, will only appear in The Parish campaign, typically dropped from Riot Infected.


Electric guitar. Found most of all in the Dark Carnival campaign. Loud and carries a decent heft.


Hunting knife. The hunting knife from CS: Source. Very short range, but fast, repetitive slashes and strikes make this a favourite for many. (This is a "sharp" melee weapon.)


One of two new weapons added since the Last Stand update. The Shovel is a unique melee weapon because it is slow to swing, but juts out its handle in the process, shoving away all Infected near you. It is considered a "sharp" melee weapon, making it suitable for both #28. New Haircut and #58. Lickety-Split.


My new favourite, the Pitchfork. One attack swings it from right to left, the other swooshes it outward, making this the longest-reaching melee weapon of all. Found in the Last Stand campaign, or everywhere if you use the Melee Weapon Unlock Mod. Also considered a "sharp" melee weapon, making it viable for #28 & #58.

[:] Achievements #1 - #5


#1. Acid Reflex


Kill a Spitter before they are able to spit. Your best bet is to shoot or melee on-sight; the quicker you kill, the more likely you'll have caught one before spitting. They can take swipes at you, just no projecting of drool.


#2. A Ride Denied


Kill a Jockey within 2 seconds of it jumping on a Survivor. Jockeys not only jump on Survivors, but tend to steer them around, typically away from teammates and into other zombies. You have two practical options:

A) Very quickly shove one off of your teammate and kill them. Shotguns work well for this.

B) Shoot or melee one as quickly as possible when they jump on a teammate. You will risk friendly damage, but save time.


#3. Armory Of One


Deploy an ammo upgrade and have your team use it. From time to time, you or a teammate will come across boxes of incendiary or explosive ammo; they can be picked up and deployed, but holding one will make you drop your medkit. One deployed ammo box will supply one full mag or one grenade of special ammunition to four separate Survivors. Once four people have used it, the box will disappear.


#4. Beat The Rush


In a Survival round, get a medal only using melee weapons. You must last 4 minutes on any Survival map using only melee weaponry. You cannot use your pistols when incapacitated, or shove with any non-melee arms. I recommend the Mall Atrium, on top of the main kiosk near the vehicle (hop down from the second floor). You can play normally or use Admin Menu to disable the Director. Being AFK too long will result in your character being controlled by a bot.

Mall Atrium:
map c1m4_atrium


#5. Bridge Burner


Complete The Parish campaign.

[:] Achievements #6 - #11


#6. Burning Sensation


Ignite 50 Common Infected with incendiary ammo. For this achievement, you will need to shoot (not necessarily kill) fifty Common Infected or "normal" zombies (i.e: no Tanks or Witches or Smokers, or CEDA Agents or Mudmen or Clowns). Where explosive rounds will gib these enemies, incendiary rounds will set them aflame. Submachineguns and assault rifles are recommended, as they carry between forty to sixty rounds of ammunition per clip.


#7. Cache Grab


Open 5 foot lockers. Most common in The Passing campaign's first two maps, cycling through different spawn points. Its third map spawns them as well, but less often. Another option is one found on the second map of Last Stand, which always spawns in the same place - a small outpost you must scale just before dropping off near a white truck.

The Passing (Riverbank):
map c6m1_riverbank

The Passing (Underground):
map c6m2_bedlam

Last Stand (Lighthouse):
map c14m2_lighthouse


#8. Chaos Generator


Have all 3 generators running at once in The Sacrifice finale. At present, my only solution is to have 3 - 4 controllers, pressing and holding the right button on all of them simultaneously. Use Admin Menu to stop the Director and make things easier for you.

Port:
map c7m3_port


#9. Chain Of Command


Kill 100 Common Infected with the Chainsaw. This melee weapon is the only one that has a finite lifespan (meaning when it runs out of gas, you drop it). This is easy to get sawing through hordes. One excellent place is the second map of Cold Stream, called South Pine Stream. You will be fighting quite a swarm of zombies to reach the Safe room, moving deeper and deeper underground after passing a number of trucks and hopping over some white fencing.

South Pine Stream:
map c13m2_southpinestream


#10. Club Dead


Use every melee weapon to kill Common Infected. This is very easy and short-winded if using Admin Menu in conjunction with Melee Weapon Unlock Mod. Simply open up the Menu on any map and select one weapon after another, killing at least one zombie with each. The Shovel and Pitchfork are new and do not count.


#11. Confederacy Of Crunches


Finish a campaign using only melee weapons. No damage can come from throwable items. No shoving with non-melee weapons, nothing. Safest route is to have only a melee weapon in the first place, using nothing but that and healing as needed. My pick for a campaign is The Passing. If you wish, you can disable the Director and warp your entire team to every Safe room, then enable the final rescue through Admin Menu.

Riverbank:
map c6m1_riverbank

[:] Achievements #12 - #16


#12. Crass Menagerie


Kill one of each Uncommon Infected. Study these following requirements:

1. Dead Center or Sacrifice Campaign ~ CEDA Agent

2. Dark Carnival campaign ~ Clown

3. Swamp Fever, Cold Stream, or Last Stand campaign ~ Mudman

4. Hard Rain campaign ~ Worker


Riot Infected and Jimmy Gibbs Jr. do not count.


#13. Dead In The Water


Kill 10 swampy Mudmen while they are in the water. You have two options (three really, but that third window is brief).

1. Swamp Fever campaign
map c3m1_plankcountry

2. Cold Stream campaign
map c13m1_alpinecreek

3. Last Stand campaign
map c14m1_junkyard

The first two have plenty of water, which is where you will find Mudmen. The first map of Last Stand has a small stream flowing by a house and under a bridge with a canoe nearby. You will find the odd Mudman there, but far less than elsewhere. Feel free to kick other Survivors and spawn what Infected you need with Admin Menu. Or, seek and destroy.


#14. Fat Ninja


Puke on all four Survivors without them seeing you. Start a Versus match in Atrium. Be ready to kick Special Infected as needed to keep the humans alive until you succeed. They will keep running around in a circle near the escape vehicle, giving you the opening you need.

Once you are a Boomer, carefully hide behind the racecar opposite them. Crouch and make your way along the car, not showing yourself. When you see their moving outlines through it, aim up about 30 degrees and vomit, turning left and right as needed to cover everyone. If you don't start as Infected, restart the match until you do.

P.S: This might take a few tries - it depends on whether any Survivor catches a glance of you at the last moment. You can even do this from behind the car, but would need more puking precision.

Atrium:
map c1m4_atrium versus


#15. Flight Deck


As a Charger, kill a Survivor instantly. Start a Versus match on Dead Center's first map, Hotel. Charge a Survivor out the first window down the first hallway of the map, just after the four of them leave the Safe area and walk down their first set of stairs. If you charge them down the hall far enough before breaking glass, you can get #60. Long Distance Carrier as well.

Hotel:
map c1m1_hotel versus


#16. Getting Started


Get a Bronze Medal (last four minutes) in Survival Mode on any map.

[:] Achievements #17 - #20


#17. Gong Show


Prove you are stronger than Moustachio. This is to be accomplished on the fourth map of Dark Carnival. You will come across a Strong Man game near Bumper Cars with a large red button at your feet. Use an adrenaline shot and whack that button with any melee weapon to hit the bell up top and prove yourself. If a Tank happens along and does so with his fists, it won't count for you.


#18. Gnome Alone


Watch Gnome Chomski get shot into space!

Starting November 20th, 2020, this achievement began to unlock for everyone playing Left 4 Dead 2. This was following a Titanium, 3D-printed Gnome Chomski literally being launched into space. Valve President Gabe Newell explained the idea before the launch, hoping Left 4 Dead and Half-Life fans would enjoy this happening, and also how it was planned as a fundraising event for charity.


#19. Grave Robber


Pick up 10 items dropped by Fallen Survivors. When one of them dies, they drop up to four items. The Admin Menu will spawn only one per map play, but you can find more of them throughout The Passing campaign (the first two maps in particular).


Riverbank:
map c6m1_riverbank

Underground:
map c6m2_bedlam


#20. Head Honcho


Decapitate 200 Infected with a melee weapon. My go-to is the Fire axe which can lop off multiple heads at once. The Baseball Bat, Katana, Cricket Bat, and Golf Club are good options as well. If you focus, you can get this done after one campaign, or one and change tops.

[:] Achievements #21 - #25


#21. Household Names


Discover the Hidden Room in the Last Stand campaign. In the campaign's first map, Junkyard, you will run into a stream followed by a bridge and small house. Go in that home, up to the second floor and out to the balcony. Once there, fall off and wrap around to your right, making your way to some metal safety bars and a fortified barn door just to your right again.

Use a melee weapon to bash your way through (it will take some time, don't give up). If playing with others, make sure whoever needs the achievement is the one who gets the last hit in before the door breaks down. At this point, you will have discovered the Hidden Room, and can use the keyboard inside to obtain a golden Crowbar. Yes, it will count toward #56. Golden Freeman, though it is to be considered Crowbar #23.

P.S: All four Survivors can use the keyboard successfully. Gold for everyone.

Junkyard:
map c14m1_junkyard


#22. Hunting Party


Win a game of Scavenge. Start up a game of Scavenge on any map. It doesn't matter whether you are a Survivor or Special Infected, though being human and pouring in a gas can or two will make things faster for you, as your opponents won't get that far. If you are a zombie, kill or kick the Survivors quickly, so that a tie-breaking time count will be in your favour. Once the game ends (three rounds, since started through the Console), you win.


#23. I Spit On Your Grave


As a Spitter, spit on a Survivor who is pinned by a Charger. Again I send you to Atrium. Once a Spitter, hide behind the elevator as you see above. It will only be a matter of time before a Charger grabs someone and you get your chance. The trick here is to hold off for maybe a second or second and a half after they start slamming a human. If you spit too early, the game will not register it. This applies also to #44. Acid Bath.

As a side-note, four Survivors clustered may make a nice target, but also means a lot of firepower in a small area. A Charger may not last long enough for you to do what you need, so kicking a couple of humans may be worth it. More than that, you can kick Special Infected to keep them alive longer while you wait. One could go further and cut out all Charger portions of the Kick Commands and have nothing stay spawned -but- them.

Atrium:
map c1m4_atrium versus


#24: Kill Bill


Have Bill sacrifice himself for the team. This can only be done on Port at the very end of The Sacrifice campaign. Play as Bill, hopping down off the bridge after it lowers, everyone is on it and you moving a switch raises it again. You hop down, restart the nearby generator, and Infected kill you, ending the campaign.

A pipe bomb is strongly recommended to keep zombies from swarming you. Kick commands are also part of a swell plan. Be careful jumping down, or you will take a lot of damage and be moving more slowly.


#25. Killing Them Swiftly To This Song


Play the new Midnight Riders song on a Jukebox. This consists of spamming the one found on the second map of The Passing campaign. You will have to jump through the window of a Pool Hall, near a construction site behind it. There are four rows of lights to indicate which song is playing; the bottom-right one is what you want.

Underground:
map c6m2_bedlam

[:] Achievements #26 - #30


#26. Midnight Rider


Complete the Dark Carnival campaign.


#27. Mutant Overlord


Play through 6 Mutations. This means from start to finish, playing it safe by allowing a Mutation to start over again before quitting and choosing another one. Many you can do yourself, despite more minimum players being posted (Improved Bots might have something to do with that). Still, some will (for some reason) not register for you.


A few good ones are:

1. Last Man On Earth

2. Lone Gunman

3. Gib Fest

4. Four Swordsmen


#28. New Haircut


Kill a Witch using only a sharp melee weapon, without anyone getting incapacitated or killed. Play a Four Swordsmen Mutation on the Hard Rain campaign's second map, The Sugar Mill. All Survivors will be carrying Katanas and cannot swap for other weapons. Find a Witch, approach and let your AI teammates surround her, then attack. If someone takes a hit, get them up, heal, and try again. It will take 4 - 5 hits to take one down.

For the record, "sharp" melee weapons are:

1. Fire axe

2. Machete

3. Katana

4. Hunting Knife

5. Shovel

6. Pitchfork

The Chainsaw (now patched) is -NOT- a "sharp" melee weapon.

NOTE: When Witch-hunting, you can kick all the Special Infected you want as the command string I've provided will leave Witches behind. Don't stop the Director though, or there will be nothing left.


#29. On Our Way


Get a Silver Medal (last seven minutes) on any Survival map.


#30. Pole Position


Escape Liberty Mall's Atrium before the first Tank appears. A few options:

1. The Traditional Way. Play single player on Atrium, Easy difficulty. You will only need 8 gas cans to enable your rescue vehicle.

Start with the 3 cans on the ground floor, across from the car. Throw them near the vehicle. Then, go up the stairs closest to the racecar and turn left, finding two more. Shoot or hit the glass beneath you at that point and throw the two you've found down there. Now drop down, finding another two cans, making four total right near you.

Throw those four down toward the car, and grab one more from across the walkway next to you when you dropped down. Hurry down, maybe jumping partway down off of the stairs nearest you and fill up that car! Doing it this way alone is possible, but hard.


2. The Kicking Way. Do the same thing as above, except to kick Special Infected and make your task easier.


3. The Admin Way. Using Admin Menu, stop the Director and activate Final Rescue when you start the map. You will notice an outline around the racecar, just waiting for you to traipse through. Once all Survivors reach it, the campaign ends. No gas cans, no Infected, no nothing.


Atrium:
map c1m4_atrium

[:] Achievements #31 - #35


#31. Port Of Scavenge


Play through 5 full games of Scavenge on The Sacrifice campaign's third map, Port. These games can be played at a single round each. "Full" means from start to finish - two teams start a game, one team wins.

Port:
map c7m3_port scavenge


#32. Price Chopper


Complete the Dead Center campaign.


#33. Ragin' Cajun


Complete the Swamp Fever campaign.


#34. Robbed Zombie


Collect 10 vials of Boomer vomit from infected CEDA Agents you have killed. The best map for this is The Sacrifice campaign's third map, The Port. CEDA personnel will spawn often, rewarding you with the odd Boomer Bile canister falling from their hip when struck down.

Port:
map c7m3_port

-OR-

Use the Admin Menu add-on in-game (say, in Atrium) to spawn as many hazmat enthusiasts as you need. Be sure to pick up each container you find and throw it before moving on to the next.

Atrium:
map c1m4_atrium


#35. Scavenge Hunt


Stop the enemy team from collecting any gas cans during a Scavenge round. First, ensure the Advanced Bots (Simple) add-on from Ziggy is active. Then, start a Scavenge game through your Console. If not Infected right away, use the Console to restart the match until you are. The AI Survivors (without third-party plug-ins) are not smart enough to collect gas cans on their own, meaning you need only wait through one round.

It doesn't matter which Scavenge map you choose, so long as Scavenge Mode exists on that map to begin with. Dead Center's fourth map, Atrium, would be my choice, as it's small and convenient to get other achievements as you go along.

Atrium:
map c1m4_atrium scavenge

[:] Achievements #36 - #40


#36. Septic Tank


Use a bile bomb on a Tank. Similar to the Towering Inferno achievement from the original Left 4 Dead, except you need to hit one with a bile bomb and not something flammable, like Molotovs, gas cans or exploding barrels.


#37. Still Standing


Complete the Last Stand campaign on any difficulty.


#38. Stream Crosser


Complete the Cold Stream campaign on any difficulty.


#39. Supreme Sacrifice


Complete The Sacrifice campaign on any difficulty.


#40. This Is Where The Fun Begins


Get a Gold Medal (last ten minutes) on any Survival map.

[:] Achievements #41 - #45


#41. Three's A Crowd


Rescue 3 Survivors from a closet. Very easy to do. With three AI teammates, load up the Crash Course campaign's first map, Alleys, on Expert. Kill your teammates once the game starts, then change the difficulty to Easy and travel to the nearby closet. It's just past a green dumpster next to a grey building with fencing across from it.

After a short time, you will notice yellow outlines of the other three Survivors suddenly appear behind the closet door. Open the door and increase the crowd by 25%. Playing Realism will disable Rescue Closets.

Alleys:
map c9m1_alleys


#42. Torch Bearer


Complete The Passing campaign.


#43. Weatherman


Complete the Hard Rain campaign.


#44. Acid Bath


As the Spitter, spit on a Survivor who is pinned by a Hunter As with #23. I Spit On Your Grave, I direct you to the Mall Atrium. Hide behind the elevator when you spawn as a Spitter waiting for a Hunter to trap someone. Wait a second or two once that happens, then spit. If not, the game won't register it. Feel free to kick humans and Special Infected as needed. One could also remove every Hunter portion of the Kick Command string I've provided, allowing only them to spawn (you yourself excepted).

Atrium:
map c1m4_atrium versus


#45. A Little Hack And Slash


Earn a Bronze Medal (last four minutes) on all 43 Official Survival maps.


[:] Achievements #46 - #50


#46. Barrel Rolled


Kill a Special Infected with an exploding barrel. This description is misleading, as any Special Infected being killed by a barrel —explosion— and not an exploded barrel’s —fire— will not give you this achievement. It can be any Special Infected, but Boomers and Boomettes tend to be easiest because their health is by far the lowest.

Before you start, realize that:

A) Mods aside, these barrels are only found in The Sacrifice campaign.

B) Any Special Infected dying from a barrel’s —explosion— instead of —fire— will not unlock this achievement.

C) Having AI Survivors with you will almost certainly complicate this achievement, as they tend to shoot on sight (well, sometimes…) Feel free to kick them as needed and make your life easier.

kick Nick; kick Ellis; kick Rochelle; kick Coach

D) These barrels spawn randomly throughout the first two Sacrifice maps (Docks, Barge). Don’t get frustrated struggling to find the right angle with what’s available, and be ready to restart maps as needed.

Docks:
map c7m1_docks

Barge:
map c7m2_barge

There is another option, much simpler. Go to any map in any game mode and spawn all the barrels you like. Spawn a Special Infected in the damage (fire) radius of those barrels, right after you've shot and exploded them.


#47. Bridge Over Trebled Slaughter


Cross the bridge finale in less than three minutes. Stay to the left side of the bridge, and invest in a melee weapon. You -can- go up the ramp that will show itself, but I recommend letting that go. With Admin Menu, you can make it easier and give yourself Chainsaws; coupled with Kick Commands, you won't have a problem. Better yet, stop the Director and enjoy the campaign version of a Last Man On Earth mutation (but better) or just warp yourself to the end via crosshair.


#48. Connecting Fights


Play a Versus game on Dead Air from start to finish.

The idea is to play through an entire Versus game, win or lose. With the Improved Bots mod, you will be able to play against bot Survivors as Infected. Admin Menu won't work in Versus (local or not), but you can still kick both Special Infected and Survivors, for example
kick bill
It may take a bit of time for the AI as humans to figure out leaving a safe area, but they will. Start at the first map of that campaign, Greenhouse.

Greenhouse:
map c11m1_greenhouse versus


#49. Cl0wnd


Honk the noses of 10 Clowns. Unless using Admin Menu, these are found exclusively in the Dark Carnival campaign. When you can, get close to a red-nosed goon and shove him square in the face. Every successful "honk" will be marked by a distinctive... well, honk. You can get up to four or five honks per Clown, assuming they aren't damaged besides. Every honk counts, even on the same zombie.


#50. Dismemberment Plan


Kill 15 Infected with a single Grenade Launcher blast. First option is to find a populated area, toss a pipe bomb far enough away so zombies don't get show by teammates, and blast a group. Wait as long as you can before shooting so that you give them enough time to congregate.

Second option is to spam-spawn lots of Common or Uncommon Infected very quickly (Jimmy Jr. and Riot police aside) just before lobbing a grenade. Helping others, I usually spawn either a bunch of Clowns or CEDA Agents in the Mall Atrium, right near the main kiosk during an untimed (non-started) Survival match.

[:] Achievements #51 - #55


#51. Elephant In The Room


Revive an incapacitated teammate while a Tank is nearby. I might call this hard, if not for three other team members. The ideal scenario is for a Tank to incap someone near or at the edge of a structure with some elbow room, following others around it. As soon as a Survivor is downed, move to revive them. Giving yourself an Adrenaline Shot before reviving is strongly recommended.

Consider the GIF here a display of what -not- to do. We're stuck in a corner, and the Tank keeps pounding on the guy I'm trying to save, almost killing him and setting me back continually. As you may notice, I learned a new equation: dying Tank + ongoing revive = no achievement.


#52. Fore!


Knock off the heads of 18 Infected with the Golf Club. My map of choice is The Passing campaign's first map, The Riverbank. If a Club is not present when the game starts, restart until you get one and aim for the head.

-OR-

Use the Admin Menu add-on in-game to give yourself one. I recommend the Melee Weapon Unlock Mod. Otherwise, you will be limited to which map allows you which melee items.

Riverbank:
map c6m1_riverbank


#53. Fuel Crisis


Make a Survivor drop a gas can during overtime. For solo, this will require Sourcemod plug-ins available here[www.sourcemod.net]. With these running, AI Survivors will be a bit more flexible, picking up gas cans and using Defibs among other things. I again direct you to Atrium, with less open space and obstruction for you (that, or Port).

Atrium:
map c1m4_atrium scavenge

Port:
map c7m3_port scavenge


#54. Gas Guzzler


Collect 100 gas cans in Scavenge. This is easier than it seems by description. This is cumulative, meaning that you can play through as many rounds and games of Scavenge as you need to in order to reach that number. If playing "normally", Atrium and Port are small maps offering quick access to cans.

-OR-

Use Admin Menu in any old map in that game mode and spawn yourself 16 cans. You might find it easier to finish one round at a time, restarting the game once round 2 begins. This is because of the Scavenge points system, which will make you waste time you don't need to waste going solo.

Atrium:
map c1m4_atrium scavenge

Port (The Passing):
map c6m3_port scavenge

Port (The Sacrifice):
map c7m3_port scavenge


#55. Get Skeeted On


Kill a pouncing Hunter with a shotgun. The SPAS-12 (black) or Benelli (grey) semi-auto shotguns are recommended. When you find a Hunter ready to pounce, don't be afraid to shoot him once or twice before he does. Try shooting for his neck and chin as he leaps at you. Headshots work too, but can be harder to land with all pellets. The Hunter doesn't have to be close up or far away when they pounce; whatever works for you.

P.S: Shotgun Slugs can make this fun, (especially if you like headshots). <--- If that is the case, don't feel you need to shoot Hunters before they leap at you ~ they'll die too quickly.

[:] Achievement #56a


#56. Golden Freeman


Find the golden Crowbars hidden in the Left 4 Dead 1 Survival maps. There are 22 Crowbars to be found, with 1 Crowbar per applicable map. The maps are:


1. Train Car: Find the boat next to a series of Chainsaws. Jump from it to reach the nearest fire escape platform and grab it mid-air.
map c7m1_docks survival


2. Port: Find a gas can or Propane tank. Go to the far end of the map with a large yellow bin. Keep throwing your item at a large traffic cone up close, moving it toward the scaffolding in front of you. Hop up, then run and jump for it. HINT: Don't push the cones too far, or you won't be able to jump on them anymore.
map c7m3_port survival


3. Gas Station: Climb up the turned over truck via its front grate. Find it wedged between some yellow and grey brick, lying on the edge of a red roof.
map c8m3_sewers survival


4. Rooftop: Near the rubble of a collapsed landing pad, there is a platform with a searchlight. Jump from the corner of that rubble to the rotating light, finding it at the platform's far-left corner. Careful, don't fall.
map c8m5_rooftop survival


5. Truck Depot: There are two buses near the escape vehicle; go to the farthest and look behind it, against the wall. Be careful to grab it before bots do.
map c9m2_lots survival


6. Church: Hop on the piano then jump up to grab it from a high, railed platform mid-air.
map c10m3_ranchhouse survival


7. Boathouse: There is a large rock in front of a tree near the dock. Scale it, and find your Crowbar nested at the base of the tree's crown.
map c10m5_houseboat survival


8. The Construction Site: Beside a large concrete column, next to some scaffolding.
map c11m3_garage survival


9. The Runway: On a ledge near some red and white plane wreckage. Jump for it.
map c11m5_runway survival


10. The Bridge: Behind the orange train car next to the bridge.
map c12m3_bridge survival


11. Junkyard: Look between a large rock and metal crate, just past the mobile crane and some steel fencing with barbed wire.
map c14m1_junkyard survival

[:] Achievement #56b


12. Barge: Next to a large green and white truck, resting on the roof of a brick building. You'll need to jump up and snatch it at just the right moment. Look for the Crowbar's white outline.
map c7m2_barge survival


13. Generator Room: Once you spawn, it's over a nearby table, laying on top of some pipes running along the ceiling.
map c8m2_subway survival


14. Hospital: From the elevator, take your first right all the way down the hall to double green doors. Go through them, turn right, and open a wooden closet door. You will have to jump and grab it from the top-right corner of some shelving.
map c8m4_interior survival


15. Bridge: Go to the booth's right side next to some vehicles in front of the STOP barrier. Jump on the concrete in front of it and look down.
map c9m1_alleys survival


16. Drains: Near a corner next to a large pipe. Jump for it.
map c10m2_drainage survival


17. Street: On top of the green ticket booth, under the theatre sign. Get up close and jump for it.
map c10m4_mainstreet survival


18. The Crane: In a flaming white barrel next to the crane.
map c11m2_offices survival


19. The Terminal: Go to the Men's Restrooms sign and turn left. Weave your way in and find it at the last urinal in a corner.
map c11m4_terminal survival


20. Warehouse: Hanging off a large crate against a wall. Drop down carefully from the catwalk above and grab it.
map c12m2_traintunnel survival


21. The Farmhouse: Behind the barn next to the house with red shutters and outpost sign. Find it on the ground, wedged between the barn and a large wood pile.
map c12m5_cornfield survival


22. Lighthouse: At the white house's rear, there is a wood pile beneath a window ledge. Jump from the roof near the ledge to just over the window, grabbing the Crowbar mid-air. This can take several attempts.
map c14m2_lighthouse survival

There is an additional golden Crowbar to be found, located on the first map of The Last Stand campaign, in the Hidden Room for #21. Household Names. Once you've broken the door down, use the keyboard in front of you to get it.

[:] Achievements #57 - #60


#57. Kite Like A Man


Kill a Tank only with damage from the original Survivors. This is to be done on Port in The Passing campaign. My suggestion is to do this on Easy difficulty. Two options:

Fight your way to the bridge and kick the other three Survivors once you start the nearby Generator. Stay close to the original Survivors on their balcony, and within their line of sight. Pipe Bombs can be useful to veer normal Infected away from you as you focus on Special Infected, especially the Tank (just be sure it doesn't damage the pink powerhouse). Pain Pills and Adrenaline are excellent ideas to make sure you can keep outrunning them after taking hits.

-OR-

Use Admin Menu to disable the game's Director, kick your teammates and spawn a Tank for Zoey and company to gun down. You won't have to worry about anything else -but- that Tank, running around and waiting for them to drop. Fly Mode and No-Clip are also options that can help.

Port:
map c6m3_port


#58. Lickety-Split


With a sharp melee weapon, cut a Smoker's tongue before he ensnares you. Best accomplished at the Lighthouse in The Last Stand. Both Shovels and Pitchforks are plentiful, either being suitable. Look at this GIF to get an idea for timing. The trick is to swing from a mid-short distance just before they shoot their tongue at you. The timing varies from one melee weapon to the next. Other valid weapons are the Machete, Fireaxe, and Katana. The Chainsaw won't work.

Lighthouse:
map c14m2_lighthouse


#59. Like Lambs To The Slaughter


Earn a Silver Medal (last seven minutes) on all 43 Official Survival maps.


#60. Long Distance Carrier


As the Charger, grab a Survivor and carry them over 80 feet. Do this either on Port or Lighthouse. The former has a long street with a large steel container at one end and a couple of trucks not quite in the way. The latter has both a large drop-off section not guarded with fencing and a long stretch right near the dock one could use.

More info on the preferred drop-off option? Sure! Start a Versus match through your console on Lighthouse. When the AI Survivors get to the generator that needs filling with gas, they'll start camping. You see, they are smart enough to know that round hole needs filling, but not smart enough to know how to use the square pegs that are gas cans.

Once you become a Charger, wait for someone to poke out of that generator room and charge them right off the cliff, between some wooden fencing. Not only will you get your 80 feet, you will also be able to get #89. Meat Tenderizer. The other three humans will not come to save their friend, and you will be able to smash them against a rock, unimpeded, until they die.

Either do it the traditional way, waiting for an opening

-OR-

Use Admin Menu to stop the Director and spawn a Survivor in front of you to charge when ready.

Port:
map c7m3_port versus

Lighthouse:
map c14m2_lighthouse versus

[:] Achievements #61 - #65


#61. Pure Satisfaction


Kill 20 Jockeys with the Shovel or Pitchfork. I prefer the Pitchfork, but it has a learning curve to its swings and momentum. Mind you, there is something oddly satisfying, I must admit, to hearing the *TANG* coming from any Shovel connecting to a git's softening cranial structure, knowing it has come from my hands.

Go to the Lighthouse map, to the little Boathouse near the dock. Use Admin Menu to spawn Jockeys one at a time for pulping. After stopping the Director, use either Kick Commands to remove unwanted jumpers and/or a single teammate to help when you miss.

-OR-

Don't do that, and either keep replaying Last Stand until you reach a 20-count or else use the Melee Weapon Unlock Mod to enable the weapons you need throughout the game.

Junkyard:
map c14m1_junkyard

Lighthouse:
map c14m2_lighthouse


#62. Scattering Ram


As the Charger, bowl through the entire enemy team in a single charge. Once again, Versus match on Atrium (Scavenge works too, you'll just have less time to work). Once you are a Charger, hide behind the elevator and wait for an opportunity. When all four humans line up, charge through them. A second option is Lighthouse, where Survivors will congregate near the map's generator and stay there.

Atrium:
map c1m4_atrium versus

Lighthouse:
map c14m2_lighthouse versus


#63. Shock Jock


Revive 10 dead Survivors with the Defibrillator. Start up Mall Atrium on Expert difficulty. Any map in any game mode will do, but a small, closed environment with more deadly Infected is best. Kick all but one teammate, then use Admin Menu to:


1. Disable the Director. This will remove all zombies and prevent more from spawning on their own.

2. Spawn Special Infected. Choose one that will either kill them instantly (Witch) or pin and trap them (Hunter, Smoker, Charger). Tanks work too, but it can be a longer process. Kill or kick what you've spawned when their work is done.

3. Revive them using a Defib unit. Atrium has one to start, then use your Menu to give you more.


You might think you could just shoot them dead or else use that Menu to incap or kill them, and I might think to tell you none of that will count. If having Defib or achievement counter issues, restart the match after every revive.

Atrium:
map c1m4_atrium


#64. Shotgun Wedding


Kill the Witch bride with a single shotgun blast on Expert difficulty. This can only be done on The Passing's first map, Riverbank. A choice to make:

1. Go to the gowned Witch and shoot her in the throat... I mean face. Partway through this map, you will exit a brick building and make your way past a bus over to some grassy lawn and a Gazebo. In front of it will be many white chairs, and some tents behind it. Knelt down and crying in your path will be a Witch dressed in a wedding gown.

As you get close to her, she will become more agitated and start to rise. Changing difficulty from Easy to Expert just before reaching her is a fine thing to do, and using Kick Commands too. Any shotgun will do, but the semi-autos are best. You may succeed shooting her in the head right off, or you might find you need to aim a bit lower, around the top of her throat.

-OR-

2. Bring the gowned Witch to you and shoot her in the head. Right after you spawn, use Admin Menu to give yourself a shotgun and also to spawn a Witch (on this map, it will always be the gowned one that appears). Shoot her in the head, maybe using a slug to get the job done.

Riverbank:
map c6m1_riverbank


#65. Stache Whacker


Prove you are faster than Moustachio. On the same map as #17. Gong Show, you will find a whack-a-mole type of game that starts with the push of a button. The overall score you need to win is 42, and you can play as many times as you need. It takes a melee weapon to proceed, and any one will do.


I'm being cute here using the Riot Shield, but its probably the worst weapon to use. Those little Moustachios get faster and more plentiful the higher your score. The best tool for this job is the Fire axe; its swings are the widest of any weapon, and it is fast enough to hit every little man that pops up if your timing is right. Second place would be the Katana.

Barns:
map c2m4_barns

[:] Achievements #66 - #70


#66. Strength In Numbers


Form a team and beat an enemy team in 4v4 Versus or Scavenge.

For this, have either the Improved Bots (Simple) or Improved Bots (Advanced) mod installed. In your Console, type:

map c1m4_atrium teamscavenge

Play through two rounds, collecting at least one gas can in each. Other maps will do, but Atrium is straightforward.


Credit to CGFW for posting this information.


#67. Supreme Survivalist


Survive for 30 minutes on any Official Survival map. Admin Menu can help by disabling the Director. Or, use Kick Commands to keep things calm and rack up time. As for which map to choose, just go with something from the original Left 4 Dead.


#68. Tank Burger


Kill a Tank using only melee weapons. Start up a Four Swordsmen Mutation on Easy difficulty. Choose Port from The Sacrifice campaign as your map. Once you run into a Tank, gang up on it and make burgers.


#69. The Big Ten


Survive for 10 minutes on any Official map in Versus Survival. As with #67. Supreme Survivalist, rely on Kick Commands to help you.

Have two controllers plugged in and create a Versus Survival match. I always choose Bud's Gun Shop because enemies funnel in nicely, but any map available to you in the Lobby will do. Host your game on a Local Server so that you can use Kick Commands; at that point, you'll only have to deal with Common Infected and the odd stray Special Infected.


#70. The Quick And The Dead


Revive 10 incapacitated Survivors while under the speed-boosting effects of adrenaline. Follow the same instructions as #63. Shock Jock, except to inject yourself before every revive and to have your teammate incapped, not killed. Adrenaline is more readily available than a Defib, and Admin Menu can keep you stocked. If having issues with the achievement counter, restart the match after every revive.

Atrium:
map_c1m4_atrium

[:] Achievements # 71 - 75


#71. The Main Attraction


On the Concert finale, survive until the helicopter arrives without leaving the stage. This is done on the Dark Carnival campaign's last map. Use Admin Menu to disable the Director or else use Kick Commands to keep Tanks and Smokers and Chargers away from you. Stay on the main platform starting from the moment you begin the light show until the rescue copter arrives and you hear the escape music kick in.


#72. Til It Goes Click


Using the M60, kill 25 Infected without letting go of the trigger. Without mods, do this:

1. In The Passing campaign where an M60 occasionally shows up. Go looking or else wait for a horde to come after you.

2. In a Gibfest Mutation, where everyone has M60s.


-With- mods, use Admin Menu to give yourself an M60 anywhere you please. Kick your teammates and use Bile Bombs or add mods like Super Hordes and Super Hordes And Never Ending Hordes. One of these two claim to conflict with Improved Bots, but will work just fine anyhow.


#73. Valve Gift Grab 2011 – L4D2


Collect three gifts dropped by Special Infected in Versus Mode. Running over gifts will collect them, and have two options:

1. Wait until December rolls around and play Versus matches until you collect what you need.

2. Change your system date to sometime in December (like Xmas, because Xmas). While this won't work for you playing on Official Dedicated servers, it will work just fine locally (i.e: through your Console). Don't forget to change your date back when done.

I favour the first map of Dead Center, in that first long hallway. Special Infected are plentiful and in an enclosed environment. Without Improved Bots, that second option will be annoying for you, scurrying for a present before being kicked from a server that shuts down.

NOTE: You need to play as a Survivor, collecting three golden-green gifts dropped by Special Infected that you or your teammates kill. If you don't start as a human, restart the match until you do. Gifts can drop at any time, so keep an eye out. Bear in mind they will also disappear after a little while if not collected. It doesn't have to be three in one match, this is cumulative.

Hotel:
map c1m1_hotel versus


#74. Violence In Silence


Navigate the impound lot and reach the cemetery Safe room without tripping any alarms. This is done on The Parish campaign's third map, Cemetery. You will reach a maze of cars in different colours - jump and walk on the white, avoid the red.

If doing this normally, be sure to not lollygag because of hordes but also clear idle zombies from around those vehicles first. If you don't, it's guaranteed that a bot Survivor will shoot and set off an alarm. Doing this on Easy difficulty will help.

-OR-

Use Admin Menu and disable the Director. Kick your teammates and take your time, walking on white card and avoiding the red ones. If you pay attention, you can't lose. I do not recommend warping to the Safe room, because the achievement will likely not unlock for you.


#75. Wing And A Prayer


Defend yourself at the crashed airliner without taking damage. Never mind mods for this one; no warping to the Safe room, no stopping the Director. Kicking is fine, but that's it. Your camping area is at the end of the plane, in a gap between two rows of seats. Clear that area of explosive and flammable items before starting the event. Having your back to the hull means you won't get hit from behind, and being crouched in there means your bot friends will protect you.

The main threats to you will be Smokers trying to pull you out and Spitters trapping you with acid. A shotgun and magnum are recommended, though a melee weapon instead of handgun can work too. Help your friends out when you can by thinning the herd, but be careful not to hurt them too much in the process. Don't be shy about shoving Infected that get near you, as it takes only one touch from them to void this achievement.

Don't be fooled by pauses in the action; when you can crouch there and wait for 20 seconds without any zombies coming, you know you're safe. Another option for camping is the exposed wing behind the hatch, but it's tougher. Try it if you're struggling, but be ready to kick. The achievement usually unlocks as soon as the event finishes without you taking damage, but sometimes will not until you reach the end Safe room. This one takes place on Swamp Fever's second map, Swamp.

Swamp:
map c3m2_swamp

[:] Achievements # 76 - 80


#76. A Spittle Help From My Friends


As the Spitter, spit on a Survivor being choked by a Smoker. Do this playing Scavenge on either Port map. This can be long because you have to wait for an opportunity and not get killed as a Spitter in the process. You can kick up to three Survivors and Special Infected you don't like also. To make sure the game registers your spit, maybe wait a second or two after a human starts being strangled.

You can also play Versus on any map to spit for this, it's just that the human bots have this habit of prancing around generators that need gas, making them easier and more vulnerable targets. More, both Port maps have tall buildings nearby with many ledges on which Special Infected can perch.

Port (The Passing):
map c6m3_port scavenge

Port (The Sacrifice):
map c7m3_port scavenge


#77. Back In The Saddle


As the Jockey, ride the Survivors twice in a single life. You can't afford to steer a human into water unless it's the second one you jump on. For once, Atrium is not that great an option; the human team will stay tightly packed, lowering your chances of success. You can kick a couple of Survivors and finish one off that remains when their health is low, moving to the last one afterward.

You know what? Go to Atrium, prove me wrong. Try it. If not, pick some exotic map I haven't mentioned that most people don't play. Proooobably it'll work out.


#78. Cache And Carry


Collect 15 gas cans in a single Scavenge round. This is hard. Mods won't work on Scavenge maps anymore (certainly not games started through the Console at any rate), so you have to grab every can by yourself and pour them in before time runs out. If more than one can is destroyed, you have to start over. While each one poured add a time bonus of 20 seconds, you need to be quick.

Potential issues are:

1. Spitters destroying cans with acid.

2. Other Infected interrupting you by slowing your pour, knocking you down, pinning you, or making you stumble.

3. Survivors damaging cans with bullets or throwable items.

If one gas can ruptures and caches fire, the flames can spread and destroy others too.


Five maps that come to mind are Atrium, both Ports, Junkyard and perhaps Lighthouse. Kick Commands are very useful here, and I strongly suggest you make use of them.

Atrium:
map c1m4_atrium scavenge

Port (The Passing):
map c6m3_port scavenge

Port (The Sacrifice):
map c7m3_port scavenge

Junkyard:
map c14m1_junkyard scavenge

Lighthouse:
map c14m2_lighthouse scavenge


#79. Fried Piper


Using a Molotov, burn a Clown leading at least 10 Common Infected. Doing this normally, go to Dark Carnival's fourth map, Barns. Toward the end of it, you will find a gate that needs opening. Once you do, there will be swarms of zombies coming at you. If you can spot a Clown, go for it; otherwise, toss fire into a large group and you will likely burn one.

Another option is that campaign's third map, Coaster. You will reach a point where you must drop down a hole in concrete flooring. There will often be a Clown and company waiting for you, especially if you wait for them to turn into a horde and start jumping up to you.

Still another option is to simply use Admin Menu and spawn a cavalcade of comedy in front of you, Molotov at the ready. Doesn't matter which map, as you won't be giving them time to move very far.

Barns:
map c2m4_barns

Coaster:
map c2m3_coaster


#80. Gas Guzzler


Collect 100 gas cans in Scavenge. This will take some time... do your best and be prepared to restart 10 - 20 times before you're through.

[:] Achievements # 81 - 85


#81. Gas Shortage


Cause 25 gas can drops as a Special Infected. I don't have a solution yet for doing this solo. I'm sure there is a way, a command of some sort to make Survivor(s) hold gas cans, but I don't know it. If they were to hold cans, you could charge, pull, jump or pounce on them. Hitting them as a Tank works too. When a Survivor is incapped or killed, they will drop their can.


#82. Ghost Of Christmas Present


Spread cheer by helping a free holiday player survive a campaign. **THIS CANNOT BE DONE SOLO**. You need to complete a full campaign with someone who received the game for free during the year 2013. This doesn't mean someone bought it for them, it means the game was free to own during a holiday period back then, and so many people took advantage.

There is this persistent rumour going around that once someone who can help others get this does so once, they can't ever do it again. THIS IS NOT TRUE, as I can attest to from personal experience. Anyone who got this game free as described above can help others as many times as they wish, there is no limit.

There is no other way to get this achievement, meaning solo is not an option. If you need this, look through Steam Discussions for this game and find people who are willing to help.


#83. Good Guy Nick


Plays games with free weekend players and helps them survive a campaign. **THIS CANNOT BE DONE SOLO** (KINDA). Every now and then (with years in between) Valve will offer a free weekend for this game. This means that anyone on Steam can play for this game without buying it for 2 - 4 days. Your task is to help one of them play through a full campaign without them dying.

Often this comes with some frustration, as many free players are new to the Left 4 Dead series and must learn. Easy difficulty is recommended in this scenario, and having one or two other experienced players with you can minimize any discomfort. The last free weekend was July 22nd to 26th, 2022. Before that, there was another in celebration of the Last Stand update. It lasted four days.

There is one way to do this solo, if you have the setup for it (two ways, kinda). The first method is having two PCs connected to the Internet at once. One is logged in to your account, the other an account you created for this purpose, as a free player. "Both" players enter the same lobby and play through a campaign. In this case, a local server should do just fine. Why? So you can use Admin Menu and warp through any campaign to Safe room after Safe room without struggling to manage two characters. Disable the Director on the campaign finale and call the final rescue.

The second method is to use something like VMware to create a virtual machine on your PC. You can have two accounts running at once, one being on that machine, one being through your normal Operating System. This can be a little more complex, but it is possible.

Free new accounts should have the mandatory $5.00 USD paid to lift restrictions. If you don't pay, you make it (much) more difficult to accomplish your goal.


#84. Great Expectorations


As the Spitter, hit every Survivor with a single acid patch. Atrium! Hide behind the elevator or across the map from where the Survivors are grouped and aim for their feet, hopefully in the center of all four people. On other maps, this can be a lot tougher. If trying elsewhere, do your best to catch them in an enclosed space or in a narrow corridor, hopefully without an escape route that isn't where you're standing.

Atrium:
map c1m4_atrium versus


#85. Guardin' Gnome


Rescue Gnome Chompski from the Carnival. At this point, he hasn't been shot into space.

Chomski will first be found on Dark Carnival's second map, Fairground. Once you win him, you must bring him through the rest of the campaign successfully, and be holding him in your hands once you get on the rescue chopper.

There is a shooting game you must play at the Peanut Gallery, near where you start the map. Submachineguns are strongly recommended, followed by assault rifles as a second option. You must finish with at least 750 points to win the Gnome, using this point system:

1. Red Bagger = 10 Points

2. Blue Bagger = 10 Points

3. Moustachio = 100 Points

4. Peanut = -100 Points

5. Double Red Bagger = 20 Points

6. Double Blue Bagger = 20 Points

Once you've won, the little wooden box holding the Gnome will open, the sign above it swirling with light. If you finish a game and do not have enough points, you have to try again starting at zero. If using mods, get your little friend and use Admin Menu, warping to every Safe room you can. At the finale, disable the Director and call the final rescue. Get on that helicopter with your Chomski and you're finished.


If playing through modlessly, be very careful what you do with that Gnome. If you let it go to fight and then travel a ways, it could disappear on you. If you drop it (say, through the floor of a coaster track or from a high place) you might just pay for it. If you are not holding it when in a Safe room and moving along to the next map, he's gone.

I'm just saying, if you don't watch out, you're go-nna-have a bad *tiiime* (mkay).


Fairground:
map c2m2_fairground

[:] Achievements # 86 - 90


#86. Heartwarmer


In a Versus round, leave the Safe room to defibrillate a dead teammate. Kick Commands are important here, as is finding a Defib unit. You can do this without kicking, but it will be longer and more difficult. As mods don't work in Versus, this will take some effort and luck regardless. Choose the Hard Rain campaign's first map, Milltown.

A melee weapon is recommended so you don't run out of ammo waiting for things to fall into place. Halfway through the map, you will come across an ambulance with its rear doors open. If there is a Defib unit there, take it and continue. If not, restart the match. (Very patient people can look around for a unit elsewhere, but why waste time?) You can kick one Survivor, but not two. If you kick too many, you will end the round by closing the Safe room door, since there will be no one left but you alive and someone else dead.

Once one of your teammates is dead, get to the Safe room. Make sure you get inside, -close- that door *completely*, and get back out before any more Survivors join you. Make your way back to the dead person and revive them. Kicking all the way there and back is entirely beyond reproach.

Milltown:
map c4m1_milltown_a versus


#87. Killing Spree


Earn a Gold Medal (last ten minutes) on all 43 Official Survival maps.


#88. Level A Charge


Kill a Charger with a melee weapon while they are charging. You can do this on any map, anywhere they have room to charge at you. Your checklist:

1. Hit the Charger once with your melee weapon.

2. Get enough distance between you to let them set up a long charge at you.

3. Timing carefully, hit the Charger one more time and level a charge.

I write "long" charge so you have time to react. You are the one who needs to decide what distance is best. Still, if they are too close, you can't swing in time to stop them pinning you. The higher your health is, the faster you will move, so keep a Medkit handy. Using Adrenaline will increase your reflexes but also require different timing for an attack.

If using mods, activate Fly Mode with Admin Menu; this will help create distance between you and the Infected. Be sure to kick all other Survivors and disable the Director. Have Kick Commands ready for in case (when) you fail and start getting tenderized. My choice map is the first of The Parish campaign, Waterfront.

Near the beginning, you will notice a green bench and grey metal barrier in front of you, with white metal police barriers to your left and right. Go to the right barrier and spawn the Charger in front of you. Hit him once, then fly above him. He will walk away from you, moving toward the opposite barrier. When he's far enough, come back down and wait for a charge. If your timing is off, kick and try again. Any melee weapon will do, but I generally lean toward the Machete.

If not using mods, I suggest Swamp Fever's fourth map, Plantation. Get yourself a Machete if you can and find a series of houses followed by a wood pile to your left and a broken down blue car just up further to your right. There will often be a Charger nearby. The idea is to get a swipe on them as they charge toward you, dropping them in one hit because your friend's bullets have weakened it.

A little further still will be a large green tractor on the left, just before some trees in front of large structure complete with yellow ladder. If you wait here, more Chargers are fairly likely to spawn ~ at least one or two.

Waterfront:
map c5m1_waterfront

Plantation:
map c3m4_plantation


#89. Meat Tenderizer


As the Charger, grab a Survivor and smash them into the ground for a solid 15 seconds. Refer to #60. Long Distance Carrier for this one. Long story short, you start a Versus match on Lighthouse, camping right near the generator room and charging a Survivor through an opening between some wood fencing and off a cliff. You will land on a large rock, tenderizing in peace.

Lighthouse:
map c14m2_lighthouse versus


#90. One Hit Wonder


As the Hunter, land a 25 damage pounce. Two options:


1. Atrium. In a Versus match, you can pounce from the third floor. Do it from behind them, leaping out while they are in combat, or else from the opposite end of the map on a wooden bench, being careful not to get shot too much before you make your move.


2. Alleys. Your first opening is right at match start, but you have to get lucky with your spawning and hope the Survivors will wander just outside the safe zone and stay nearby. Your best chance will be when the Survivors climb down a ladder near several large vehicles. There is a tall building just before the drop-off you will use to make your pounce high and far enough.

Atrium:
map c1m4_atrium versus

Alleys:
map c9m1_alleys versus

[:] Achievements # 91 - 95


#91. Qualified Ride


As the Jockey, ride a Survivor for more than 12 seconds. Start a Versus match anywhere. Once you are a Jockey, kick all but one Survivor and jump on them. The challenge here (besides surviving) is to jump on them before their health is too low. You can kick other Special Infected to up your chances, but Common Infected will remain a factor.

12 seconds tells you their hit points need to be in the green or close to it. If you don't want to kick, you need to be careful and looking for opportunities to present themselves. Probably in this case you would want other Infected to be plentiful, keeping the humans busy so you can hop on one and steer them away from assistance. Expect Spitters to make acid patches (they're just trying to help).


#92. Rocky Horror Picture Throw


Destroy a Tank's rock in mid-air. The farther away a Tank is when they throw, the more time you have to damage the rock they toss your way. My first pick is the M60. If not using Admin Menu, look for them in Riverbank and Underground from The Passing campaign or Lighthouse from Last Stand. Another option is the Gibfest Mutation, in which all Survivors have M60s all the time.

Assault rifles and shotguns (semi-auto shotguns especially) can work too. Don't be too confident using Grenade Launchers. While they do pack a punch, one grenade will be all you have time for, and that won't be enough on its own.

Riverbank:
map c6m1_riverbank

Underground:
map c6m2_underground

Lighthouse:
map c14m2_lighthouse


#93. Rode Hard, Put Away Wet


As the Jockey, ride a Survivor and steer them into a Spitter's acid patch. Go to Atrium and kick at least two Survivors. When one is occupied and you see a Spitter closing, jump on the other and steer.

If not kicking, go out of your way to choose a location where Spitters have multiple vantage points. Four Survivors means more targets, but also more chances of being stopped.

Atrium:
map c1m4_atrium versus


#94. Sacrifizzle


As a Special Infected, incap someone who is trying to sacrifice themselves. You want to be a Smoker. Hide in the brick room closest to the generator. When a Survivor hops down from the bridge and approaches the generator, pull them in and incapacitate them.

P.S: You can be a Hunter, Jockey, Tank, or Charger, but it would take more effort using them, and expose you to weapons fire.


I want this to work, but every Versus match I start on The Sacrifice's third map, Port, gives me a failure message before suddenly ending and showing game scores. Like the first game in this series, this map is the -only- map that can work for this achievement.


Thus, my only solution is to have two controllers, playing as both a Survivor and Special Infected. Have your human self hide inside the brick room closest to the bridge, just beyond the generator. Try to put your character hiding either in the front-left corner of that room, next to the turbine, or to the right of the doorway, behind the brick. If you don't, your SI will be vulnerable to AI fire while you're trying to cause an incap.

Make sure you've reached the point where the bridge is raised with all AI Survivors on it. With your other controller, Bring either a Smoker, Hunter, or Charger to incapacitate your human player. A Tank is fine too, if you become one, but you have to be faster the other Tanks that will show up. Don't bother using a Spitter or Boomer. A Jockey can work, but then you're gambling that you'll cause an incap at the right moment, before a Common Infected does it for you.

Port (The Sacrifice):
map c7m3_port versus


#95. Spitfire


Destroy 20 gas cans as the Spitter. Spitter goo will only affect cans a Survivor has picked up and dropped. You will notice gas can outlines starting out white and turning orange once humans have handled them.

A) Using a mouse and keyboard, start a Scavenge game through your Console. For instance:

map c1m4_atrium scavenge

B) Spawn as a Survivor or restart the match until you do. Grab the gas can closest to the race car and bring it to the other two on the opposite end of the ground floor, near a white sign. Drop your first can with those other two, then pick up and drop the rest in that same place. At this point, all three cans should be outlined in orange.

C) Press "M" on your keyboard and choose the Infected side. Cycle through spawns until you are a Spitter and spit on the three cans you've handled. After a few seconds, they will rupture, adding to your needed 20-count.

Rinse and repeat. I couldn't figure out how to change sides using a gamepad, and had to unplug it so that the "M" key would function.


Thank you to AlfredNathan for posting this solution in the Comments section.

[:] Achievements # 96 - 101


#96. Still Something To Prove


Survive all campaigns on Expert. Easy with Admin Menu, hard without. There are five campaigns counting toward this:

1. Dead Center

2. Dark Carnival

3. Swamp Fever

4. Hard Rain

5. The Parish

Menu method: On every campaign you start, warp your team to the Safe room right away. Do so on every map but the finale, where you will disable the Director and call a final rescue.

Non-Menu method: Patience, practice, and dedication. Kicking Special Infected can help quite a bit, but that's up to you. This is doable, but will require many attempts. In time, you would prefer Survivor bots on Expert instead of human players, because you will get to know their movements and predict their patterns of behaviour. Every hit you take on Expert is at least 10% damage.


#97. The Last Dash


Complete the Last Stand campaign in 13 minutes or less, without any Survivors dying. Refer to #96. Still Something To Prove.


#98. The Last Frontier


Survive the Last Stand campaign on Expert Realism. Realism means there are no outlines around objects until you are close enough to use them, making them more difficult to locate. Rescue Closets are also disabled, meaning either you carry a Defib unit to revive someone after death or they stay dead throughout that map.

Witches (except on Easy difficulty) will kill Survivors in a single hit and can no longer be "Cr0wned" (killed from one shot to the head). All weapons except the Desert Eagle (magnum), M60, and explosive rounds in general do less damage against zombies. Only headshots remain lethal.

All that aside, refer to #96. Still Something To Prove.


#99. The Real Deal


Survive a campaign on Expert difficulty with Realism enabled. Refer to #96. Still Something To Prove and #98. The Last Frontier.


#100. Wedding Crasher


As the Charger, grab a Survivor and crash them through 8 chairs at the wedding. This must be accomplished on The Passing campaign's first map, Riverbank. "The wedding" refers to the gowned Witch crying at the edge of a Gazebo, beyond several rows of white chairs. You must charge a human through at least eight in a row. You can use Kick Commands to get rid of the competition, but it's your only trump card.

Try charging either in a very straight line through an entire column of chairs, or (more plausibly) a diagonal one from one corner of the chair setup to the other. You will stand a much better chance of catching extra chairs as you go along. Know ahead of time that this can take many tries, and that you would not be the first to walk away from it and take a break.

Riverbank:
map c6m1_riverbank versus


#101. Z-Genocidest 2: Episode 2


Kill 53,599 Infected. You made sure the dead won't rise anymore!


METHOD 1: There are two mods I recommend:

1. Super Hordes And Never Ending Hordes

2. Super Hordes

Both are good, though one claims to conflict with Improved Bots (but doesn't really, in my experience). Try them both and stick with the one you want. Don't be afraid to peruse the Workshop and have fun using different mods from the community.


METHOD 2: Subscribe to this add-on by Residents evil from the Workshop.

Follow these steps precisely:

A) Copy +attack to your clipboard, then type map achievement_genocidest survival into your Console.

B) Press the elevator button to your immediate left as soon as the map loads.

C) Quickly start using the mounted machinegun and aim directly ahead.

D) Open your Console fast and paste the +attack command.

E) Let it run, and crash if it must. Rinse and repeat until you reach what you need. Should you have crashes happening before you get started, keep trying and be quick about it. If your hardware is lacklustre, try lowering the graphics settings.

4a. Custom Content


Foreword: None of the Workshop content below is authored by me. I've mentioned add-ons either relevant to this guide or which are favourites of mine. Full credit to every author and developer and creator who took the time and effort to share their creativity and expertise with all of us through the Steam Workshop.

1. Infinite Kick Script + HUD Toggle

A double-featured add-on that I wish existed...designed to toggle both the auto-kicking of all Special Infected and the game's HUD information (crosshairs, health bar, icons, etc.)

2. Screamer (;´༎ຶД༎ຶ`)

https://steamcommunity.com/sharedfiles/filedetails/?id=2780265819&searchtext=screamer
Add-on by Toranks. As mentioned in my guide for the original Left 4 Dead, the Screamer was a concept Special Infected character, ultimately replaced by the Boomer. With this mod, the tables can be turned!

3. John Wick's Shotgun

In the "EASY" and "MEDIUM" banners for this guide, Wick is seen using a customized Benelli M2 Super 90 (TTI M2 Ultimate 3 Gun Package by Taran Tactical). I haven't found a single add-on that resembles it *HINT* <--- make it - come on now, you know you want to. Give it highly OP steel slug shots like in the film, and make sure it gets reloaded from any POV the way Keanu does it.


Charon, the man you don't see that's helping Wick, uses a Benelli M4 Super 90 which is featured in this game.


4. John Wick's Revolver (kind of...)

https://steamcommunity.com/sharedfiles/filedetails/?id=1272785717
Add-on by Tööttieläin

The revolver used by John Wick in the "HARD" banner of this guide is a modified Remington 1875 chambered in .45 Long Colt (well, it took that load at first). The closest I could find for an add-on is a model of the 1873 Colt Single Action Army revolver a.k.a. Colt SAA "Peacemaker". The two are very similar.

As a lefty, I've always wished that certain weapon mods (especially arms like these that can legitimately operate left-handed) would have a southpaw version. *Sigh* >.>

5. Improved Bots (Simple)

https://steamcommunity.com/sharedfiles/filedetails/?id=121071938
Add-on by Ziggy. This mod is meant to improve AI Survivor behaviour, and is required (in Simple or Advanced form) for this guide's method of obtaining the achievement #45: Strength In Numbers.

6. Melee Weapon Unlock Mod

https://steamcommunity.com/sharedfiles/filedetails/?id=121429214
Add-on by 该醒了. Unlocks all melee weapons on every map, including the Hunting Knife from Counter-Strike: Source that used to be elusive.

7. Admin System & Admin Menu

Admin System
https://steamcommunity.com/sharedfiles/filedetails/?id=574484797
Add-ons by Smites, Rayman1103, and Egregoros. Admin System is an add-on designed to give you Admin control via chat triggers. Admin Menu adds a simple menu to Rayman1103's Admin System add-on.
https://steamcommunity.com/sharedfiles/filedetails/?id=213591107
Finally, here is a command list for the Admin System add-on. Credit to vlα∂, Eddiboy, and Rayman1103.

8. All 8 Survivors Sourcemod (2018)

https://steamcommunity.com/sharedfiles/filedetails/?id=1488979533
Add-on by 「𝕽𝖆𝖎𝖟𝖊𝖓」. Enables playing with all eight Survivors from both Left 4 Dead games in any standard Left 4 Dead 2 campaign. Custom campaigns can also be used, but may have to be handled with some delicacy. Spawning the original Survivors direct from console without this mod will work, but in my experience can often cause glitching or crashes.

9. Shotgun Slugs Collection

https://steamcommunity.com/sharedfiles/filedetails/?id=1264371217
Add-ons by Sableagle. A set of shotgun slug mods that I find behave well with a number of
other add-ons I favour.

10. CS:GO Sawed-Off Shotgun

https://steamcommunity.com/sharedfiles/filedetails/?id=220109359
Add-on by Twilight Sparkle. Replaces the Remington 870 Police Magnum Riot (wooden pump shotgun).

11. Remington 870 AE

https://steamcommunity.com/sharedfiles/filedetails/?id=131131462
Add-on by Doktor haus. Replaces the Remington 870 Marine Magnum (chrome shotgun). Additional credit to arby26, K1CHWA, Doktor haus, Millenia, Twinke Masta, and Geno.

12. Parabellum P08 "Luger" Artillery & HUD Icon

A) Add-on by Tööttieläin. Replaces the Desert Eagle (Magnum) with a "Luger" P08 Artillery variant. This will hold eight shots per mag, and is another firearm that should work left-handed, if for no other reason than shell ejection being upward and not left or right, much like the C-96 Mauser.

B) Add-on by Alex_D_Vasilkov. Adds a matching P08 HUD icon to the mod above.

C) Do take a peek at Töötti's Vintage Weaponry collection; there you will find some beautiful pieces from the past, along with links to more matching HUD icon mods.

13. Counter-Strike: Source Weapon Unlocker

Add-on by Rectus. Unlocks all CS: Source weapons (except the hunting knife; see 6. Melee Weapon Unlock Mod above for details).

14. HD... almost everything

Add-ons by *so many people*

What has made this game so beautiful and lasting for me is all the ingenuity and imagination from the Workshop. There is great work in graphic enhancement, game modes, maps, functions, it goes on and on.

4b. Custom Requests #1


Foreword: In the previous section, I felt bad only mentioning a few of the great many Workshop contributions that I see as classics and fine works of art. There are only so many characters allotted per section, and seeing as this is first and foremost an achievement guide, I don't want to make your eyes glaze over. Perhaps I will make a collection of mods that lists all of my favourites; with so many add-ons available, I hope it might help bring these contributors some of the attention and regard I believe they deserve.


In this section, I'm going to list requests. I'd be tickled pink (ba-dum *TSS*) if an artist picked up on these ideas and made something out of them in the Workshop. For characters, I am always thinking of HD models with sound, voice, HUD, and name changes. That level of detail brings you right back to the old classics you remember enjoying.

1. Earthworm Jim


Greatest hero in the Universe. I've seen enough in the Workshop over the years to know nothing is too much ~ including the cow-launching, bumblebee queen-saving earthworm with a Pocket-Rocket. And Peter. Always Peter. Other thoughts for him are to make SMGs into his red handgun, sounds, effects and all, and to somehow let him use his head as a melee weapon to whip enemies, like in the original games.

2. Psycrow


Arch-nemesis of Earthworm Jim. Imagine his hook weapon punching through all Infected in a straight line, but having to wait until it full retracts to fire again. Maybe pressing the fire button again can force a retract?

Or even replacing a Special Infected with him, like a Spitter who shoots at you or a Charger who runs you over with a blur of yellow.


3. Evil the Cat


Pure evil kitty from Heck, with *minor* setbacks. I'm thinking he could make an excellent Jockey.


4. Bob the Killer Goldfish


Somehow I feel like Bob can replace Molotovs... zombies flipping out in water from his busted bowl after you throw it. That, or make him swimming in his bowl replace Propane tanks. Big shattering glass sounds when it blows up with a SPLOOSH ~ and triple explosive radius + damage.

5. Spawn


Good ol' Al Simmons. For me, it was Soul Calibur II for the Xbox and the Animated Series. Tell me you don't want to hear Keith David cry about Wanda and blow Infected brains out.


6. John Wick

There are a few John Wicks in the Workshop, but I find only one looks much like Keanu Reeves. I imagine one very hi-def, with Keanu's voice. "John... ... ...Earnest".


In the 4a. Custom Content section above this one, I mentioned Wick's customized Benelli M2 from the series' third chapter, Parabellum. I imagine that too.

7. Ash Williams & BOOMSTICK!

There is a very good Ash available at present. My idea though was actually having the game's Chainsaw being his melee weapon to start, being used instead of his metal right hand. Maybe he could detach and discard the saw when it runs out of gas, twisting on his metal hand, or else just using weapons one-handed. When he finds another Chainsaw, he could twist it on again or just keep one on with infinite gas.

The Boomstick to me would be the logical choice to go with his chainsaw. Just take his double-barreled Remington from Shop's Mart (Shop-S-Mart) and give it absurd power, enough to send a Tank flying with one shot. Sounds like Ash. He would likely be reloading with one hand; maybe it could reload with self-ejecting shells for convenience, or the full animation of a fast manual reload.

No doubt this would be an awful lot of work, but would make one of the best Survivors ever made.

8. Zarok the Sorceror


Villain from the first MediEvil game back in 1998. I think he could replace a Smoker, using his staff to pull you toward him. Instead of the Smoker's tongue, he could use "magic" or electricity to pull you toward him and zap or "magic" you. Or, his final form could replace a Tank.

9. Blasto


Another hero from Sony back in the 90s. When he's not fighting Bosc, that pear-headed idiot, he's rescuing pretty girls and cracking jokes. With Phil Hartman's voice and timeless one-liners, what more could you ask for?

9.5: Winston Churchill


Please, someone, make this. With his voice or else his voice actor from Channel 4 Warlords. Give him that look with the pocket watch chain, his big hat, and that lit cigar moving around in his mouth, maybe even burning to the end, getting spat out, and him pulling a new one out and replacing + lighting it. In this context, I think it would be very cool to have all four Survivors covered in this spirit (Churchill, Roosevelt, Stalin, Hitler) but Churchill would be the top.

Some ideas for weapon replacements in a "Churchill Collection":

A) Thompson SMG w/drum mag to replace Ingram Mac-10 (silenced SMG).

B) Sten to replace IMI Uzi (SMG).

C) De Lisle carbine (with or without custom scope...?) to replace Heckler & Koch G3SG/1 (military sniper).

D) Bren to replace SCAR-L (burst-fire assault rifle).

E) Lewis gun to replace the M16 (assault rifle).

F) Vickers .50 and BESA machine guns to replace the Browning MG and GE Minigun.

G) Vickers medium machine gun or similar to replace the M60.

H) Webley Scott to replace the Desert Eagle (Magnum).

I) .45 Model 1911s to replace stock pistols.

J) Scoped Lee Enfield Mk.III to replace the Ruger Mini-14 (hunting rifle).

K) Vickers "K" machine gun perhaps, in an M60/Browning slot.


10. Webley Mk. V (left-handed) with moon clips


Would love to see one of these for left-handed use, reloading with full or hopefully half-moon clips (top half, bottom half, top half, bottom half, top half, bottom half). Perfect to replace the Desert Eagle.
4c. Custom Requests #2


11. RMB-93 pump shotgun (ambidextrous)


An ambidextrous pump action shotgun that ejects shells downward. The pump action is reversed, with the user pumping away from themselves to let the shell eject. Another lefty candidate, though it's about as versatile with either hand as can be.


12. AMB-17 suppressed assault rifle (ambidextrous)


Fully ambidextrous controls. Would be a replacement for the SCAR-L, hopefully with a lefty version for gameplay. Fire select would be fantasmatabulous, but it might be asking too much.


13. Street Fighter II Turbo: Hyper Fighting


This game may always have a special place in my heart. The four characters that came to mind as Survivors are Moff Bison (red cap and outfit), Edmond Honda (Sumo), Sagat (one-eye), and Zangief (Wrestler).


14. Finale BGM replacements

We know very well what music plays for finales, but why not swap them out for cool, calm jazz? Most of these can be found in the soundtrack for This Is The Police. All can be found here[drive.google.com].

No Mercy: This Train (Turk Murphey Jazz Band)

Crash Course: Snag It (Len Barnard)

Death Toll: Spiders and Flies (John Sangster)

Dead Air: Watercolor Grays (Ben Matthews)

Blood Harvest: Sweet Ginger Green (Pearce-Pickering Band)

The Sacrifice: Don’t You Leave Me Here (Pearce-Pickering Band)

Last Stand: Song of the Volga Boatmen (Glenn Miller)

Dead Center: Whiskey Tinged (Ben Matthews)

The Passing: Clarinet Sugar (Bob Barnard)

Dark Carnival: Blues for Mr. T (Bob & Len Barnard)

Swamp Fever: Billabong (Bob Barnard)

Hard Rain: Late Hour (Pearce-Pickering Band)

The Parish: Temptation Blues (Turk Murphey Jazz Band)

Cold Stream: Singn’ ‘Em (John Sangster)


15. Jukebox tunes

The Jukebox has interesting bits, but it can't be heard from far away (must change) and does not include (yet) the following[drive.google.com], among others:


A) Rap song that plays while Forest Whitaker eats ice cream in Ghost Dog: Way of the Samurai (this one may have to be made louder).

B) Fire In The Brain by Bob Barnard.

C) Midtown Combat 3 from Wolfenstein: Enemy Territory.

D) Skin On Our Teeth from both L4D1 & L4D2.

These would complement the finale music replacements, don't you think?


16. She-Hulk


Rochelle needs to become She-Hulk. Tall, gorgeous, ripped, and ready to rumble. I'm not sure if a Survivor can be made heavier, sort of more resistant to Chargers or being knocked back, but she would be it.


17. The Shadow


My favourite comic book hero of all time. Who knows what evil lurks in the hearts of men? The Shadow knows! HEHEHEHEHEHE! Alec Baldwin's portrayal of the character in-costume gave me a taste of something fantastic, and something I'd like to see again. With that raspy voice and laughter, I'd -love- to see The Shadow in this game, with a couple of .45s for pistols shaking things up.

If he could be made immune to common horde attraction (i.e. outside of Boomer bile on him, Common Infected or most Infected not noticing him, reflecting the whole clouding minds/invisible dynamic) that would be about the coolest thing I'd ever seen. Maybe even changing the Hunting Knife to the Phurba blade from the 1994 film would be possible.


18. Peter Puppy


I've just decided Peter Puppy from Earthworm Jim in hurt form needs to be in this game, as a Tank.


19. Pennywise the Clown (Tim Curry)

This is the second most important of all. My, how many, many times I've irritated my Dad with the reenacted contents of this GIF. I just... I -NEED- this. I need to play Left 4 Dead hearing Curry tell zombies he can make them float, and maybe eating the odd one or biting an arm off ;)

Another thought, replace Clowns in the Dark Carnival campaign with him. It seems weird having more than one IT, but then it could just be seen as Pennywise popping up over and over again after you thought you killed him. God, we need Pennywise in this game.


20. Bruton Fedora

The ultimate, the utmost, the zenith, the epitome of add-ons... THE BRUTON FEDORA!!!!!! Put it on Pennywise, put it on Bill. Put it on Infected, replacements are nil. With this being created, I think I might have nice fluffy dreams for a long time. Like, seriously. Hat.

Imagine a Wild "Bill" Hickok with the Bruton in place of his beret, wearing a mid-thigh length Frock coat in a similar green with a couple gold engraved buttons on the back. A larger pink paisley bow tie over an ivory large placket shirt with wide pleats. 'Tis beautiful... or at least, it could be.
4d. Custom Requests #3

21. The Mask


Tell me you don't want him in L4D2 (don't tell me, because it wouldn't be true!) Gotta have references to the 90s movie and SNES video game. Lookit those big teeth! :D P.S: He definitely always had that hat.


22. Reboot


It's hard for me to choose one character over another, liking this series so much. Later Bob, Dot, Matrix, Mouse, good Hex, etc. Megabyte in particular though does interest me. The Pitchfork could be retextured as Andrala's Trident used against him later in the series. The questions are what sounds to use for him and how to approach the inflection aspect. Not using Tony Jay's voice would be a crime, but how much work is it to inject him into the game, and where to use which lines?


Matrix would be choice #2. Not sure what to chalk his sidearm up to, maybe a modern SMG of some sort? His voice is cool, and no one will expect to hear metal clanking when he walks. On the other hand, that eye of his would sure need a high level of detail. On the plus side, his skin would probably be way easier than Megabyte's plating.


23. Beast Wars


The ones I want most are Optimus Primal, Rhinox, Megatron, and Tarantulus.


25. Zombie Army Trilogy


Two devastating bosses I'd like to see replacing Special Infected. The Super Elite on the left shooting an MG-42 at you from far away like in ZAT, the Chainsaw Elite to the right waving a Chainsaw to shred you. The health of a Tank, the ability of much more.

26. James Bond(s)


Having James Bond in his every iteration as Survivors strikes me as plausible. I'm reminded of Goldeneye for the Nintendo 64 where people open the ROM and discovered Bonds other than Brosnan within the game files, just unmapped to any existing character bodies in the game.


27. Ryuk


Villain from the animated series Death Note. While perhaps an impressive Death God Survivor, I think he would also make a mean Smoker.


28. Agent Smith


Main villain from The Matrix film series, portrayed by Hugo Weaving. As much as he is "the bad guy" in that series, I feel he could used in many ways.


29. Silas Greaves


Main character from the Ubisoft game Call of Juarez: Gunslinger. Some old-fashioned revolvers and a scattergun (or Boomstick?) mods would make him fit right in.


30. Abraham Lincoln


Just... Top Hat. I think of him being a Survivor with the Fire Axe as in Abraham Lincoln Vs. Vampires. Top Hat must be optional.

4e. Custom Requests #4

31. Robocop


So glad there are four whole movies in this series. He can team up with the Terminator or Inspector Gadget, if ever the chance arises.


32. Soul Calibur


Nightmare and Astaroth are my favs, maybe Necrid and Raphael to complete the Survivor set.


33. Star Wars


Four characters I would covet are Darth Vader, Luke Skywalker (his later self in black, with a machine hand and green saber), Yoda (as a Hunter at least, if not a Survivor), and Count Dooku.


34. Star Trek


For me, later versions of most Captains are the most attractive (different apparel, more mature-looking).


35. The Terminator


"Seh-rah CA-NNA!? Come weeth me if you want to leeve!"

Having an overpowered "flip-cocking" Model 1887 like his to replace the Magnum would be righteous.


36. One Punch Man


Saitama can fit right in with that Thomas the Train Engine mod that replaces the rescue vehicle. Let that white cape flow, and let him use his fists instead of other melee weapons.


37. Shazam


Superman, Batman, Wonder Woman and more are already in the Workshop, so why not him? A high-res Captain Marvel is the cornerstone of any successful crossover fighting game.


38. John Matrix


Greatest movie ever made. Still. Would very much like to see Col. Matrix in this game, with his M202 FLASH four shot, four barreled rocket launcher replacing the M79 Grenade Launcher. Arius in his tan outfit would be nice also, and of course Bennett with Duke as third and fourth Survivors. (P.S: For those who don't know, this is all from the 1985 film, Commando.)


39. Demolition Man


Not quite Judge Dredd - better. I bet the stun batons from this film could make an excellent reskin for a melee weapon. Wesley Snipes with blonde hair can join in too.


40. Peter Pan & Captain Hook


When I say "Peter Pan and Captain Hook", I mean from the Spielberg film. Nothing was so magical for me as a boy as watching this movie, over and over and over again, being encouraged to believe anything was possible.


41. Steven Seagal


This should be the Out For Justice version of him, like in my banner GIFs from this guide.

"Anyone seen RI-CHIE!? Anyone know why Ri-chie-did Bo-bby Lu-PO!?" Maybe his teammates can help him teach those zombies some English...


42. Common Infected

Why don't we turn the tables and let the Survivors get shot at for a change? Just swap all Common Infected with them on every map, or at least make one zombie in a Survivor role. Just a run-of-the-mill, overworked, underrated, underpaid bayou bum. Kind of like those rednecks in South Park that get shot in the head when they start begging for change.

5. Soundtrack & Conclusion
Soundtrack for this game is available here.[downloads.khinsider.com]

Some of the artwork throughout this guide, particularly borders and icons, were provided by csgs.


https://steamcommunity.com/sharedfiles/filedetails/?id=1871299464
9 kommentarer
Ed The Hyena 5 dec, 2022 @ 12:08 
can you make an updated version of this? thanks
Gragt 22 okt, 2022 @ 11:18 
A slight modification to AlfredNathan’s strategy to unlock Spitfire: start the atrium map in Versus instead of Scavenge mode (map c1m4_atrium versus). If you first spawn as a survivor, you have time to go around the map gathering all 13 cans in one spot, change teams and then wait until you spawn as a Spitter, after which you can simply spit on the cans. Since you need 20 cans, you only need to do this twice. Kill all special infected at will with the command listed at the beginning of the guide to make it easier.

That way gives you more time than the 1:30 minute Scavenge would give you.

You don’t even need to collect all 13 cans for this since 2 sessions of 10 cans should do it.
Muzungu,TheKingOfDogSufferers 6 mar, 2022 @ 10:17 
An old thread but nevertheless might help someone.
For SPITFIRE this was the method i used solo.
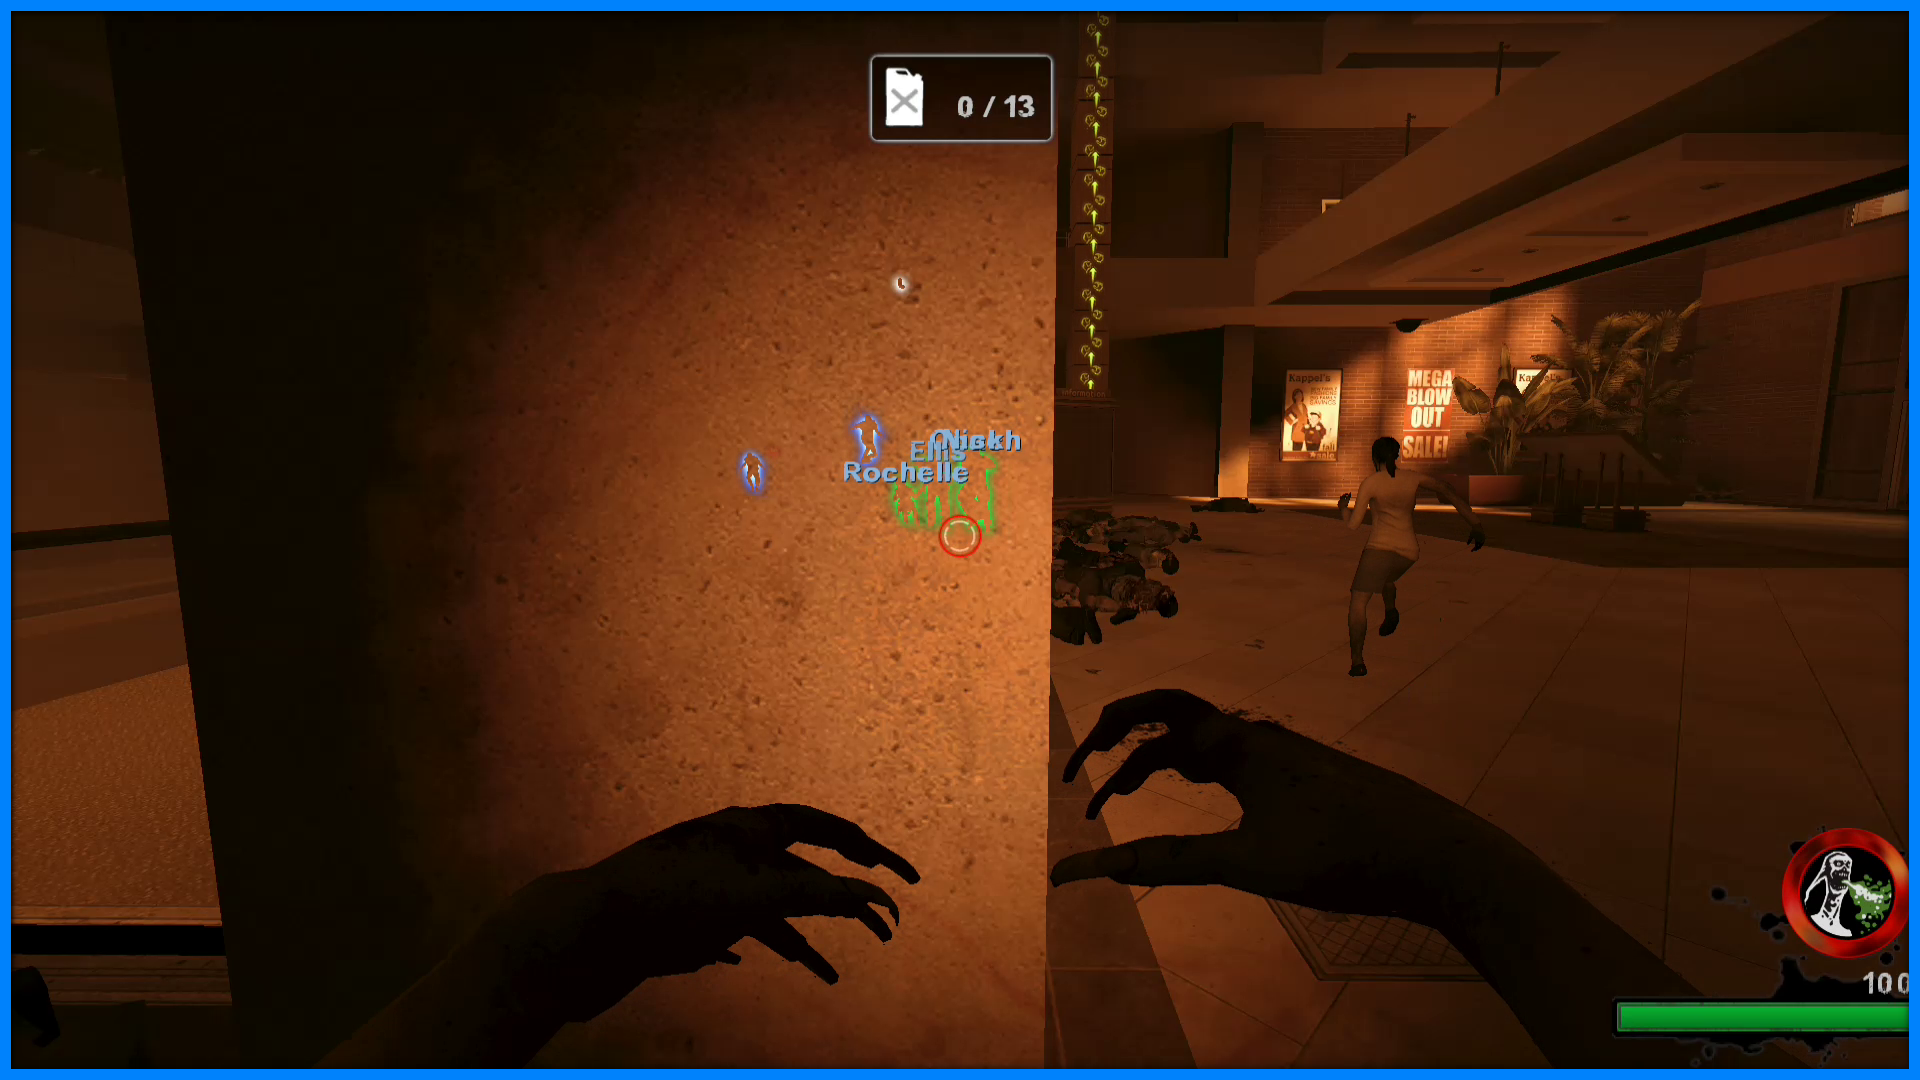
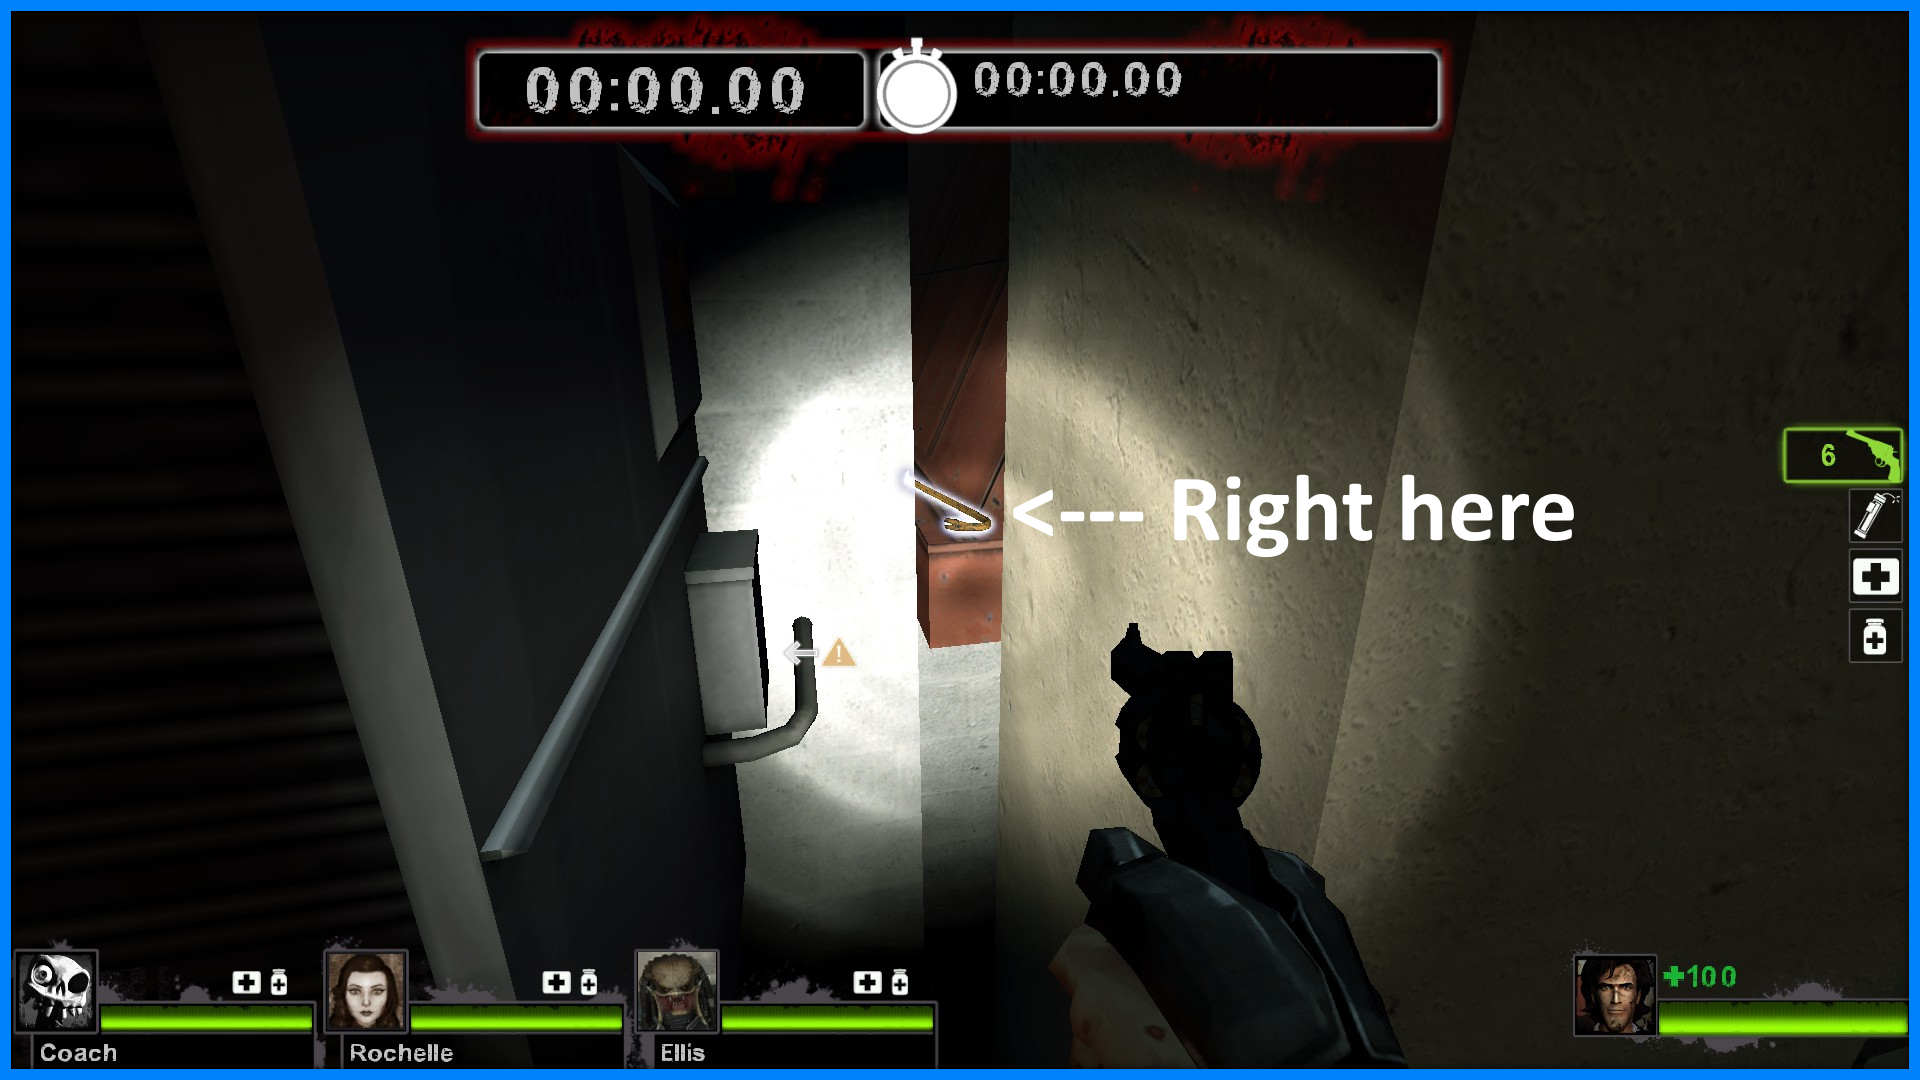
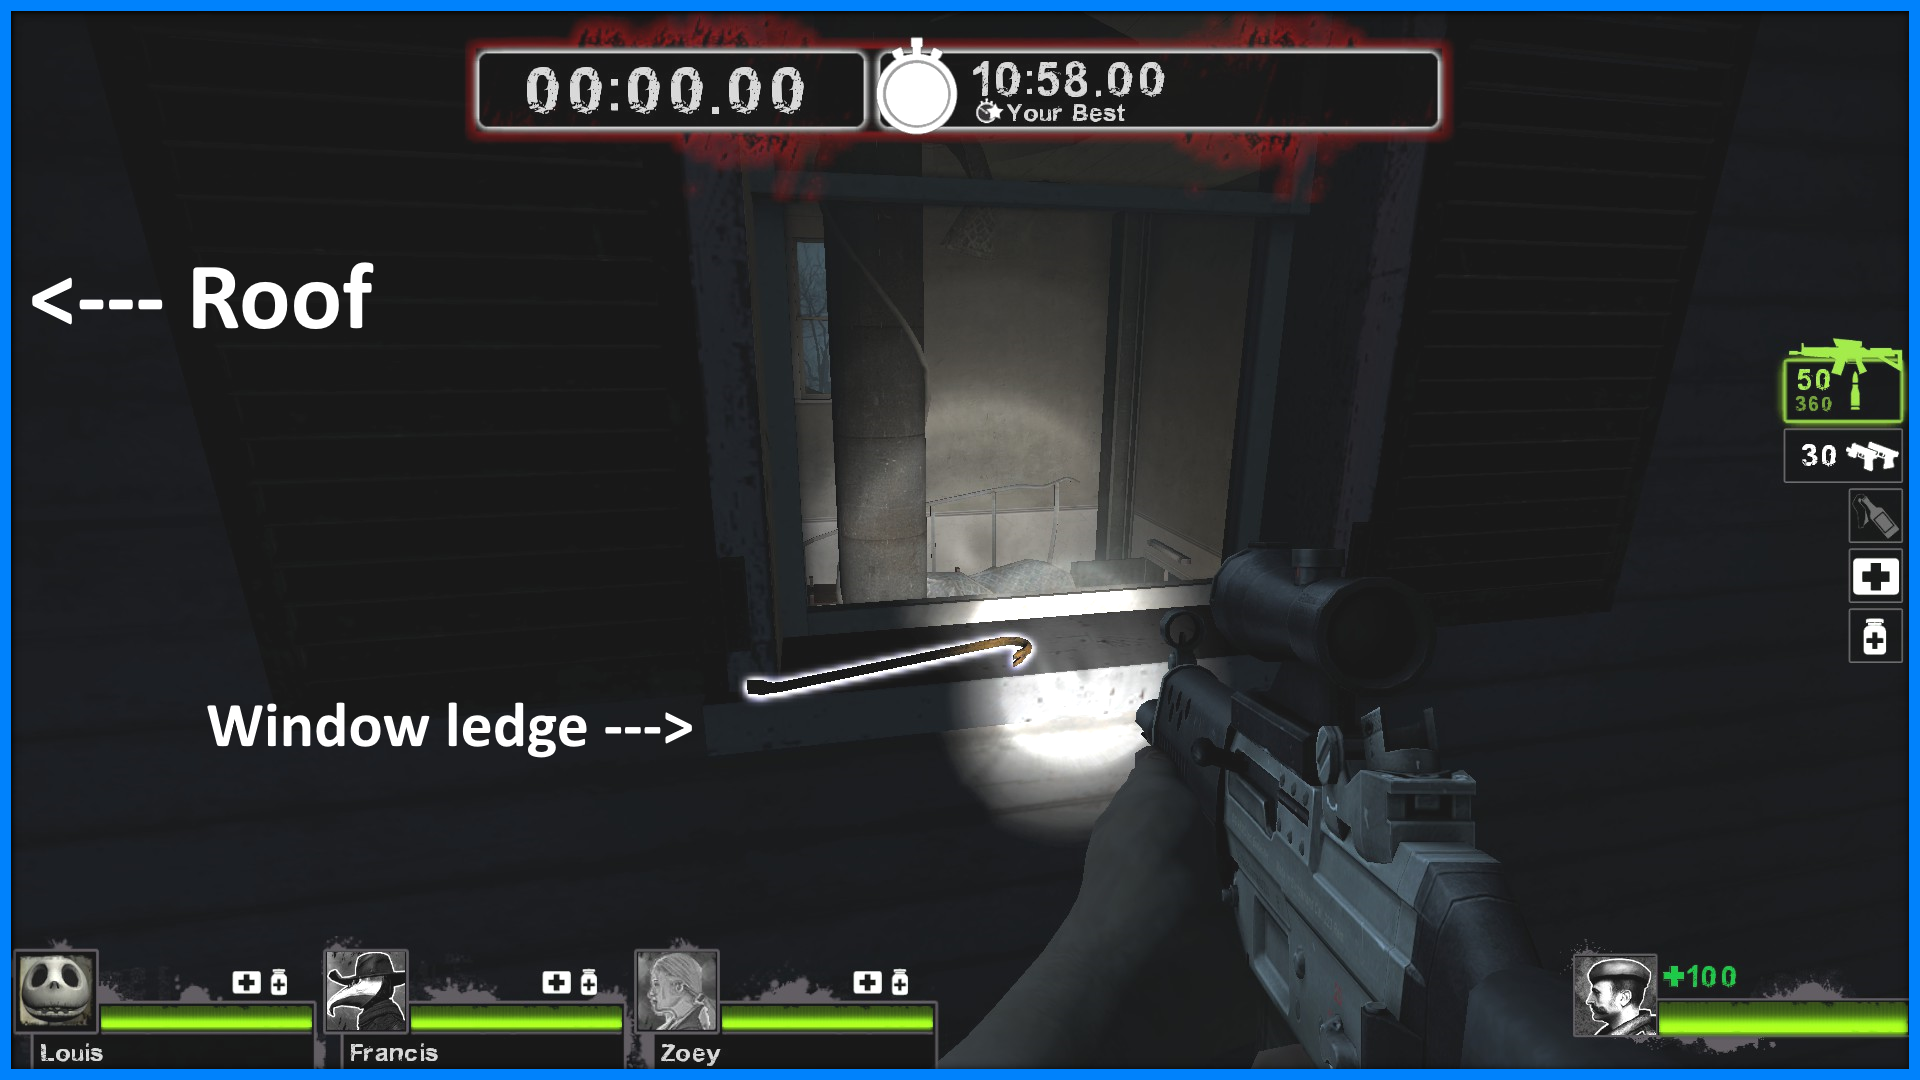
- Create a map with "map c1m4_atrium scavenge"
- Try spawning as a survivor first (because changing sides can only be done once)
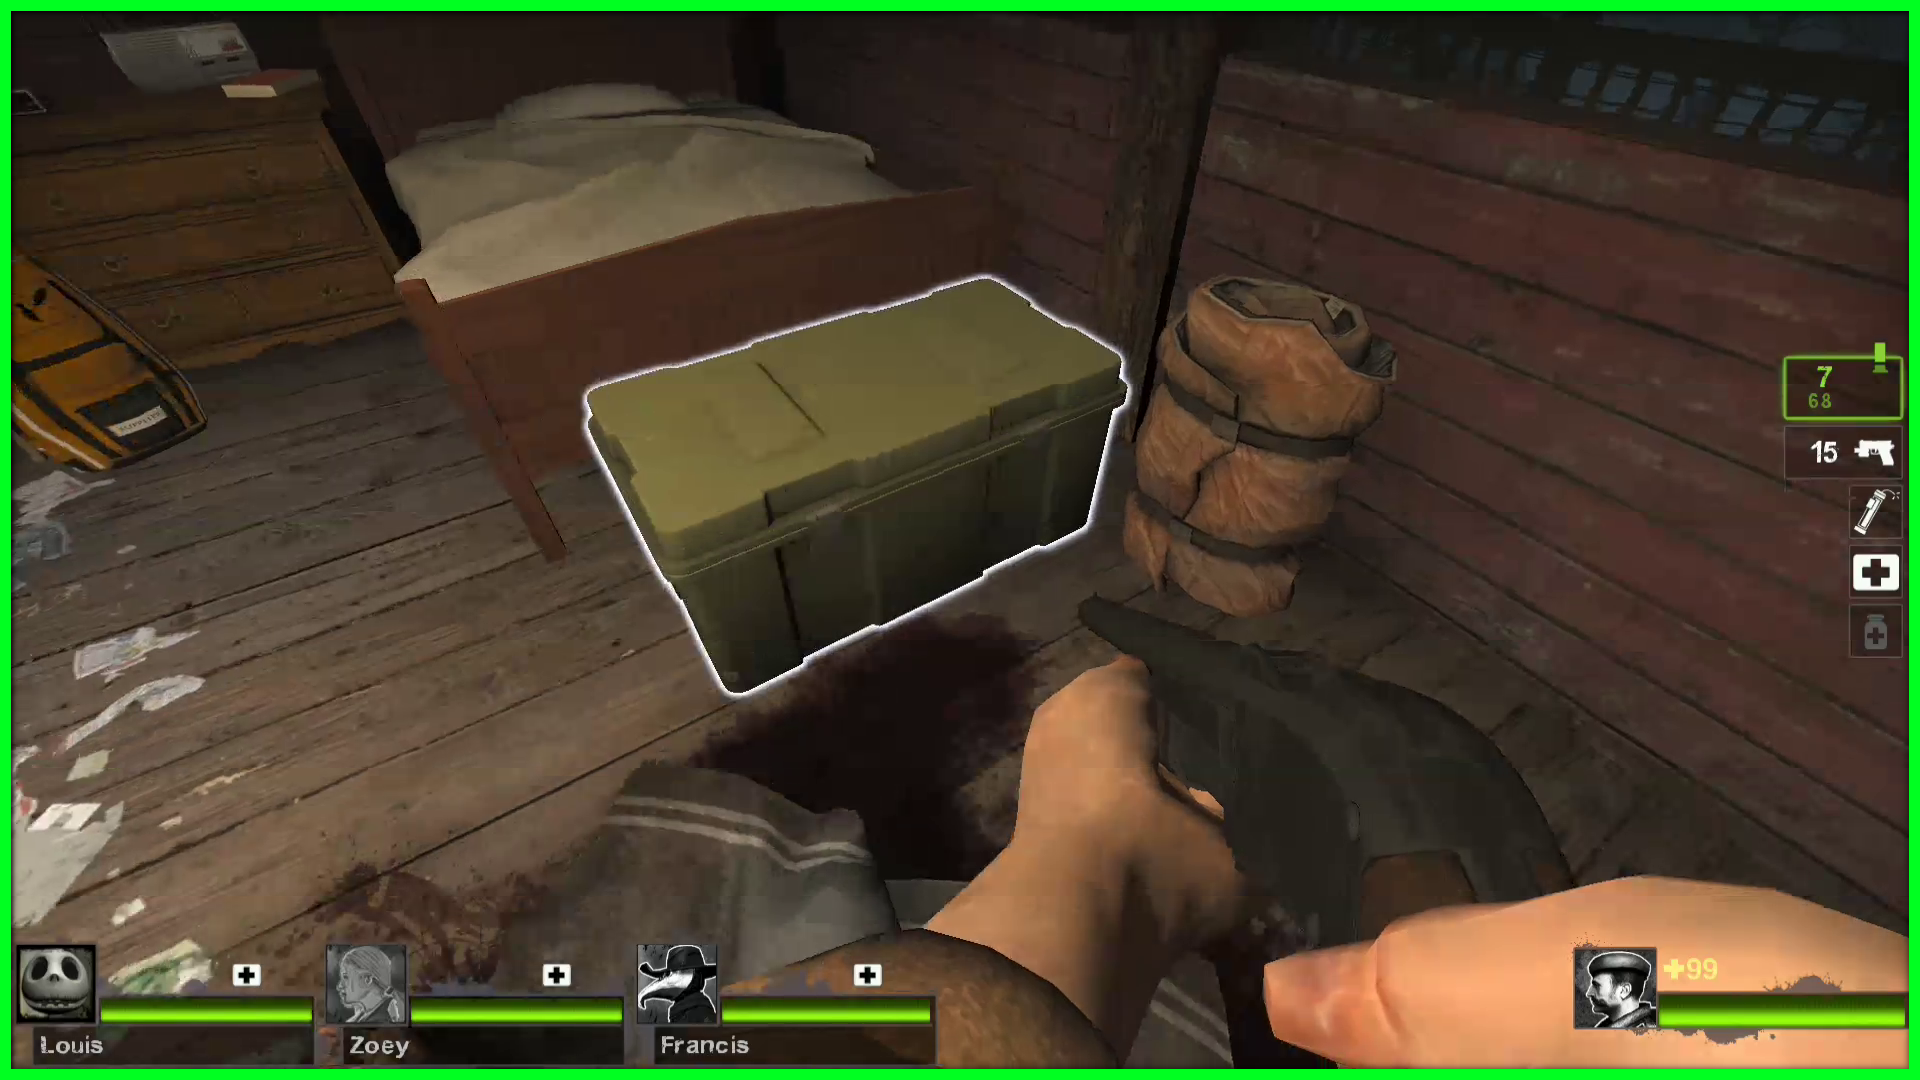
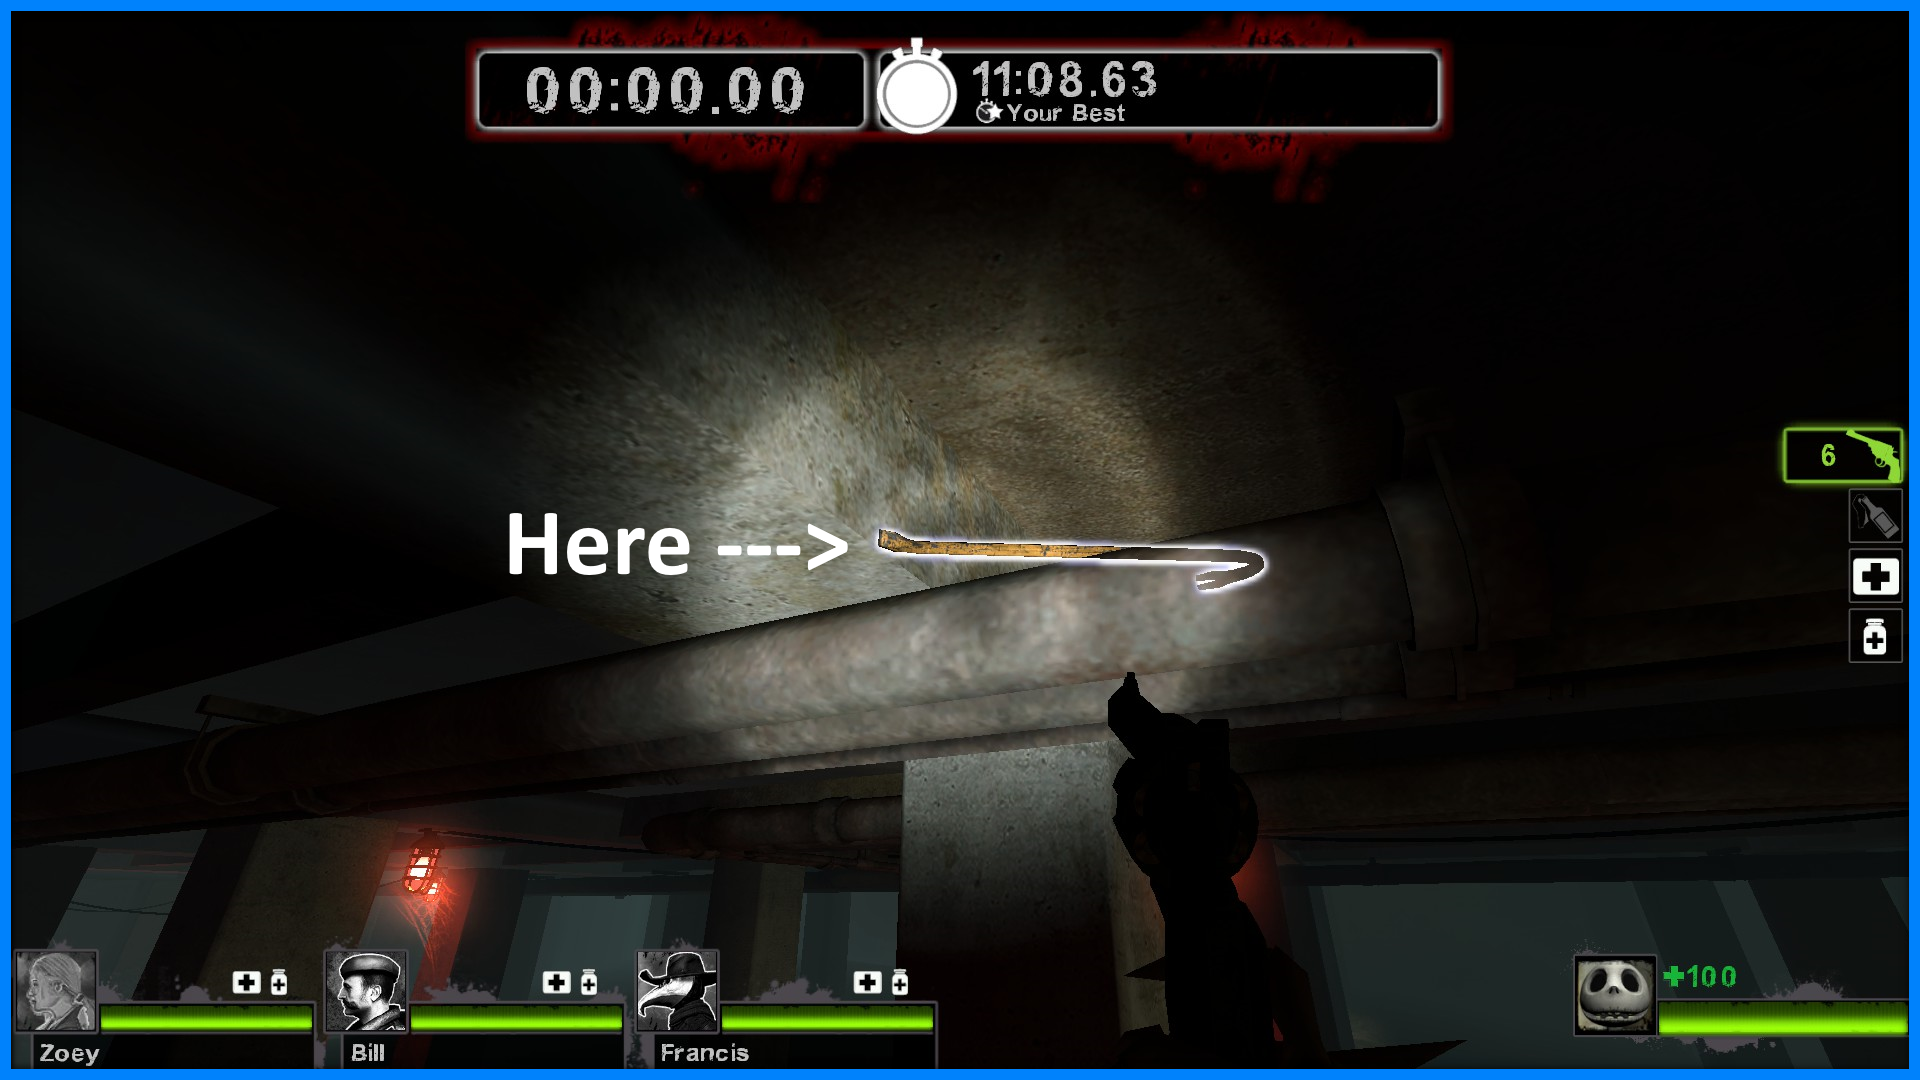
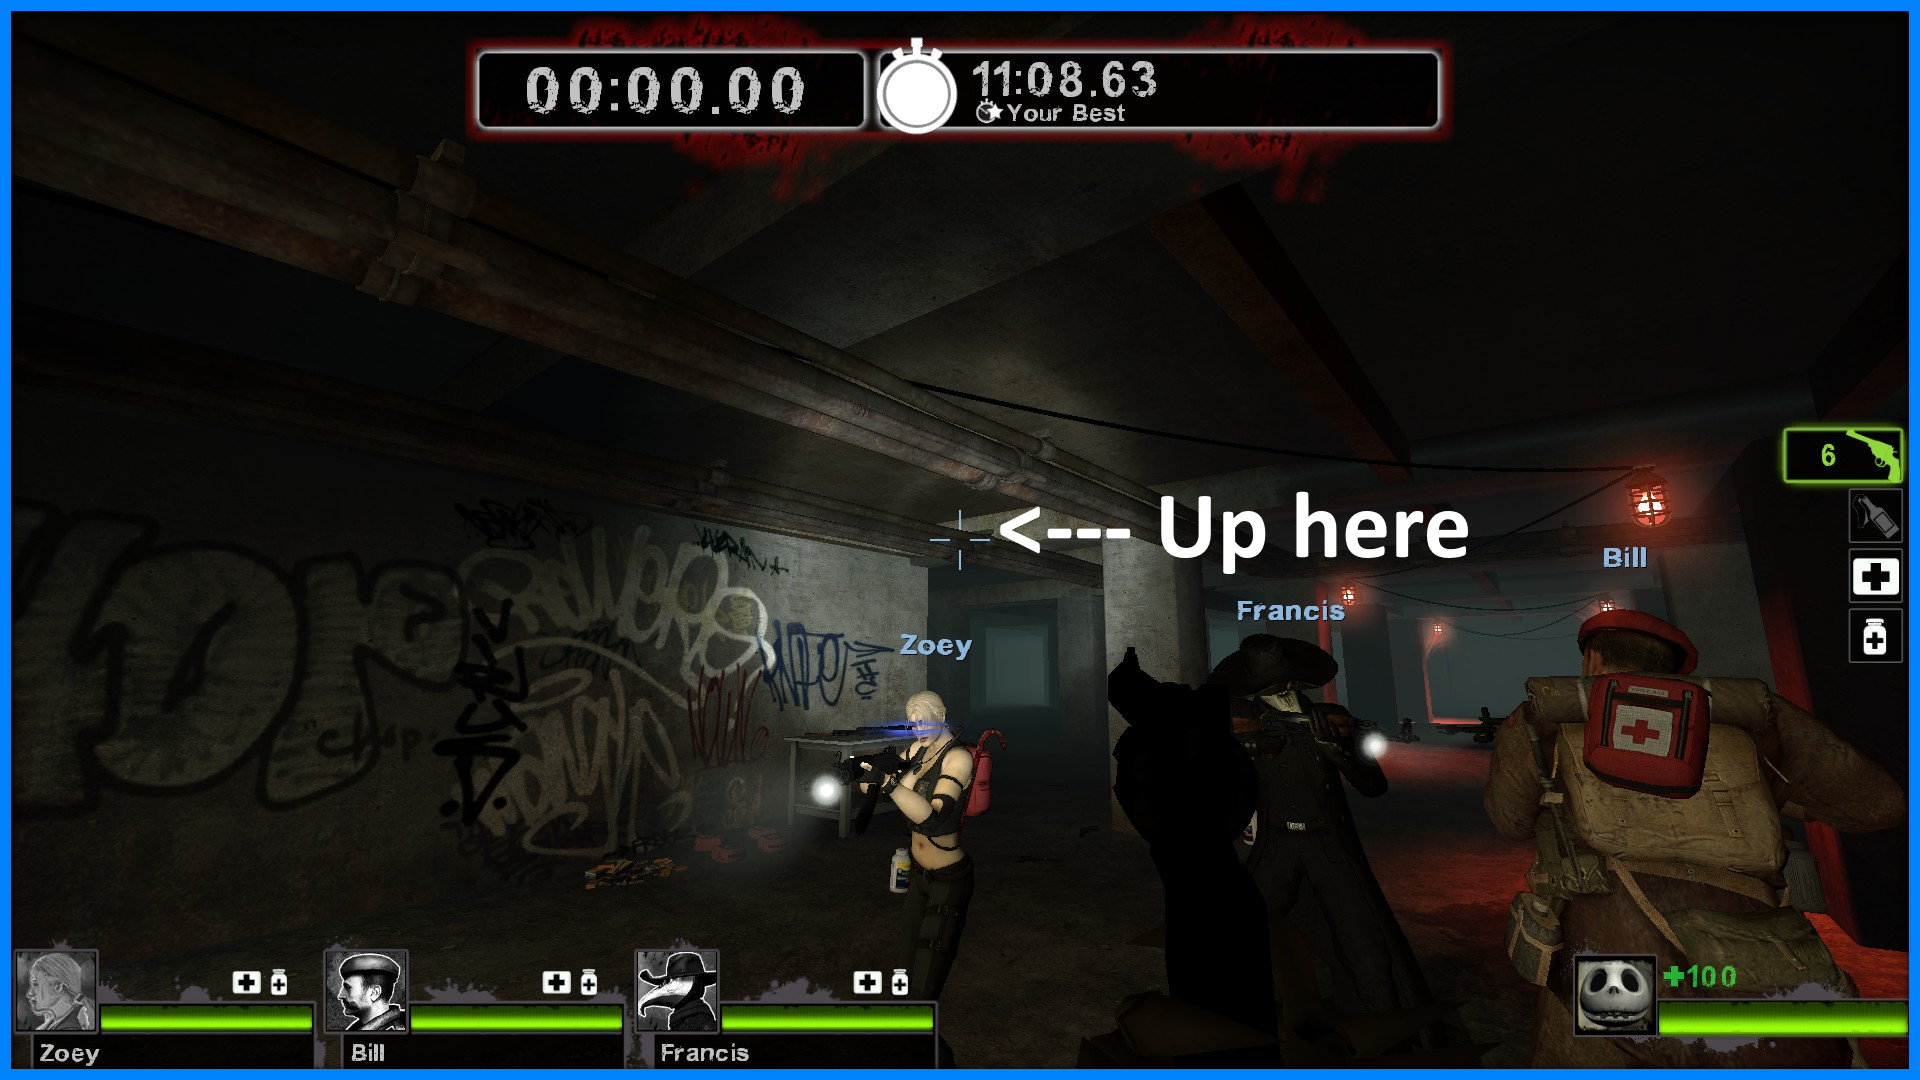
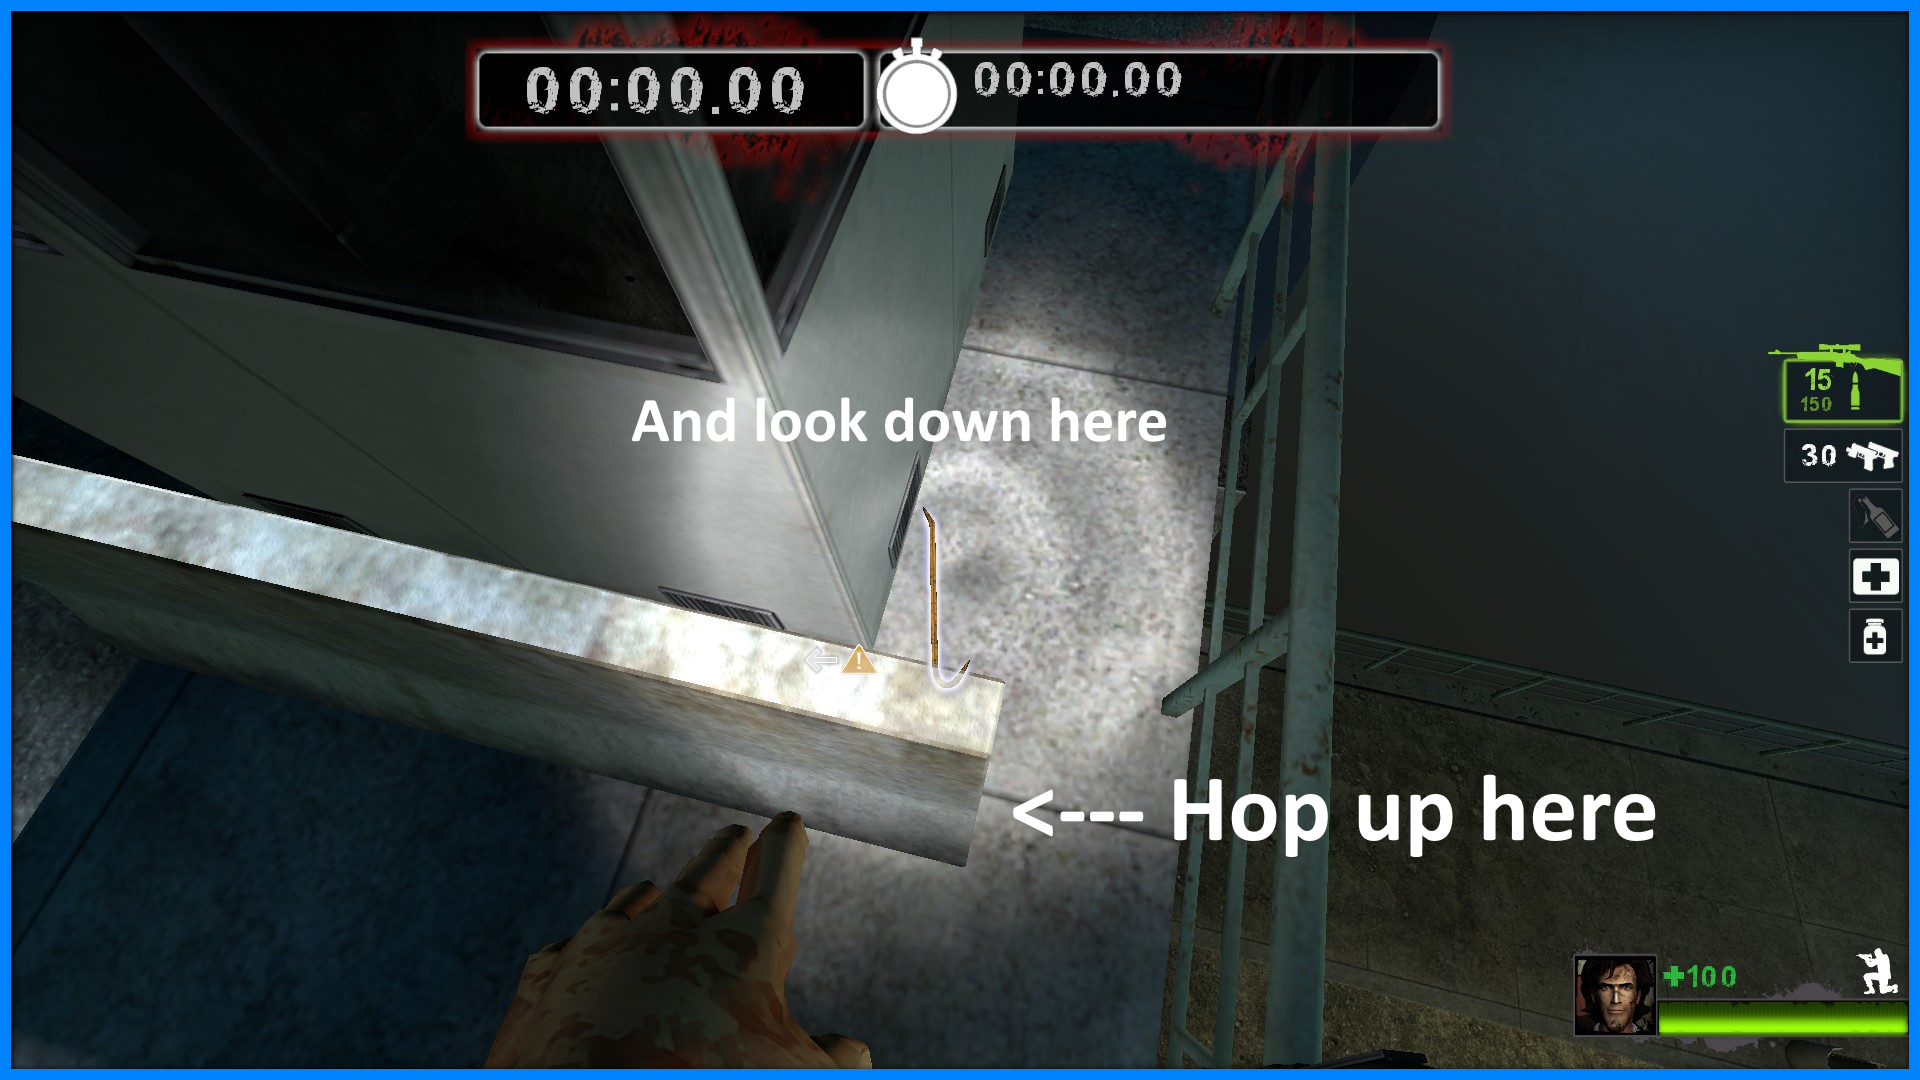
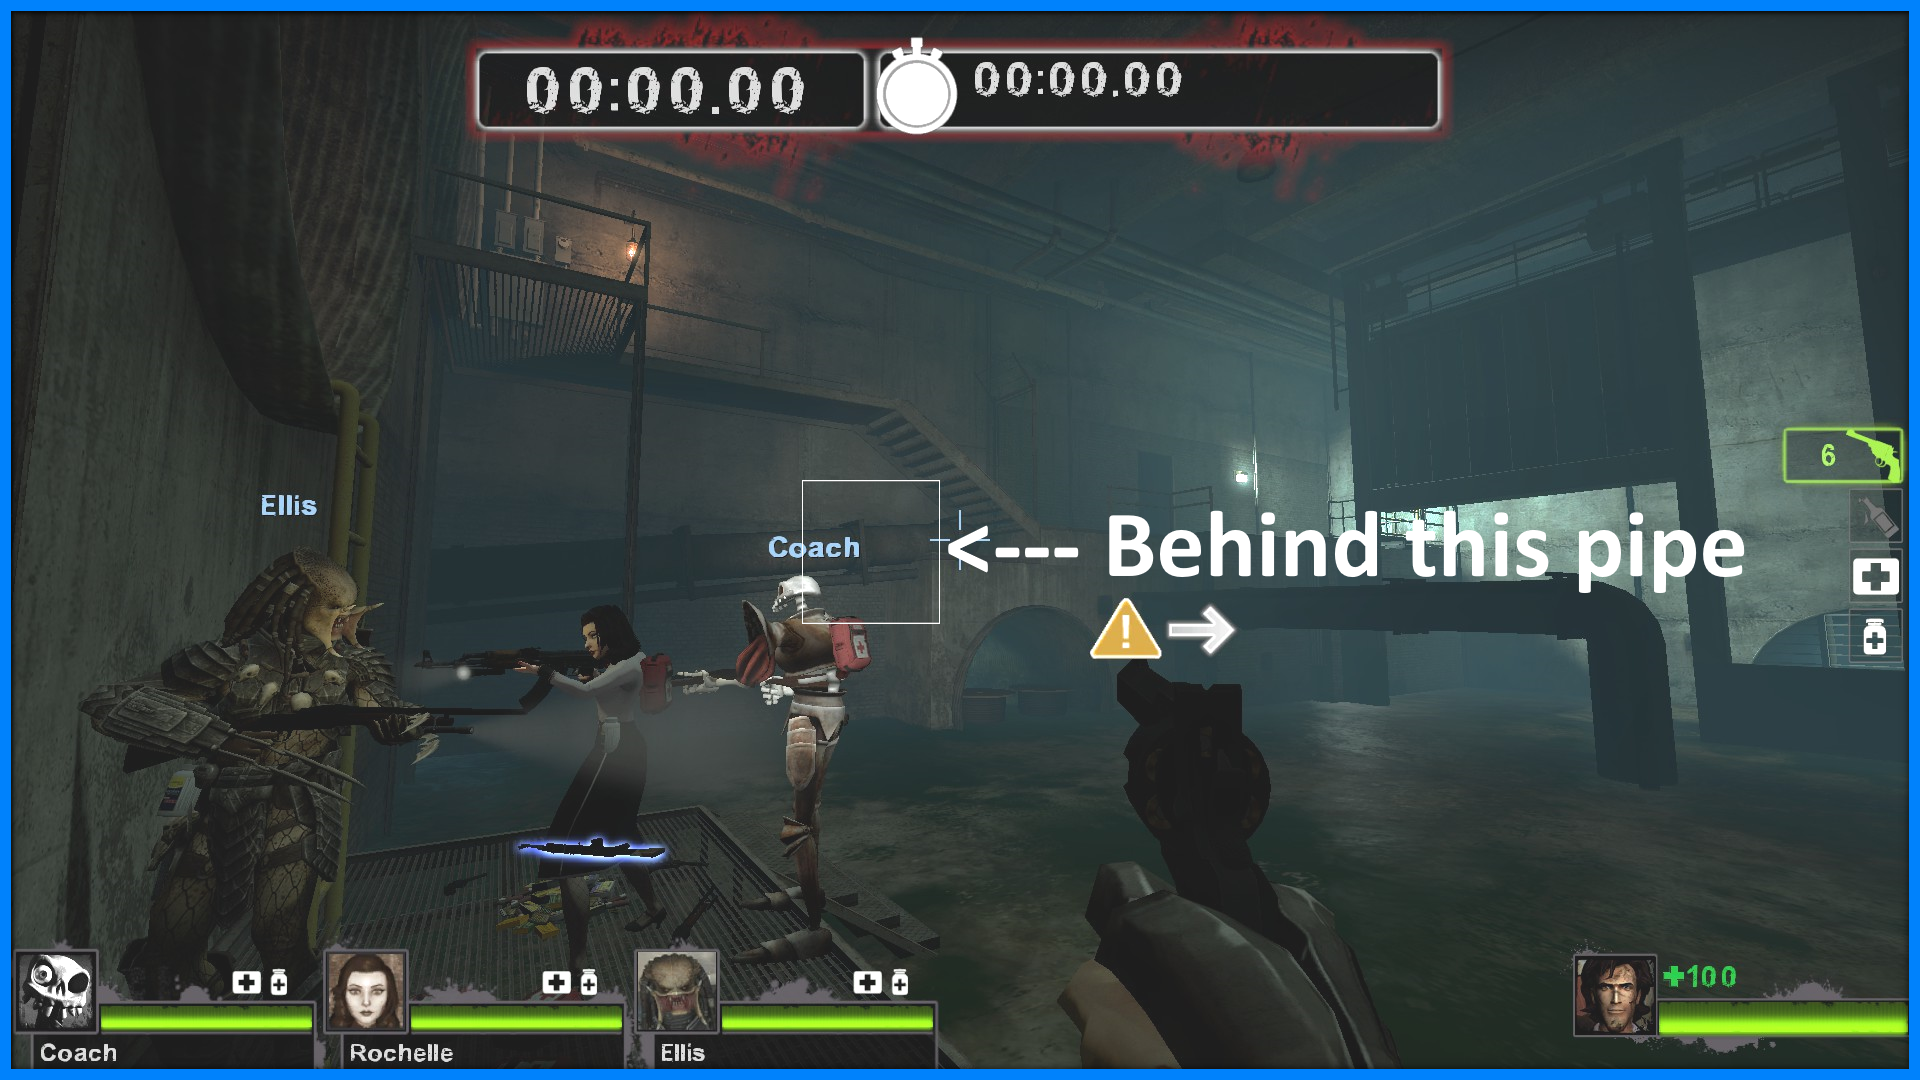
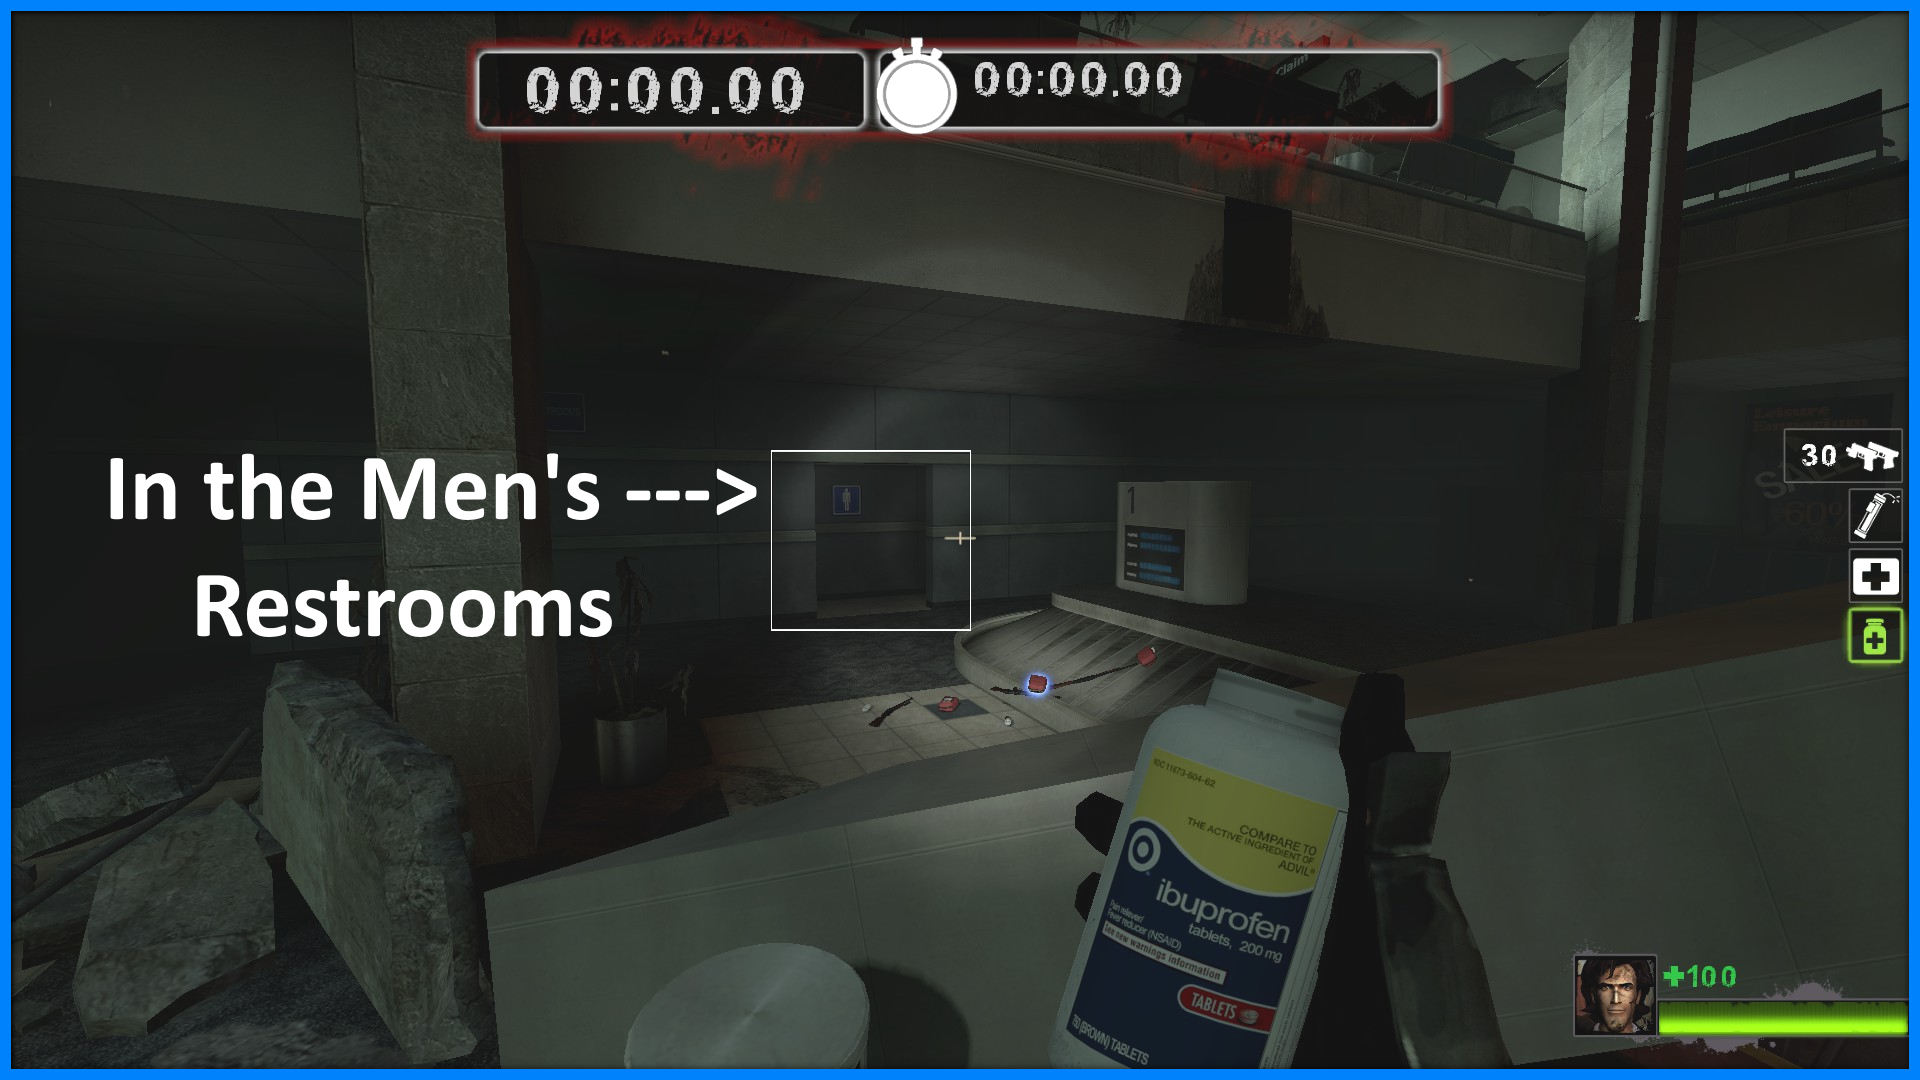
- Get the can behind the pillar near the race-car and bring it to the furthest two cans at the end of the first floor
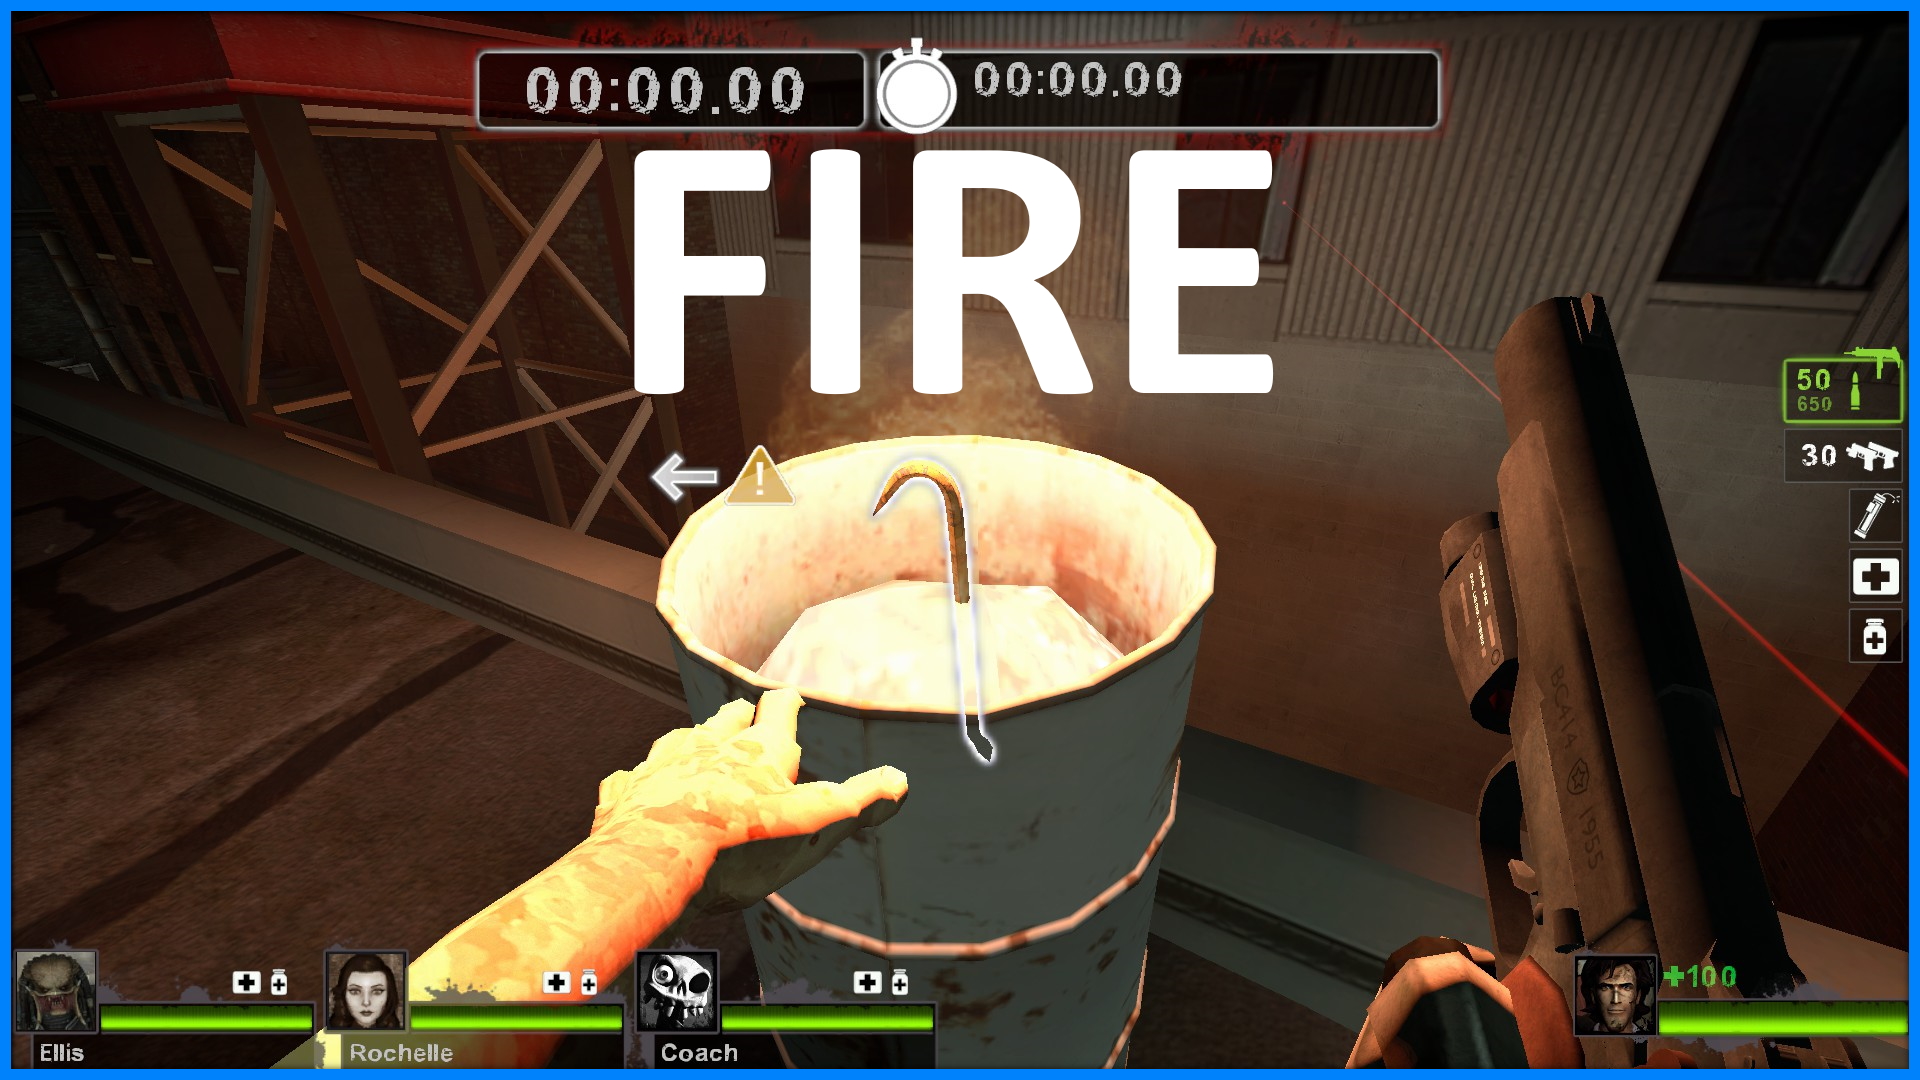
- Pick the other two and drop it immediately on where you picked them from (this should make them have orange highlights)
- Press "m" to change side to the infected and pray that you got a Spitter (by the time those three cans clumped together I had around 1 mins to 58 secs left which allowed me to cycle through infected around 3 times - i.e. if you don't get a spitter just run to the survivors and respawn)
- Essentially you want to get a spitter as an infected while there are previously picked up cans lying other floor. You do this by picking and just dropping them where they are.
- I got mine with a couple of tries. Cheers
Gun Metal Grey 14 jan, 2022 @ 12:06 
This guide is a masterpiece, i have never seen a guide so detailed and "to the point" at the same. +1 for the custom GIFs. Author/s really outdid themselves this time.:dallas::steamthumbsup:
ZiЯA 2 jun, 2021 @ 2:26 
Achievement #96 counts when you use a mutation. I suggest Gib fest, it goes super easily
Les.P.Stewart 12 apr, 2021 @ 20:01 
Spitfire, Gas Shortage, and other achievements that seem to demand another player can be accomplished via the use of split-screen mods (SFK Main Menu)/use of the "ss_map" console commands.
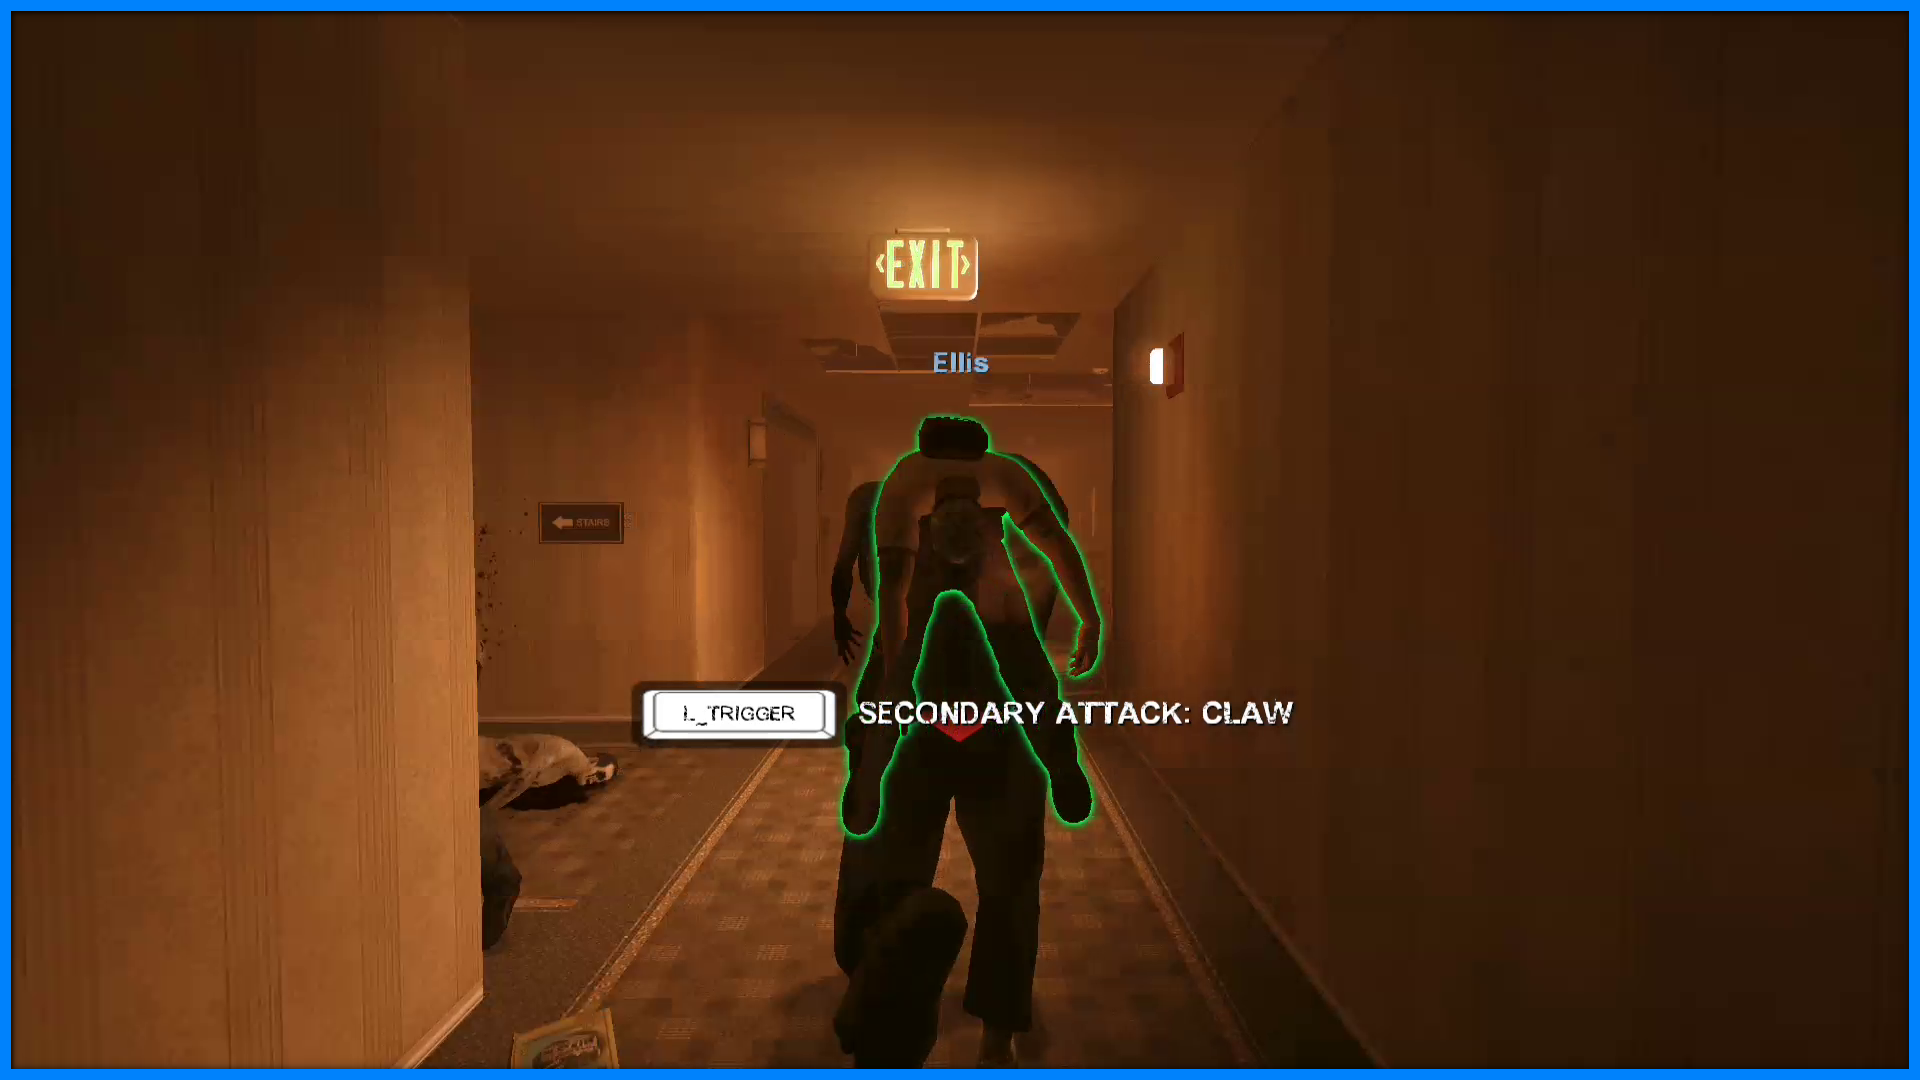
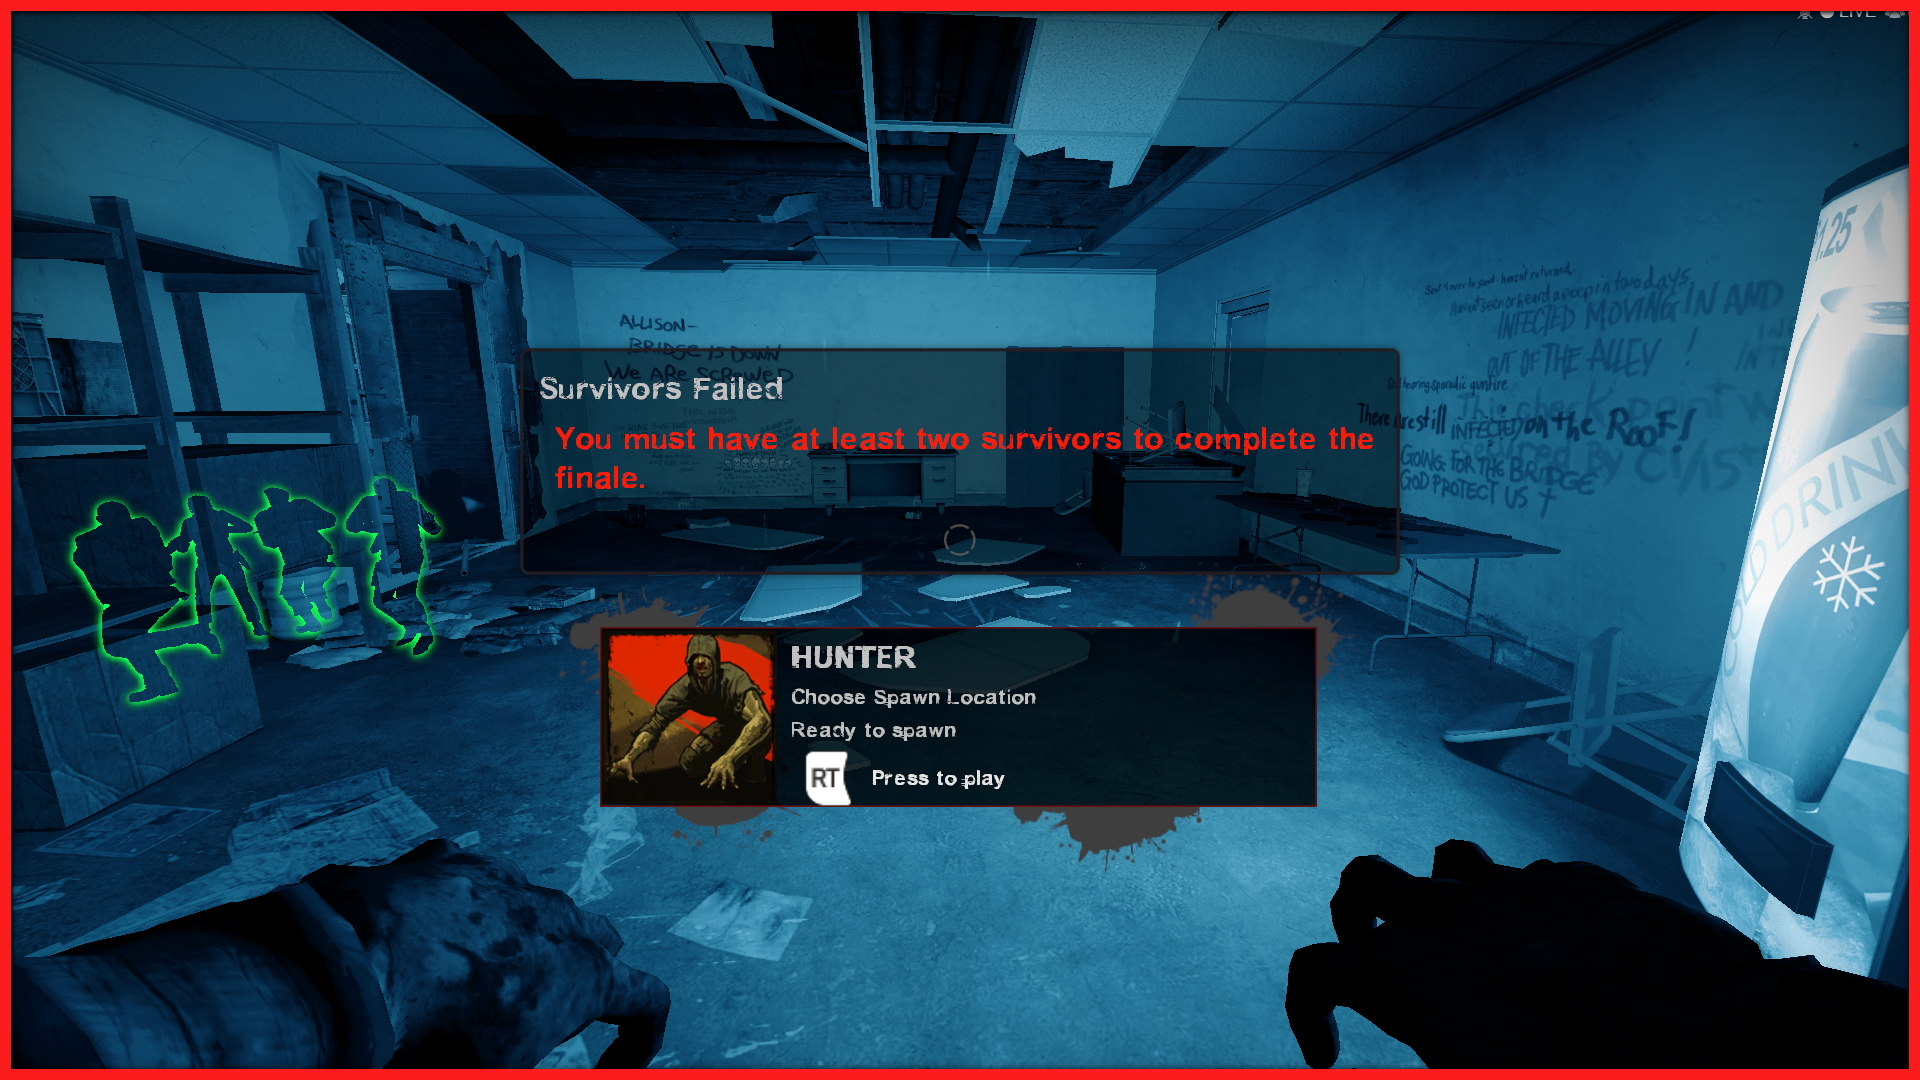
Similar to the method found in Left 4 Dead 1, using a single controller and unplugging then re-plugging it (or the receiver if it's a wireless controller) from the PC as the match loads will allow the controller to control the second player (thereby letting you pick-up and drop gas cans, attack gas can carriers, etc).
Ilfarro 3 jan, 2021 @ 8:08 
Is there any update for "Sacrifizzle" achievement? Good job btw :)
[弾幕の伝説]Mobius 15 dec, 2020 @ 23:48 
Stache Whacker should be done with a M60, not a melee weapon.
mbhrogas 6 dec, 2020 @ 4:57 
nice