Acquiring the camera
As my Sony DSC-V1 infrared magnet hack blog post was so popular I finally got around to making a new one with my old DSC-F828. Problem was is that I didn’t have the camera on me. It was back in Australia. So after looking at postage costs to Japan and back, it worked out cheaper to buy a used one from eBay.
I received the camera, charging cable, battery, and a 128mb compact flash card. All in good working condition. But as noted below I would need a few more accessories
Charging the camera
First problem was charging The camera. The adapter comes in two parts. The brick which plugs into the camera and the cord which plugs into the wall. The adapter supports 100-240hz which means I can use anywhere in the world. However the cord was the EU version, not a big problem, I just needed one for Japan. Looking on Amazon Japan I found what I needed quickly for cheap.

Firmware updates
When getting a new or used camera, I always check to see if there are any firmware updates. These generally resolve any issues that the camera may have. There was an update, but Sony had removed it from their site a long time ago so I had to go around the internet to find it. Once I did, I then used it to update the camera to fix the following issues:
- Picture deleting issue using quick review function and pictures getting damaged when transferred from a PC to a camera via USB.
Memory
128mb is fine for a few test shots using the JPEG format. But as this camera supports RAW, I wanted to take advantage of the extra post processing availability I would be able to squeeze out of each image unlike the DSC-V1 which could only shoot JPEG or TIFF (basically an uncompressed version of the JPEG file).
As this camera can use either compact flash or memory stick cards, I had to do some research as to which one was the “best” to use in 2021. When the camera first came out, memory card sizes were not that big. One gigabyte was the maximum size recorded on the Sony website (for either card type).
Would any of the newer bigger memory card storage sizes available today work in this camera? Some reports on the web said yes, but not were not fully tested. As in the cards were recognised and formatted in camera. But was there any file corruption when filling the card with photos and videos?
Speaking of videos, it seemed that the camera was more picky with compact flash cards. Some cards would not record video in “fine” mode whereas the memory stick pro cards had no problem at all. The difference between “fine” and “standard” is about fifteen frames per second. I will go over this a bit more later.
I ended up getting an eight gigabyte Sony Memory Stick Pro Duo as it was the best cost for storage. I wasn’t sure it would work but I was willing to take the chance. I also grabbed a memory stick duo adapter as the camera takes full sized memory stick cards.

Card Readers and adapters
With storage taken care of, I needed a way to transfer the files over to my iPad Pro. To do this i needed to buy a usb cable to plug into the camera (I had one from my scanner but it was a bit worn and started to only work in certain positions. Then I purchased the Apple iPad Pro usb-c to usb-a adapter.

This copies the JPEG and RAW photos into the Photos camera roll in iOS 12.4.1, but doesn’t copy over the video files. Also the RAW files are NOT supported in iOS, despite Apple saying so on their compatibility web page.
I haven’t tried iOS 13 yet, to see if the videos and photos can import into the iPad’s “Files” app. Technically i don’t see any reason why it won’t. (Post Update: I updated to iOS 13.7 and Raw still isn’t supported. Also the camera doesn’t show up in the files app.) (Post Post Update: iOS 16 and Affinity photo work fine for processing the raw files directly from the files app.)
As for the RAW files on Mac OS, they work fine when loaded directly from finder in OSX High Sierra on my old 2010 11inch MacBook Air.
With the possibility of upgrading my laptop to a 5K iMac sometime in the future (or a newer silicon iMac), I thought about getting hold of a USB memory stick pro card reader. Not an easy task. Especially one with usb-c. There were a couple of multi card readers but I just wanted a single card reader.
I ended up getting an offical Sony one. Sony MSAC-US30 Memory Stick USB Reader/Writer (maximum transfer speed of 480Mb per second).

There is a newer version MSAC-US40 (supports Hi Speed USB 2.0 which is basically the same speed as the one I bought) which I saw after getting my one but not sure what the differences are between them.
The one I got runs fine on my MacBook Air straight out of the box and supports the eight gigabyte memory stick pro.
Post update: After Updating to iOS 13.7 I tried the memory stick reader connected directly to the iPad to see if it was supported in the files up.

As you can see in the above photo I can now view both photos and videos in the files app thanks to iOS 13. However two cables is still a little messy for my tastes.
So I ordered a usc-c to mini usb cable to plug the card reader into the iPad via a single cable. Unfortunately I could only get hold of a two metre cable at time of purchase.

But as you can see in the picture above it works just as well as the former solution. Now just imagine a shorter cable and how much better/tidier it would look.
Magnets
I still had a couple of earth magnets left over from my DSC-V1 blog post. Being strong and rare, I thought I should hold onto them and I’m glad I did. Unlike last time where I attached the magnet to the camera directly, I put this one on my key ring as shown below.
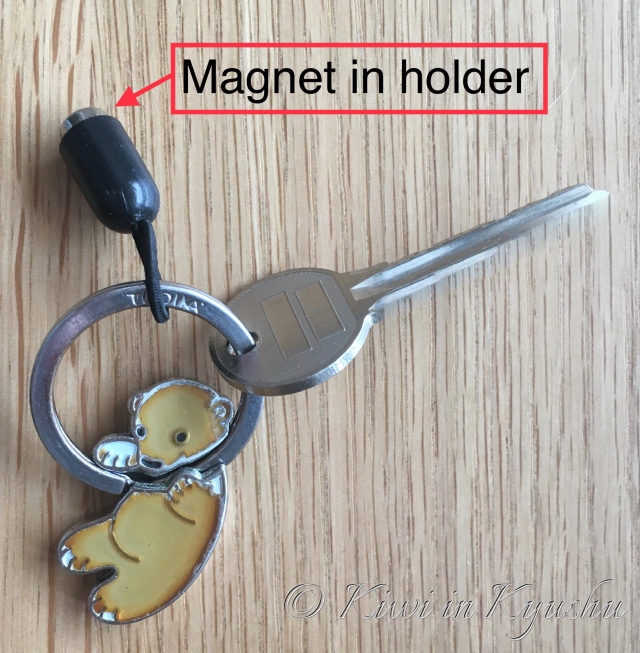
I thought it would make it easier to carry around (which it does), but taking it out of my pocket each time to attach to the camera when I turn it back on can be a little bit troublesome. (2022-03-08 update, you can turn the camera on and then use the magnet to switch the camera into Full Spectrum mode, and put the magnet away again).
Video
As mentioned briefly, the only way to get video onto the iPad is with the Files app on iOS 13 and the memory stick card reader.
27mins and 18 seconds is the maximum recording time for each video on the 640×480 fine setting. You could double the recording time by using 640×480 standard but in by doing so you go from 30 frames a second to 15 frames a second. It looks like each video is limited by a file size of up to 2.15 GB. Also iOS can’t play the file natively.
Below are some samples of video from the camera. I took these down at the beach using a cheap $30 monopod, hence the not so smooth panning. It was a quick and dirty test to compare video with and without a 850nm infrared filter.
Original Videos format straight from camera
Dropbox link to the above video
Dropbox link to the above video
Edited Videos straight from camera
Dropbox link to the above video – Used with Kolari 850nm IR filter.
Dropbox link to the above video – Edited in Adobe Premiere Elements using colour desaturation.
Dropbox link to the above video – Standard video with no infrared or magnet hacks.
Dropbox link to the above video – As above but using the shake reduction filter in Adobe Premiere Elements
Note: Videos are hosted in Vimeo. I’ve added drop box links to the original files in case Vimeo’s “optimisation” has an impact on quality.
The original Sony mpg video format cannot be played on iOS devices natively. There are workarounds such as using apps like InFuse Pro (paid app). Or in my case converted/editing them on a MacBook Air using Adobe Premiere Elements (or your video editor of choice via windows or Mac).
Step Up/Down Rings
As the camera uses a 58mm filter thread, none of my current filters fit. So I could either order some new 58mm filters (an expensive option) or order some filter adapters (a cheaper option). I decided to fo the the later for now and in the future perhaps purchase some 58mm filters (2022-03-08 update I ordered a cheapish variable infrared filter in the 530nm to 750nm range, which I’ll post about later)
Currently I only have infrared filters in the 49, 52, and 67mm sizes. So it is better to go with a 58mm to 67mm step up ring to prevent the black rounded corners in the photos (otherwise known as vignetting).
So when the step up ring arrived I took the camera out for a test spin with my Kolari 850nm Filter. It was a nice sunny afternoon with clear skies. Great for this strong infrared filter.
Camera Settings
I decided to stick with aperture priority and a set iso. I tried iso 64, but shutter speed was a bit too low, so I kept it at iso 100.
As I didn’t have a black and white setting in the camera’s menu I had to shoot in regular colour mode. Which with this filter, gives me a mostly red image which needs to be converted to black in white either in camera or later in post.
The 850nm, known as the black and white filter, due to no visible light passing through. Doesn’t require a custom white balance setting. But at the time I forgot this and tried setting one anyway by point the camera at some green grass.
EVF / LCD
The LCD, a step up from the Sony DSC-V1, is still had to see in direct sunlight and not helped by wearing sunglasses.
Using the EVF however, is much better for framing. But unfortunately, that’s about all it is useful for. What you see in camera, is not what you get on a monitor screen at home. Looking through the EVF makes it hard to choose what settings to use. Putting the camera in “Auto” is out of the question as it will expose higher than it needs to. So it is pretty much guess work out in the field.
This is why I recommend taking it out for a test drive first, so you can get an idea of how it behaves with different filters, etc.
I tried shooting close ups of flowers in bushes, but it was hard to distinguish them from the leaves. So it’s probably best to stick with nice seperate, contrasty images when framing.
For some shots I tried shooting the same scene using different apertures. In doing so I noticed the iso, even through set to a fixed number, still adjusted itself slightly.
For this 850nm filter I’d recommend shooting landscapes using a tripod with higher aperture settings. This will help with framing and you can also try out lots of different settings to see what works best for you (be sure to make a note of the settings, for each photo, in a notebook or something) as it helps when back at your main computer reviewing/post processing images.
For handheld shooting, the 850nm is possible in full sunlight, but I’d recommend a 720nm for more shooting possibilities.
Results
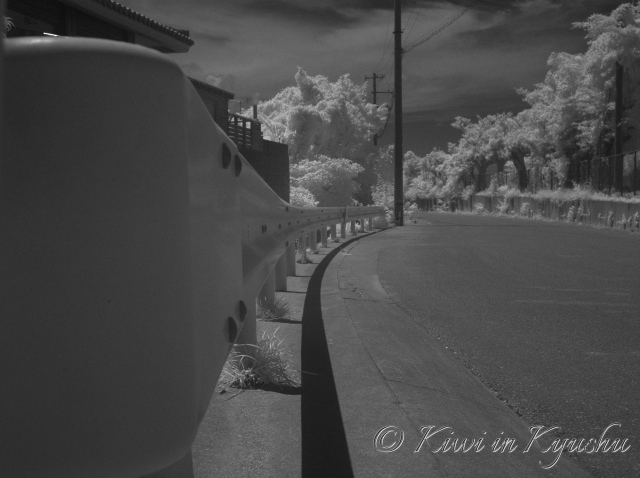
Here is an example photo (in jpg and raw) taken from camera with no post processing.
Post Processing
As you can see, the above photos don’t look all that great, so this is where a little post processing comes in. Below are a couple of examples of what you can do with different software. Basically the shot you take is yours, so your taste and style will be different.
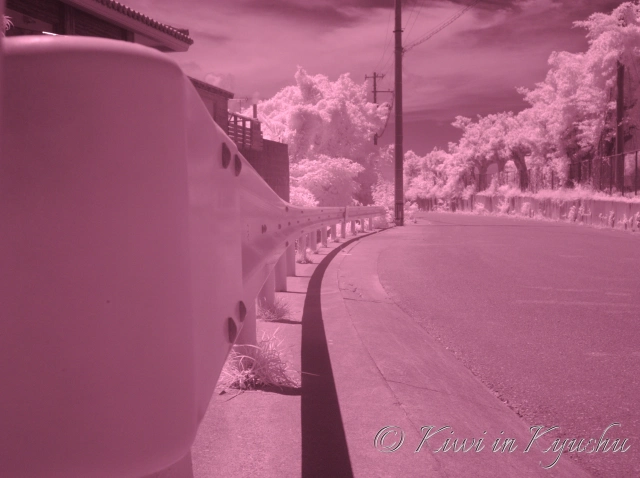
1. Image below is the original jpg desaturated in the “Photos” app on the iPad
2. Image below is the original jpg auto adjusted with the Noir filter applied in the “Photos” app on the iPad

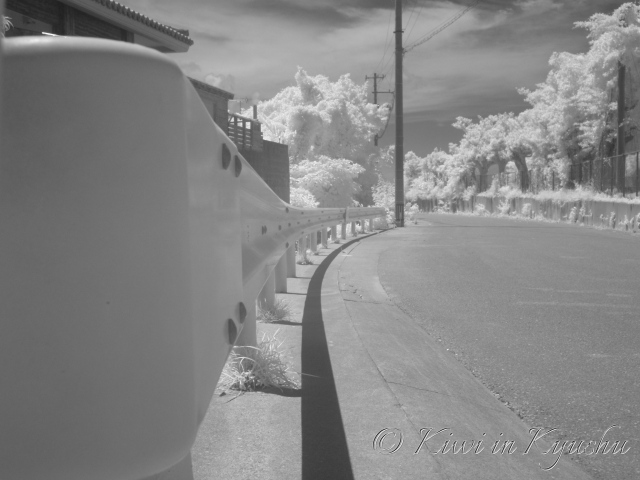
3. Image below is the raw file processed on the Mac using Iridient Developer and exported in jpg format

4. Image below is the raw file processed on the Mac using Iridient Developer and exported in tiff format and then processed with Silver Effex Pro 2 from the Nik Collection
Infrared Magnet Hack
How to set up and use your camera
Now for the technical stuff. Basically just to let you know how to do the magnet hack and what to expect with your camera.
1. Turning the camera on
For the this hack you can use all of the camera’s shooting modes available to you (PASM). Bypassing the limited Night Shot mode.
After turning your camera on and selecting your most used shooting mode (I use A on the camera dial aka Aperture Mode), you’ll see something like this in your cameras LCD (or similar if you use the EVF).
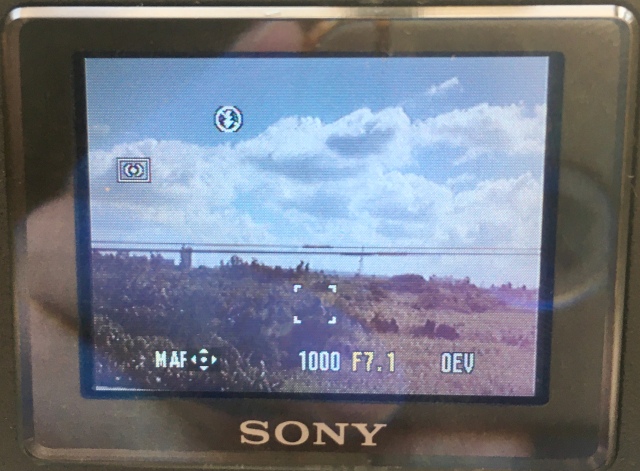
Excuse the poor quality of the above image, I used my iPhone 6s to take the photo. Also not the best composition/framing. But a quick and dirty setup to help you get started.
2. Attaching the magnet
With the camera on, we now attach the infrared filter. In my case I’m using a 67mm 850nm filter (from Kolari) with a 58mm to 67mm step up ring as I don’t have a native 58mm filter.
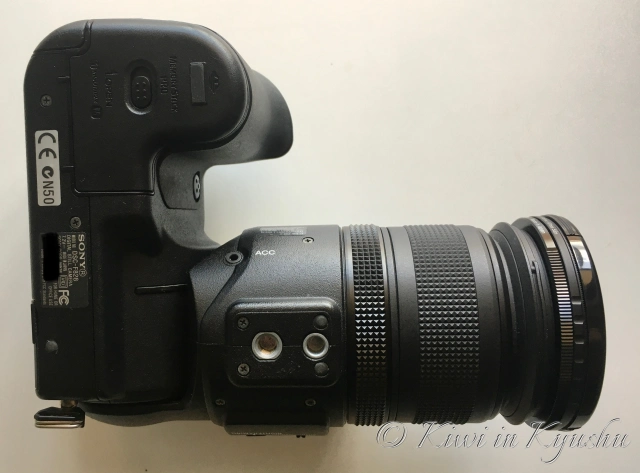
Once the filter is attached, flip the camera over so you can see the bottom and using your strong rare earth magnet place it on the area below I’ve marked with a yellow “x”.

You’ll hear a faint click of the hot mirror moving and the view in the LCD will change.

As you can see in the above image we are on the other side of the looking glass. What you see will change depending on the day and filter used. As this is a strong filter, no visible light is getting though so it is best to use a black and white setting (unfortunately this camera doesn’t have a B&W mode so we are stuck with colour for now but we can post process later).
To help us get close to what we require (which is to make any green grass to appear as white as possible – generally I do this for the 720nm filter) we need to change the camera’s white balance. To do this just point your camera at some green grass or leaves of a tree that is in direct sunlight and follow the camera’s white balance setting how to.
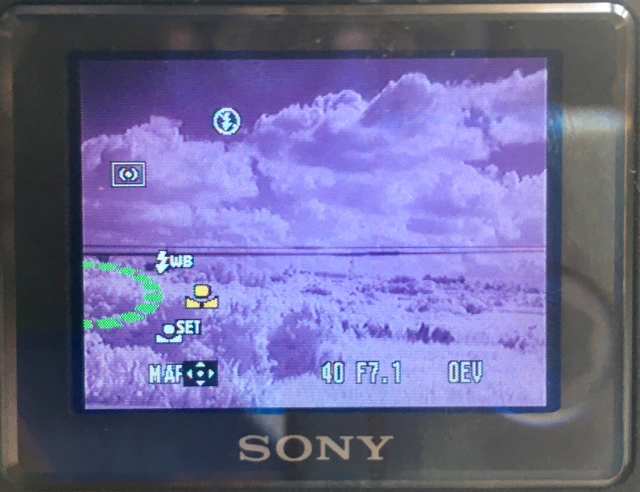
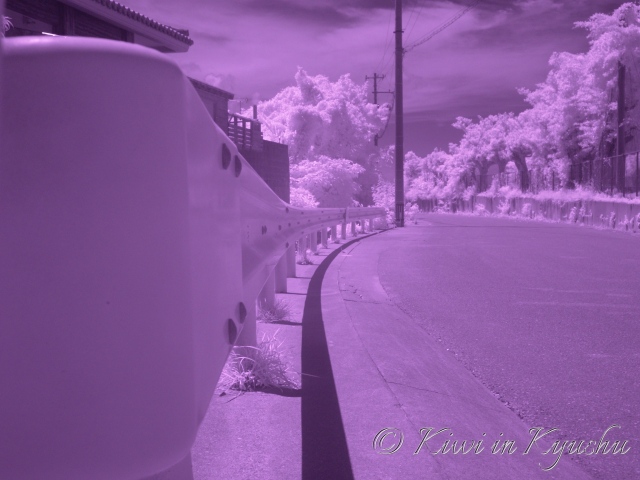
After setting the white balance you’ll notice that the image isn’t black and white, but more of a purplish. This is normal for the 850nm filter. I saw a YouTube video of a guy using this hack on a Sony F707 and he was able to get black and white after doing a custom white balance but I’ve never come close.
Note:
You can reverse the magnet to move the hot mirror back into place. However I find switching the camera off and on again does this more quickly.
In camera colours aka picture effects
So why not choose black and white in camera? Well believe it or not, there is no option for this. You only have the choice of “Solarize, Sepia, or Neg. Art, or Off”.
Below are the in camera jpegs of the above picture effects.


As mentioned earlier in the post you can edit the jpegs or raw files to get your style of black and white for the 850nm filter. For other filters your post processing will be different.
Go out and shoot!
So now you can take out your Sony camera and shoot some infrared photos! In future I’ll be creating another post with photos taken with the camera.
Thanks for looking!
2022-03-08 update:
I’ve corrected a few errors and added links to videos hosted on Vimeo for easier viewing (I’ve left links to the original files hosted in Dropbox).
2023-04-07 update:
I’ve corrected a couple more errors. Also I am now selling prints again! This time through Darkroom as opposed to Shutterstock. Take a look and if you see something you like please don’t hesitate to buy as it would help me out tremendously.
Purchase Prints here: https://kiwiinkyushu.darkroom.com/


is it hard to transfer video files to a laptop with this camera? Can you just use a USB cable to transfer over video from the camera to a laptop?
LikeLike
Hi Jes,
Yes, you can use a USB cable from camera to laptop for file transfer. Just make sure the camera is set to MTP (think it is this one) in the USB settings. And the laptop will detect the storage device in the camera.
LikeLike
cool thank you!
LikeLike
Hi Eltrain,
Glad you are enjoying the camera. It certainly brings back nostalgic memories for me.
As for the firmware, the update isn’t on Sony’s website anymore unfortunately. You could try emailing their support and asking if they can email you it directly. Otherwise I would post a link to the file I had (I must have deleted it after I updated my camera as I can’t find it now). Last option would be to google the file. Some unofficial sites might still have it up somewhere (this is what I resorted to when I got it).
Good luck.
LikeLike
I just picked up one of these too for IR/magnet fun. Where did you find the firmware update? I notice the custom white balance is far less broad than the DSC-V1 which I have been using for IR for years.
LikeLike