
So today I decided to take my old Sony DSC-V1 camera out for a walk using the magnet hack I read about. Basically this hack removes the IR blocking mirror without disabling any of the camera functions.
The place I chose to take photos was at my local hiking trail. Unfortunately it doesn’t have all the things that make a good infrared photo:
1. Blue sky with clouds.
2. Water, such as a river, beach, lake, pond, etc.
3. Greenery, such as grass, leaves, etc.
4. Sun behind you.
I had to make do with a blue sky with no clear cloud and sky separation and a lot of greenery. The sun was overhead and not in front of me so that was good. I was more focused on documenting the use of the camera than the image I would be taking.
Here is a little ‘step by step’ how to for using the camera with the magnet hack with a couple of infrared filters. Enjoy.

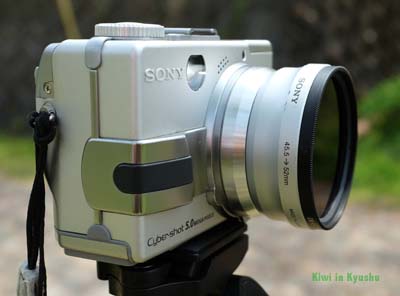
First we need to use an adapter from one of the official Sony tele conversion lenses. It doesn’t matter which adapter we use as they both have their pros and cons.
Sony VCL-DEH17V Tele conversion lens (x1.7)
Filter size: 45.5mm – 58mm
Pro: You can use the camera zoom.
Con: Filters are more expensive for 58mm filter ring size.
Sony VCLDEH07V Wide Angle Conversion Lens
Filter size: 45.5 – 52mm
Pro: Filters are cheaper for the 52mm filter ring compared to the 58mm filter ring size.
Con: Camera zooming is disabled.
We only need to use the adapters as they have the filter thread needed for attaching the infrared filters. The conversion lenses do not have filters at the end so we can’t attached filters to those unfortunately. We could attach filters by using tape to hold them in place, but this would be troublesome and we would need even bigger filters. And i’m not sure if the lenses would give IR hot spots or not. But feel free to try and let me know the results.


Here are pictures of how the adapters look on the sony DSC-V1. As you can see, in the picture on the right, the 45.5 – 58mm makes the camera stick out a lot more. I prefer to use the 45.5 – 52mm as it takes up less space and is easier to carry around.
Magnet hack.


Left picture: I have attached the magnet to a piece of string, normally used for lens caps, to hold the magnet so I don’t lose it. I am using two magnets, one on top of the other, wrapped in electrical tape for easier handling.
Right picture: We can see where to place the magnet. To do the hack, we have to turn the camera on, then place the magnet in the position as shown in the picture. Once it is in this position you will hear a small sound of the camera moving the hot mirror. Once this is done we can leave the magnet in place or remove it. When the camera turns off, the hot mirror moves back into place and we have to repeat this hack when we turn the camera back on.
I used super strong N52 Rare Earth Neodymium Cylinder Magnets with a size of 5/16″ 8mm x 8mm. You can buy these on eBay.
Using the camera.

Before the magnet hack was discovered I had to switch the camera to nightspot mode, and turn the dial to program mode. Then I had to stack a lot of ND filters to compensate for the set shutter speed of 1/30.
Now, with this magnet hack, we can use all of the shooting settings on the dial (M-manual, A-aperture, S-shutter, P-program, Auto, Video, Scene)
Today I shot only using the camera’s manual mode. Feel free to experiment with the other shooting modes.
Camera settings.


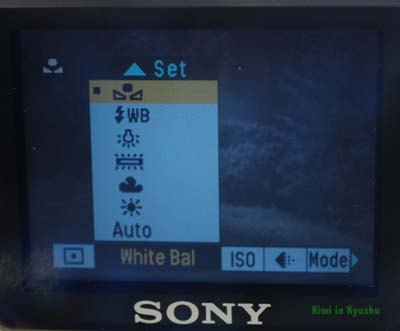
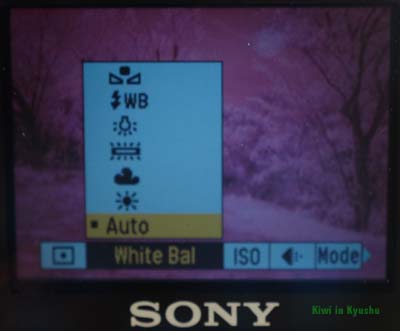
Here we will take a photo without the IR filters for a comparison. So first let’s set the camera’s white balance to ‘Auto’. and then set the camera’s ISO to 100. A lower ISO generally provides a nice sharper image. Increasing the ISO introduces grain and noise to the image.

Here is an out of camera jpeg image with the above menu settings without any post processing. I wanted to show what a normal image looks like before shooting with the infrared filters.
Shooting in infrared.
Now we put our filters on. Today i’m using three filters, a cheap IR 950, a cheap IR 850, and a Hoya r72 (IR 720 equivalent).
IR 950 filter.
I’m going to start with the IR 950 filter, and then work my way through the IR 850 and Hoya r72 filter.


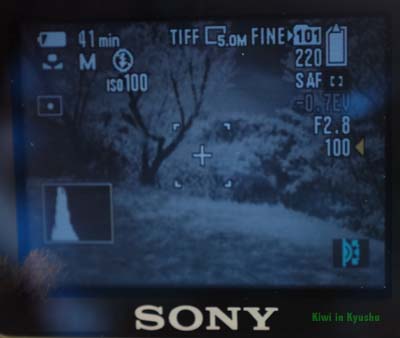
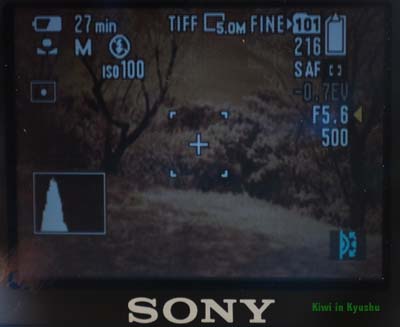
Here are photos of the menu settings with the IR 950 filter attached. White balance is set to auto, ISO is set to to 100 and shutter speed is set to 200. You can adjust the shutter speed to give more light if the image of the LCD is too dark. As you can see in the image the EV is greyed out. It adjusts automatically in manual mode.

As you can see in this photo, the auto white balance gives us a purple looking cast to the image. From here we can import into photoshop and make changes. For IR 950 I would just convert to black and white as there won’t be any visible light to play with. IR 720 or lover are much better filters for false colour infrared shooting and post processing in photoshop.
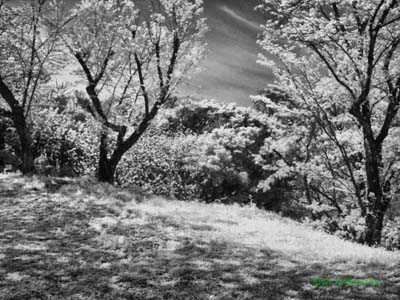
Here we can change the white balance in camera to give us a nice black and white infrared image, which can save a lot of post processing time later.
To do this, point the camera at something green like grass or green leaves and press up key on the directional pad. You will see the image now looks black and white. The grass and leaves, in direct sunlight, will now look white.

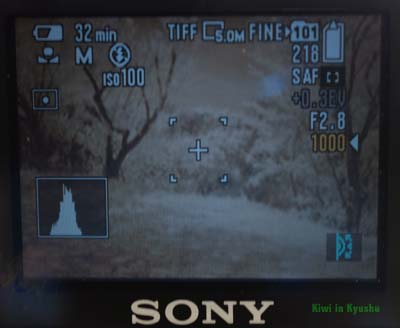
Here is a jpeg image taken with the Sony camera with the above settings without any post processing. As you can see the image is looking a little dark. So let’s change the shutter speed.
The image on the LCD screen is a little brighter now. So let’s take a photo with these new settings.

Here is a jpeg image taken with the Sony camera with the above settings without any post processing. As you can see the image is looking a little better now. So let’s move on to the IR 850 filter.
IR 850 filter.

As the IR 850 lets in more light than the IR 950, we have to adjust the shutter speed to a higher number (faster) otherwise the image will be all washed out (too bright).
The cheap IR 850 is similar to the IR 950, in that both block out all visible light and only let in light from the infrared spectrum. I would recommend using a better quality IR 850 equivalent filter (either Hoya or B+W or some other quality brand). An IR 850 equivalent will be cheaper than the IR 950 equivalent and if you use a smaller filter size, it will be cheaper still. I’m planning to buy an 850 equivalent filter in the future and will compare it with the cheaper 850 filter to see if there is any difference in picture quality.

Here is a jpeg image taken with the Sony camera with the above settings without any post processing. As you can see the image there is little difference between the IR 950 and the IR 850 except for the fact I knocked the camera position when I changed filters.
One good thing about the IR 850 is that you can use a faster shutter speed, so you should be able to use the camera without a tripod (although I haven’t tested this yet) as we are still using the fast 2.8 aperture. The higher the aperture number the more susceptible the camera is to camera shake thus resulting in blurry photos.
Now let’s move onto the Hoya r72 filter.
Hoya r72 filter (IR 720 equivalent)
A noticeable difference compared to the IR 850 filter. We have a lot more light coming in to the camera. So we have to change the aperture to let in less light as we can’t increase the shutter speed past 1000.

Here is a jpeg image taken with the Sony camera with the above settings without any post processing. Here we can see visible light mixed in with the infrared light. Looking closer at the photo we can see it looks a little blurry. So let’s fix that.
The image is looking a little better in the LCD now. We have an aperture of f5.6 and a shutter speed of 500.

Here is a jpeg image taken with the Sony camera with the above settings without any post processing. Looking closely at the image we can see it is a lot sharper compared to the previous photos. I was so used to shooting at f2.8 pre magnet hack I forgot I could change aperture! Why is this good news? Well for landscapes we get a better, sharper image at the right aperture. I might have to go back and take some more photos with the cheap IR filters with a higher aperture and see if I can get a better image. I also forgot to reset the custom white balance. But that’s ok, I remembered to take a photo with automatic white balance.
I set the camera’s white balance back to auto so I can use the camera’s .tif file to do some post processing in photoshop later. Using a .tif is better than .jpg as it isn’t as compressed and gives better post processing leeway.

Here is a jpeg image taken with the Sony camera with the above settings without any post processing. Before the magnet hack we were limited to a green cast so could only convert the image to black and white. Maybe we can get a bit creative with some near infrared false colour in this image later with some post processing in photoshop.
If you have a DSC-V3, at least you would be able to shoot in raw and jpg. raw is much better for post processing.
That’s enough photos for today. Time to go back home and edit some photos.
Some post processed photos.
I am using a Mac computer with Affinity Photo and Silver Efex Pro 2 to do my post processing. You can use Photoshop or Photoshop elements with a third party channel mixer plugin.

A straight colour channel swap in Affinity Photo on Mac. I swapped the Red channel with the blue channel. Here are the settings I used.
Red Channel:
Red 0%
Green 0%
Blue +100%
Green Channel:
no changes
Blue channel:
Red +100%
Green 0%
Blue 0%

In this photo I roughly played with all the numbers in all the red green and blue channels.
Red Channel:
Red +70%
Green -74%
Blue 0%
Green channel:
Red 0%
Green +100%
Blue 0%
Blue channel:
Red +70%
Green -74%
Blue 0%

Here I just set the saturation to zero in Affinity photo (gives the best black and white I think).
Here I am using my favourite Silver Efex filter – #024 Full contrast and structure. As the Nik Collection is now free, I recommend you download and use it for your photos.
That’s it! Hope this helps.
Here is a link to the photos taken with the sony camera via google photos.
https://goo.gl/photos/ATrwVD92czjYoLuP6
2023-04-07 update:
I am now selling prints again! This time through Darkroom as opposed to Shutterstock. Take a look and if you see something you like please don’t hesitate to buy as it would help me out tremendously.
Purchase Prints here: https://kiwiinkyushu.darkroom.com/

If anyone is still watching this i need a tiny bit of advice. None of the ir pics i take focus very well with the auto focus using magnet to switch to ir. (using a V1 with various filters from 720 to 950nm and have tried all f-steps and various ISO settings)
I have to mess around taking several pics of varying focus steps from infinity backwards to get a good photo out of the lot. But with nightshot mode on in the daytime with all filters the pictures are auto-focused perfect. Im using a tripod.
Have you missed out anything that affects the AF? Or have i just got a wonky V1? lol
Great blogpost 🙂 Been great for finding settings for my other cameras and thank you for spreading the magnet hack 🙂
LikeLike
Hi, it’s been a while since I used the camera with the hack so I can’t remember what settings I did. I was mostly using the night shot mode with IR filters and step down filters on a tripod to take photos before I came across the magnet hack for myself.
I don’t have my V1 with me anymore so I can’t run anymore tests to help you out sorry.
With the auto focus issue, I can only recommend using manual mode with the F stop at the highest number (to get more depth of field or more picture in focus). This will only be of use in the daytime on a tripod. It should make it a little easier getting photos in focus.
Generally for hand held photos you will want a smaller F stop (f2 or something) and a lower IR filter (720nm or lower).
Anyways thanks for posting and sorry I couldn’t be anymore help.
LikeLiked by 1 person
Thank you for the response 🙂 It gives me something else to try 🙂
LikeLike
Does the magnet hack work for the DSC-V3? Where you place the magnet on that camera?
I also think you could use the short adapter and still have zooming capabilities if you cut a bit of his rear threads on a lathe. At least on the V3 a switch exist in the tread where the adapters are screwed in, the long adapter goes far less deeper and it doesn’t activate the switch.
LikeLike
I’m assuming the magnet hack would work on the V3 as it’s the same lens as the V1. Just a different body with more features and megapixels. The only way to know for sure would be getting hold of the camera and a strong enough magnet to test.
Regarding the short adapter, I ended up taking the camera apart (using a service manual I found on the internet). Then removing the small piece of plastic that acts as a switch – when you fully screw the smaller adapter in. With no plastic, you can screw the filter in fine with no problems.
It all depends which you’re more comfortable with. For me it was easier opening up the camera.
LikeLike
Yes, I can confirm that the magnet hack is working with DSC V3 too. Unfortunately, after this, with both V1 and V3, focus (AF or manual) is only available for close distances. I guess that for NightShot the camera adjusts something inside the lens to compensate for the removal of the IR filter form the optical path. So, after you remove the filter using the magnet, the lens behaves as it has some back extension – it becomes better for macro (closer and higher magnification) and cannot focus to infinity anymore of even at 2 meters away. I don’t know if it’s the same for F717 and F828.
LikeLiked by 1 person
Thanks iso rivolta, that is very useful information. It is a shame that doesn’t work as we would like. Still as you say, it has usefulness for close up shots. Maybe of bugs and flowers. I didn’t get to test a UV filter with the lens, so that would be something I would like to try one day.
I know someone who has the Sony F828, so if I can get my hands on it and a UV filter I can try it out and write up another blog post on it one day.
LikeLike
i was having a similar problem with manual photos on the V1. If you unscrew the lens adaptor(on V1) a little to re-activate the zoom and zoom in 2 steps the auto focus will work perfect 🙂
I believe this will work on the V3 f828 and f717 as well as long as the zoom is or can be active during manual IR 🙂
Full wide isnt a good position for IR to focus to infinity.
Here’s a few V1 shots i took:
https://photos.app.goo.gl/w4kSdbT1K9va5Np18
LikeLiked by 1 person
Thanks Mr McDuckit,
I don’t have the V1 anymore (I wore it down after opening it up too much and making adjustments for testing out hot mirror removal as well as removing the small tab that turns off the zoom when attaching the wide angle adapter).
As this IR magnet hack for the V1 is so popular, I’ll be getting hold of a Sony F828 to try the magnet hack on that. I’ll be able to test out your theories on that camera.
I took a look at your photos and they are pretty cool.
LikeLiked by 1 person